|
-
Rear bumper of DC2/DC4/DC2R sagging? Try this!
Disclaimer: The following is provided as a GUIDE ONLY, and neither myself nor Ozhonda take any responsibility for the outcomes of someone else doing the following. You follow these steps at your own risk!
Aim: The rear bumper of the DC2 sags with age as the metal support beam beneath it bends. Here's how to get at it and straighten it. A few people on the boards have asked how this is done, so here's how.
Required: philips screwdriver (stubby one if your car has splashguards), 12mm socket wrench, 10mm socket wrench, socket extension bar
Steps:
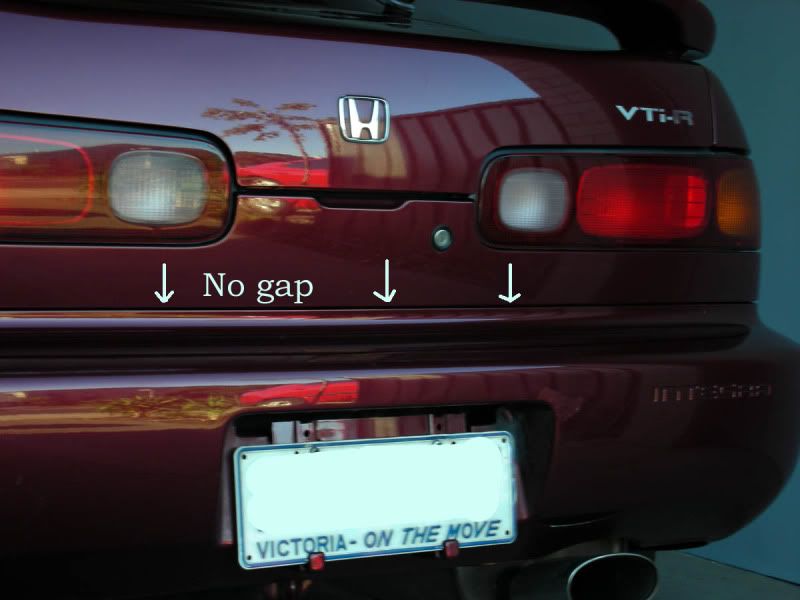
Is your car's rear end starting to look like this? See how the bumper looks like it's dropping off?
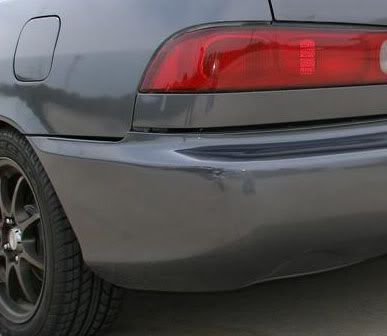
The support beam that holds it up from within isn't Honda's best effort, and with age it causes the bumper to simply sag and look like crap. You can attempt to fix it by getting under the car and pushing up at the supports, or simply loosening the bolts that attach the support beam and retighten them, but they won't be perfect. Mother always said do it once, and do it right, so you'll have to take the whole bumper off.
You'll need to take off the interior panels in the luggage compartment. The rearmost piece covering the taillights is held in by 7 snap pins/scrivets/plastic rivets/ whatever you want to call them around the edges. If they're still the OEM pins they'll have a small, flush fitting button in the centre of the pin. Push that button down with a pen or screwdriver if your fingers are not slender enough. The button will snap down below the surface about 2mm, and you can safely ease the pin out. To reinstall these, push the centre button up until it protrudes above the surface of the rivet top, press the pine back into the hole and push the button until it clicks flush with the surface. Excellent idea I must say, but they can be a b!tch if you don't know how to get them out in the first place.
Remove the child seat anchor with a 12mm socket before you take the interior plastic panel off. DC2R owners will need to take the strut rod fixed at the back off too.
The side interior panels need to be pried up halfway too. You can get the rear bumper off without doing this, but if you have big hands it will be a major bleeding pain. Ok, this picture shows how:
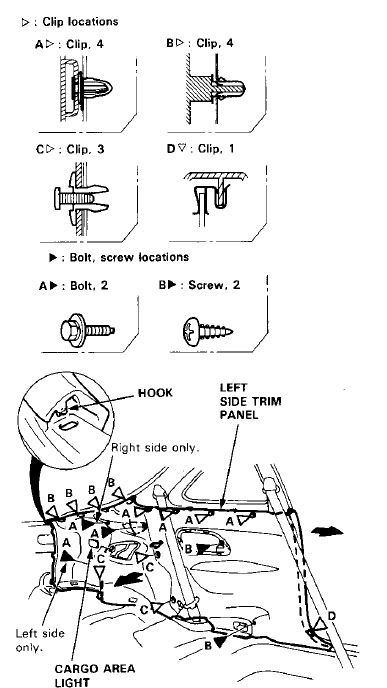
Just unclip and unscrew everything from between the rear seatback and the tail of the car. Easier to do with the seats folded down. Remember to unplug to luggage compartment light and not yank the wire off.The 10mm bolts holding the panel down will need to be removed with an extension socket as some are very deep in.
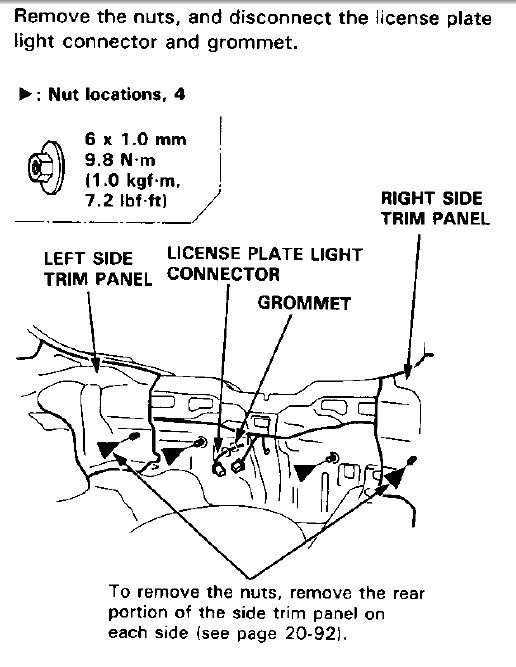
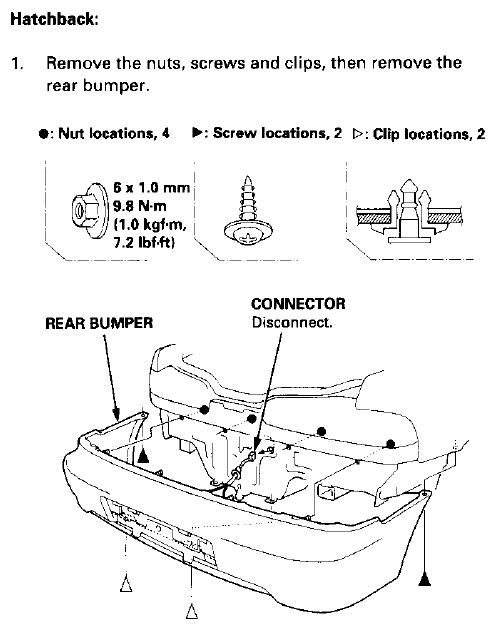
Unclip the rear half of the side interior panels. The plastic is quite flexible so you can get to the bolts holding the rear bumper. These two images show you how the rear bumper is attached:
If you have splash guards fitted to the rear wheels, you'll have to unscrew them with a stubby screwdriver.
All right, you've come this far. The culprit is here, the Bumper Upper Beam. Remove it from the rear bumper by undoing the row of plastic rivets.
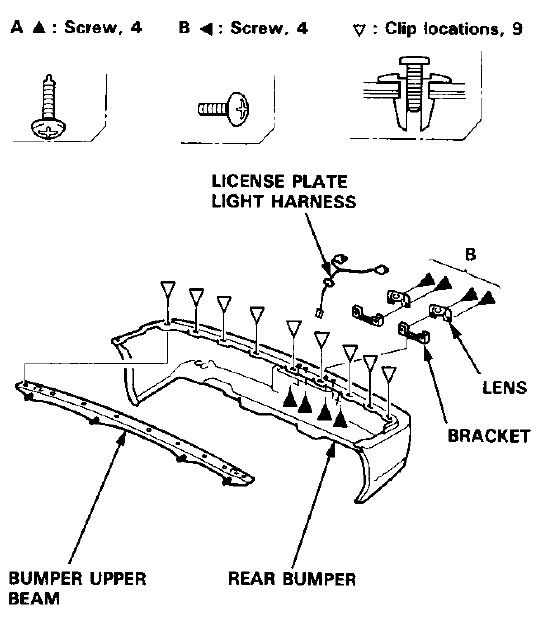
Note that the 4 threaded posts on the Upper beam that mount to the car have rubber washers on them. Do not loose them. Or else water can get in the car.
The Bumper beam will need to be bent upwards into a gentle U shape. Put one end on the floor, grab the other end with one hand and force the middle section down with your other hand.
Arch it in the direction of the arrows:
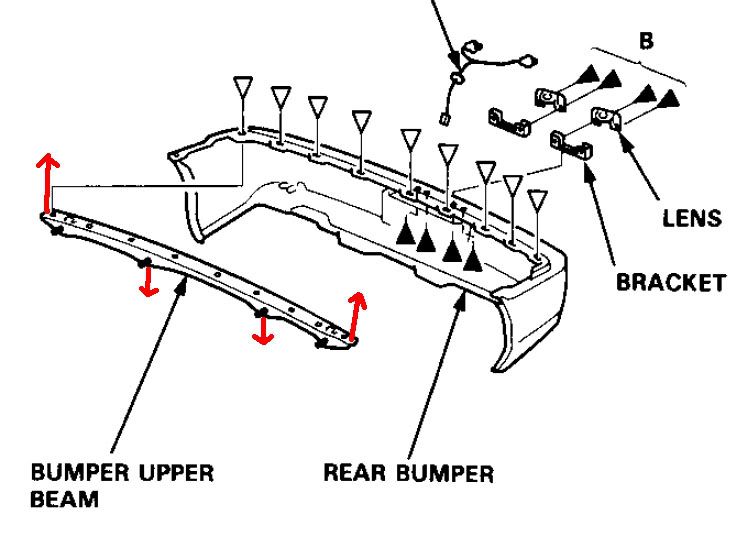
Refit the bumper beam onto the car WITHOUT the bumper, checking for fitting and alignment. get the corners of the beam up as high as possible under the taillights. The four mounting holes on the car body are quite large so adjustments can easily be made. This step will take awhile, and patience is needed.
Once you are satisfied, clip the support beam back on to the bumper, and refit and align the whole bumper back in. Hold the bumper up as you tighten the four bolts inside the body. Be careful with these bolts, not too loose, but not herculean tight either. Just snug and ensure that the washers fixed to the bolts clamp into the body. These bolts and the threaded posts CAN strip if you apply too much force, and you don't want that.
Check for left/right alignment as well as up/down alignment. If you did it right, you should see no daylight between the garnish plate below the taillights and the top of the bumper. If you still see daylight or a gap, it's not high enough. Either try to push it up higher, or take it off and bend the support beam more. Remember, do it right, do it once. You don't want to have to pull everything apart again. I got the bumper of my car up tight against the tail garnish, so it can be done.
There might still be a slight gap at the sides of the bumper, above the rear wheel. There is very little that can be done there because the side is only held up by once screw at each end and the portion with no screws can have a gap. But, I repeat again, the whole length of the rear face can be pushed up tight!
Final result:
Once satisfied, refit everything you tore out to get at the bumper beam and you're done.
Expect 2 hours for this job, but better make it 3 if you're unsure. alot of time is actually spent test fitting the beam for fit and alignment.
Last edited by dinorider; 28-12-2009 at 07:28 PM.
-
Cause DC2's have issues not the gap in between the rear valance and the rear bar, but mainly saggage on the side.
You should have some photos of the side.
I know not much can be done about the sides, but it would be good to see how yours are after the final results..
Anyways nice write up, you finally did it after all of us bugging ya huh? haha.
Last edited by xntrik; 30-12-2009 at 12:27 AM.
-
excellent write up man 
-
Here's how I fix it! - DIY.
-
 Originally Posted by beeza

Yes I saw this too. But the trouble with the DC Integras is that it's hard to wedge any wood underneath to push it up because the bumper curves under just that tad too much and blocks direct line of sight from below.
The best you can do is to get the rear inner beam up as high as you can along the whole length, and bolt it up high.
Last edited by dinorider; 30-12-2009 at 07:58 PM.
-
Gotcha!
Thanks dinorider,Great work!
RePPed!
 Posting Permissions
- You may not post new threads
- You may not post replies
- You may not post attachments
- You may not edit your posts
-
Forum Rules
|


 Reply With Quote
Bookmarks