Disclaimer: The following are provided as a GUIDE ONLY, and neither myself. nor the original writer, nor Ozhonda
take any responsibility for the outcomes of someone else doing the following. You follow these steps at your own risk!
DIY Ignition Control Module (ICM) Replacement
By specialst
Firstly. this guide is written specifically for the DC2/4 Honda Integra with a B series engine. May also apply to others as well.
This guide will purely focus on how to replace the ICM
If this guide has help you, please acknowldge it by leaving a comment and rep point.
Ignition Control Module 101-
The ICM is a component inside the distributor.
Has your ICM failed?
Before concluding that your ICM has failed, it is best that you follow the Honda Service manual for diagnostic tests:
Refer to section “23-95” of the 1994 Honda Integra service manual for instructions to test your Ignition Coil. Note: vehicles with failed ignition coil wont ever start up. A coil is either working or failed unlike the ICM.
Refer to section “23-96” of the 1994 Honda Integra service manual for instructions to test your ICM. Also have a read of EdgeAutos guide which has some nice photos as well. It can be found here: http://www.ozhonda.com/forum/showthread.php?t=56224
www.Team-Integra.net also has an awesome article on the “Distributor Anatomy”. It can be found here: http://www.team-integra.net/forum/di...g+Common+Topic
Do not automatically assume your ICM has failed. Other common causes of engine cuts include; the main relay and fuel pump. These will not be discussed here. The search tool is your friend!
These failing parts are becoming a victim of age as well as normal wear and tear. A failed ICM usually occurs when the engine is HOT. It often results in the following symptoms:
• Engine cut while driving. You will still be rolling with little or no power
• Engine fails to start after engine cut. But drives fine once engine is let to cool.
• Tachometer gone crazy and/or unresponsive and/or jumping
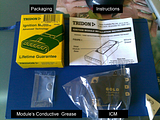
Next is a peek at my replacement ICM.
The Replacement ICM
I am sure that there are other brands out there but for this session I have:
Brand: Tridon
Part: Ignition Control Module
Part No: TIM032
Application: B18B2
Origin: Australia
Warranty: Lifetime (The OEM part is made by NEC and OKI which only lasted 15 years =P)
Next is a guide to replacing the ICM.
Replacing Your ICM
What You Will Need:
Replacement ICM
8mm, 10mm and 12mm spanner
Impact Screw Driver with Bits
Hammer
Phillips Head Screw Driver
Solvent & Rags
Thread Locker
Probably other stuff I have missed
Getting to the ICM:
1) Disconnect the battery at the negative terminal.
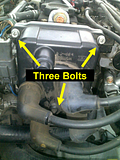
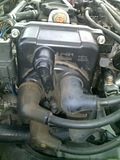
2) Remove Distributor Cap by undoing the three 8mm hex bolts. Do not use a screw driver despite the look! You will end up rounding them off!
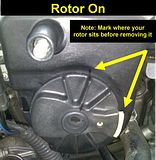
3) Remove the rotor. Use an Impact Screw Driver to remove the screw holding it on. You will need an Impact driver because its on damn tight!!
NB. If you cannot see the rotor screw behind the dizzy - its because the motor + pistons arnt in the "correct position"
I dunno if its TDC or what but to get around this:
Replace and screw on the rotor cap and briefly crank the engine by turning the ignition key. This will change the rotors position (BYM's way lol). Repeat until you can see the rotor screw (rotor will be in the identical position as the photo).
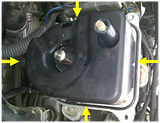
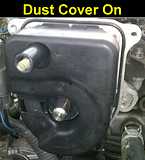
4) Squeeze off the dust cover by its sides.
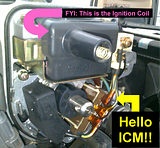
5) Hello ICM!!!!
Removing the ICM
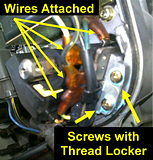
6) It is imperative to note the position of the wires and terminal connections!!! Take many photos if needed. Take the wires off.
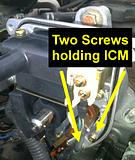
7) Remove the two screws that hold the ICM and slide the ICM out.
Preparing the OEM Heat Sink for Re-Use
8) Remove the screws attaching the heat sink attached to the OEM ICM. Put the OEM ICM aside.
9) Clean the heat sink thoroughly with an appropriate solvent and rag! I used Methylated Spirits. Ensure the surface is clean and free of all contaminants.
Preparing the new ICM
10) Clean the ICM thoroughly with an appropriate solvent and cloth! Again I used Methylated Spirits. Ensure the surface is clean and free of all contaminants.
11) Spread a liberal amount of Conductive Grease onto the heatsink. Covering the entire surface.
12) Re-attach the greased Heat Sink and ICM using the same screws. Clean any excess grease away.
Note: You MUST use conductive grease between the Heat Sink and ICM. The same way your PC’s CPU and Heatsink have that conductive paste.
Re-Assembling
13) Slide the ICM back into the distributor housing same way it came out.
14) Screw the ICM tightly bak into place. Use medium blue Thread Locker to ensure the screws stay nice and tight. You do not want the ICM coming loose whilst your revving it the motor to a heavenly 8200 rpm!!! Did I mention; USE THREAD LOCKER!
15) Attach the correct wires to their terminals (you took photos... right?)
16) Put the dust cover back on firmly into place.
17) Put the Rotor back on the same position it came off.
18) Affix Rotor Screw. Again USE THREAD LOCKER and do it up nice n tight. A dizzy rotor coming loose at 8200 rpm is sure to make you CRY! You ain’t in heaven anymore mate! Welcome back to reality.
19) Bolt the dizzy cap bak on. This one just needs normal tightness. Do Not Over Tighten!
Congratulations! You have changed your Ignition Control Module and also saved yourself from buying a new $700 dizzy from Honda.
PDF: http://www.megaupload.com/?d=OVTKKV03






 Reply With Quote
 because now my tacho works properly


Bookmarks