|
-
Comprehensive Ek Civic Led Cluster and Climate control Conversion
Disclaimer: The following is provided as a GUIDE ONLY, and neither myself nor Ozhonda take any responsibility for the outcomes of someone else doing the following. You follow these steps at your own risk!
Aim: To get rid of the dated amber dash lights and replace with leds
Required:
Screwdrivers
Soldering iron
Acetone
Rags
Cotton tips
Resistors 1/2 watt usually 470R-680R (depending on your led choice, Google Led resistor calculator if you dont know how to work it out)
T10, T5 and 3mm Leds
Wedge bulbs:
Ek cluster: 6 T5's and 1 T10(T10 holder can be modified to accept T5 so you can use all the same leds for even lighting)
Climate control: 2 T5's
Ashtray: 1 T5
Automatics have 1 T5 in the shifter surround thing
3mm leds:
Gear indicator in the auto cluster: 7
Climate control: 7
Demistor switch: 2
Hazard switch: 1
Step 1: Removing dash parts
You need to remove all the dash components that you will be working on the Cluster, Climate control, hazard button and rear demister switch.
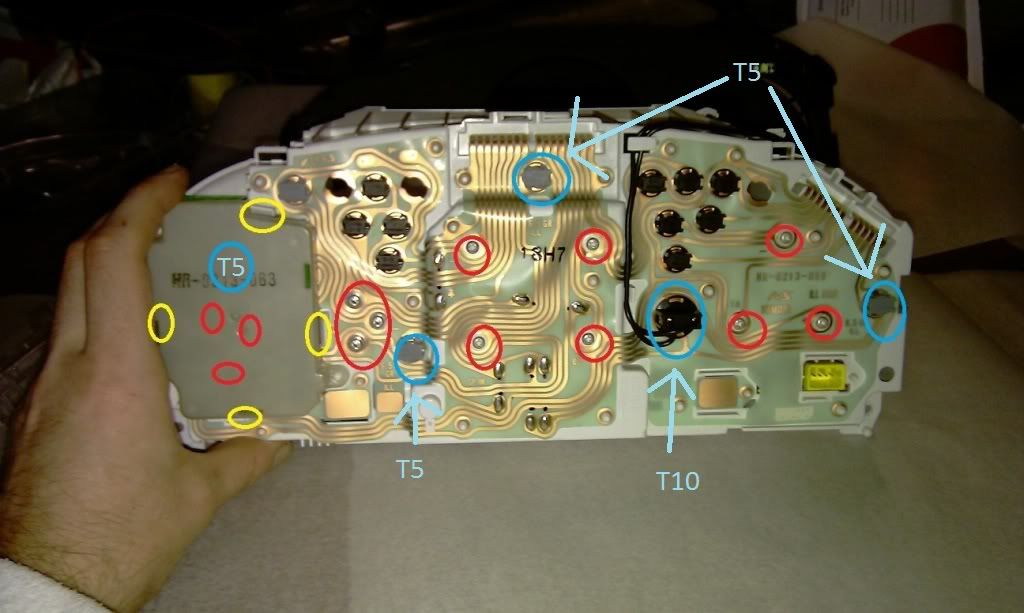
I have marked out the screw locations on the picture below with a red circle and the 2 panels to be removed with red arrows.
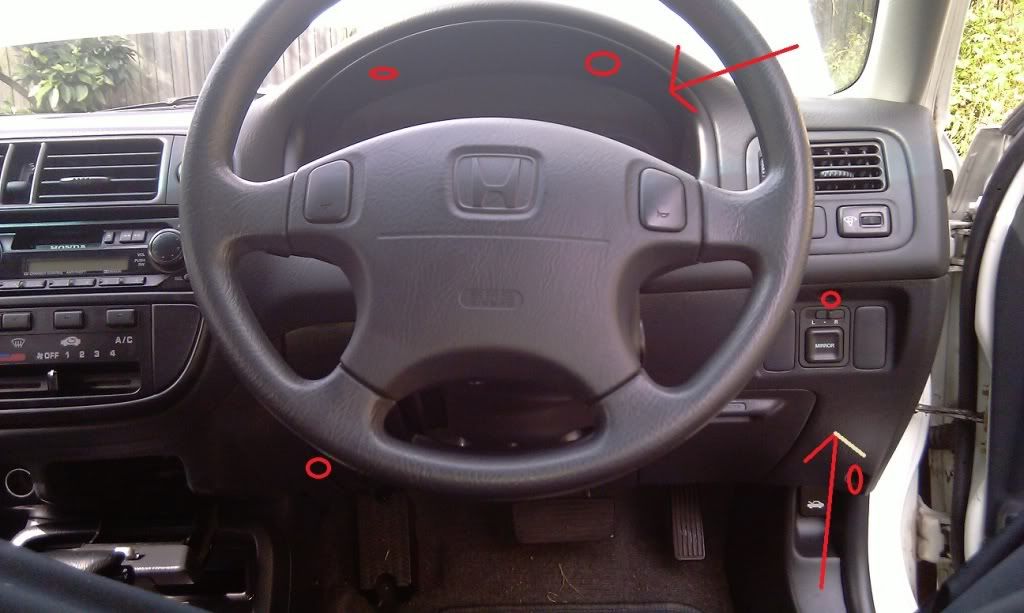
Once you have removed the screws from above, take the 2 panels off to reveal the next set of screws.
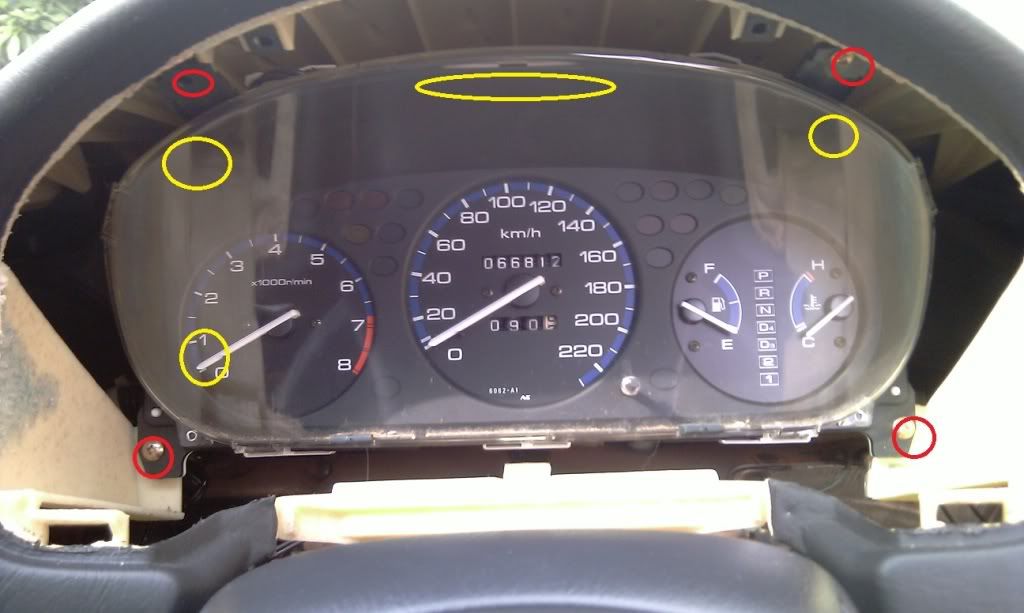
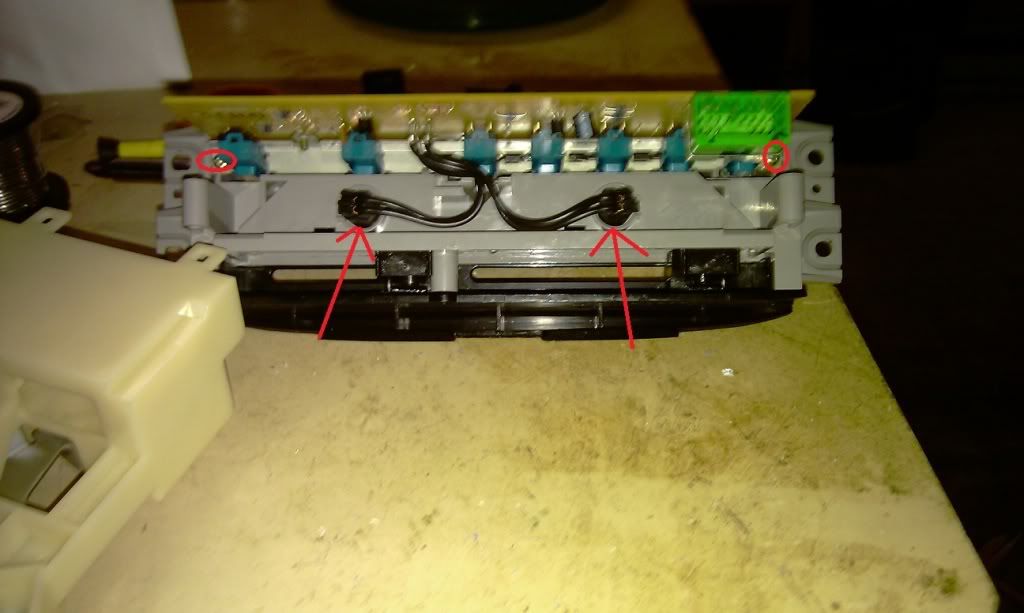
Now you can remove the 4 screws and 4 connectors(manual might be 3 connectors) from the cluster and it will come out. Pics below, Screws are marked red, Connectors are yellow.
Now you need to remove the glovebox and both the hazard and demister switches so you can get at the next set of screws marked below. Note The Hazard and Demister swtiches can be removed with a trim removal tool or a flat head screwdriver by levering the outer edge of the switch, I have marked out the position i levered mine out from with yellow arrows. Becareful not to scratch or dent the plastic when using a flathead screwdriver. Heres a video as some people seem to be having trouble getting the hazard/demister switches out. http://youtu.be/CWAPDa3KQ7A
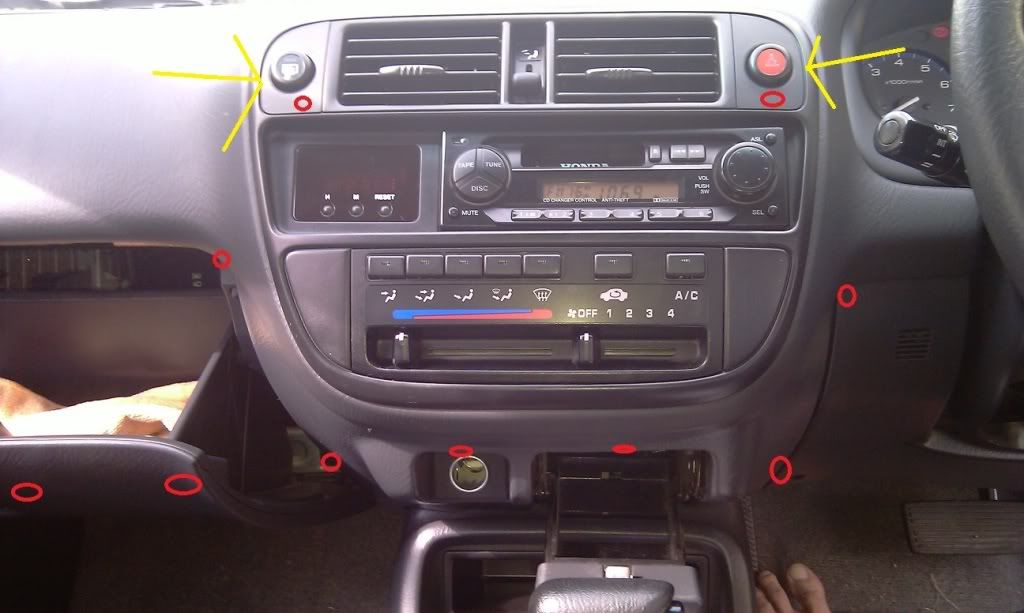
After removing all the screws you can remove the lower panel, when you pull the panel down there is a connector attached so unclip it then remove the panel. Note: you can now change the ashtray light(T5).
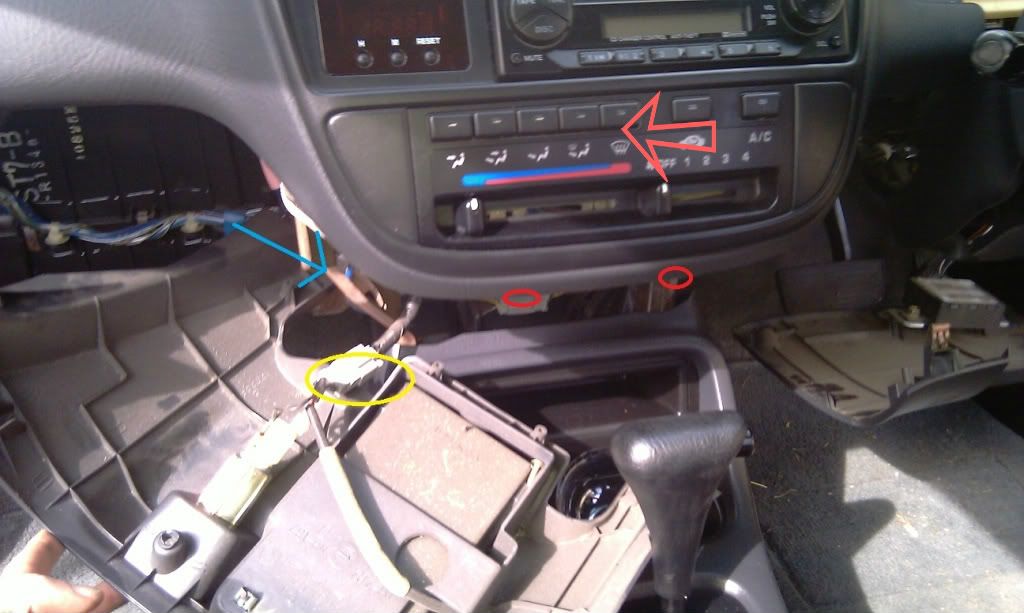
Once that panel is gone you will reveal yet more screws and a blue cable(marked with a blue arrow). Note: The Red Arrow is pointing to a screw inside the dash thats at the back of the AC unit, If you lay in the foot well and look up into the dash you should see a gold/brass screw going into white plastic, its right near the factory headunit screws. it can be seen in the headunit video at 0:09.http://youtu.be/obUaMUpAMEk
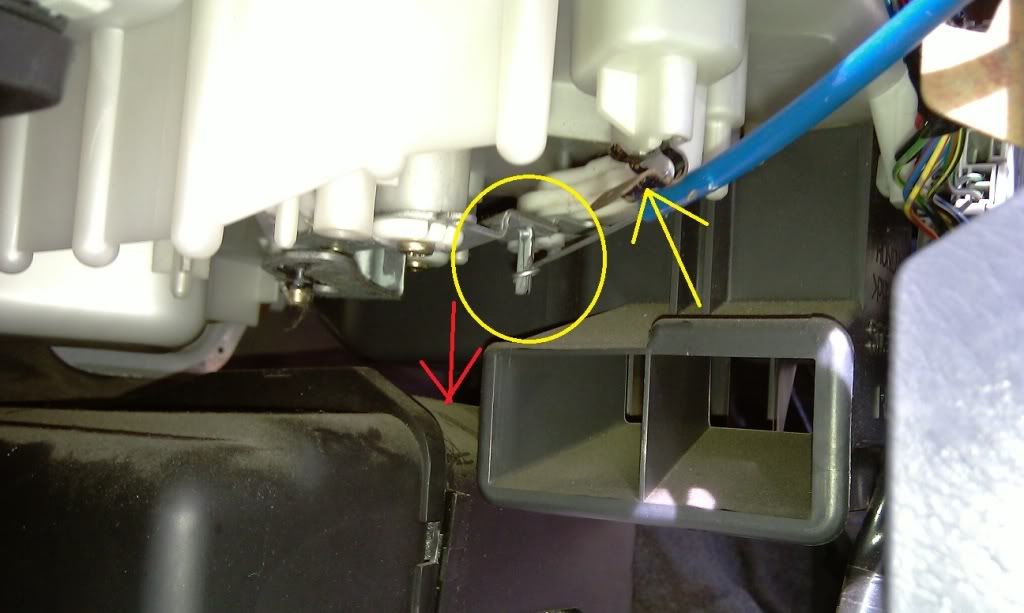
Unclip the blue section from the holder and Pull the silver wire down. Note the red arrow is the direction you pull the cable down once you have unclipped the holder which has the yellow arrow pointing to it. Video http://youtu.be/qBmFsmv9y6g
Now you can remove the head unit. The standard factory unit has 2 screws on the bottem of the headunit behind the ac unit(lye on the floor and look up into the dash behind the Ac unit) then it has an 2 connectors to unclip and its out,Video http://youtu.be/obUaMUpAMEk.
If its an aftermarket unit you should know how to remove it.
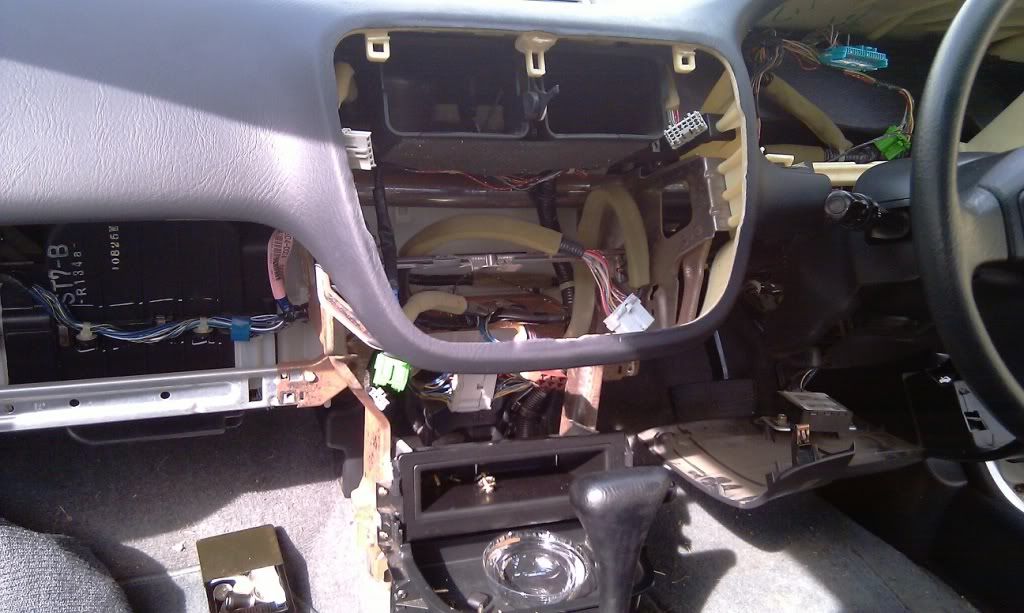
Once the headunit is out there will be a conector for the clock and 2 for the Climate control then you will be able to remove The whole centre section with the Climate control attached. Once its out there is 2 screws in the back of the centre section that you need to undo to get the Climate control off the centre section.
If you followed the steps properly, your dash will now look destroyed, now for part 2.
Step 2 Climate control
Get your Climate control and with a flat head screwdriver remove the buttons from the unit, There is a small hole on the underside of the button that fits a flathead perfectly.
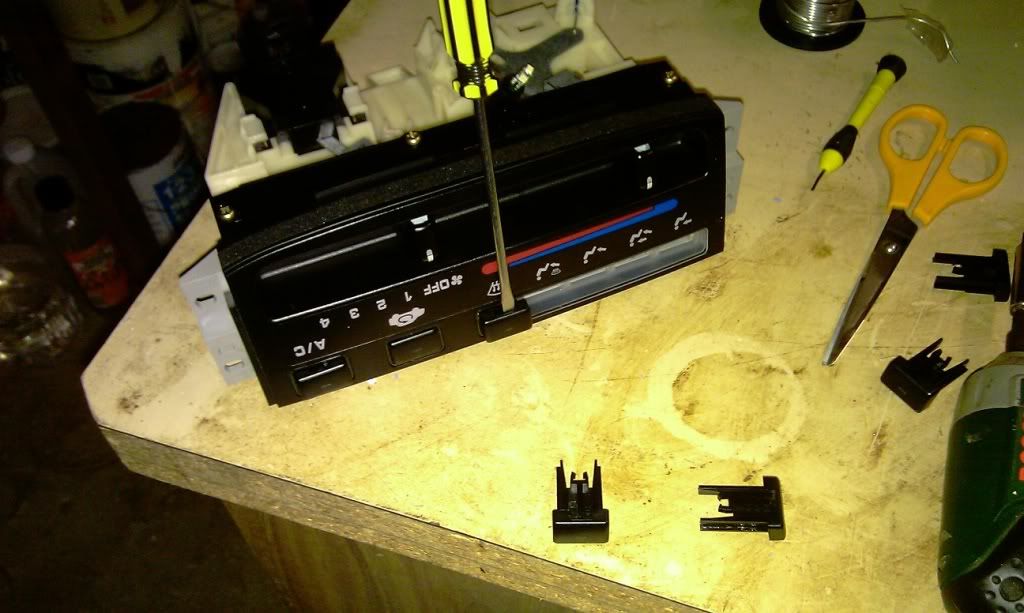
Now remove the 5 screws.
Now use the flat head to leaver up the white clips untill the white section comes loose.

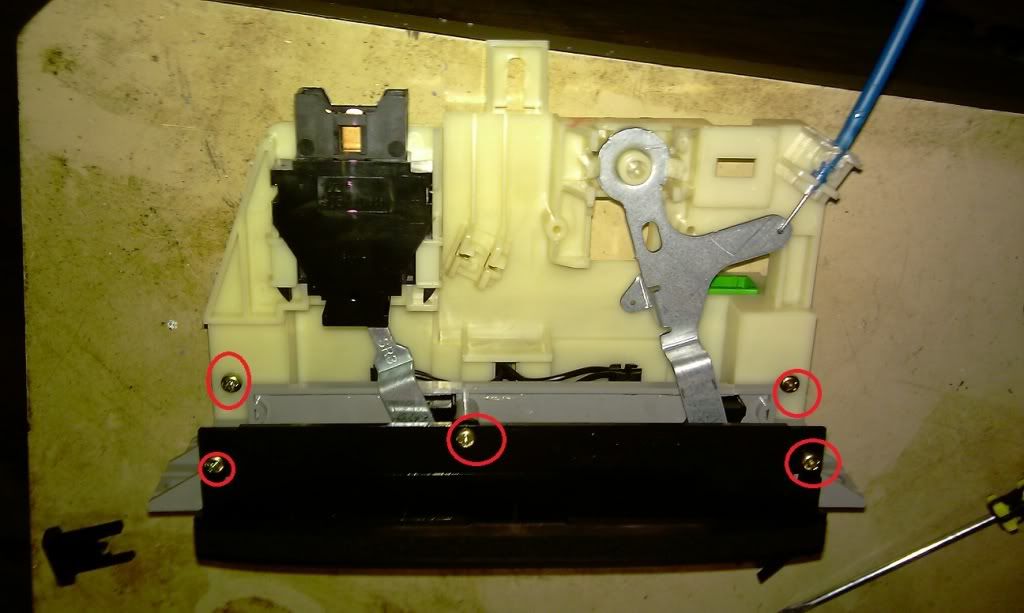
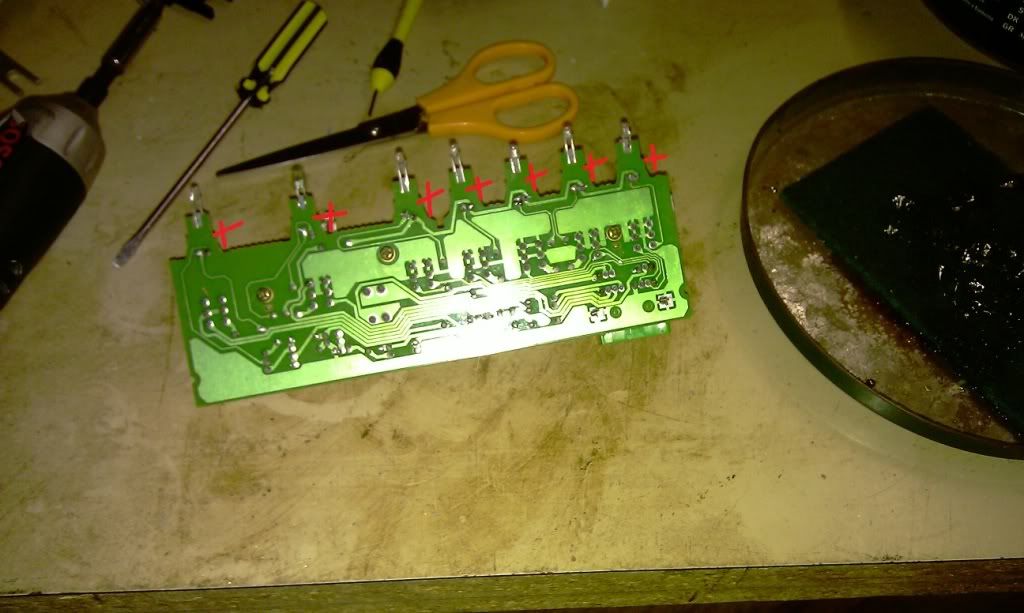
Now you can remove the last 2 screws. Note you can replace the two T5 leds now which are marked with the arrows, These are the leds that backlight the Climate control.
Now you just solder in new 3mm leds, becareful not to make them too long as when you press the vent button it can hit the led and break the connection. Ive marked out the positive side to help but it says it on the other side of the circut board anyway.
Once your done follow the guide backwards to put it back together.
Note: once your done plug in your Climate control and check all the leds are working before you screw it back in, if they arnt just turn the bulb holder or the bulb 180 degrees as leds are polarised, if your soldered leds arnt working check you connections and polarity.
Step 3 Cluster
If you have an auto use this link for the gear selector. http://www.ozhonda.com/forum/showthr...=1#post3043745
Undo the 7 clips and remove the clear cover.
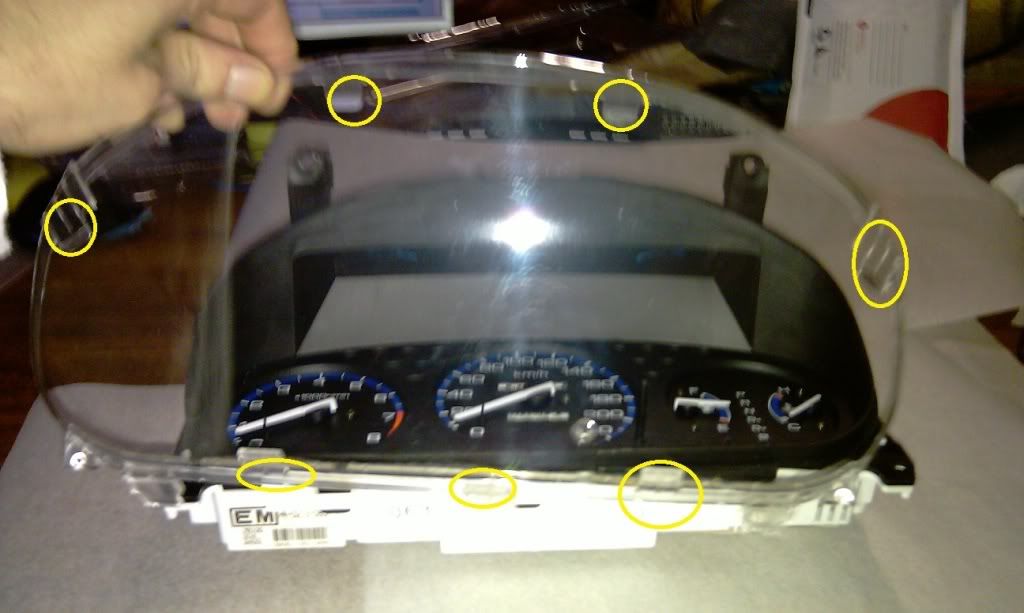
Undo the 9 clips and the left T5 bulb holder to remove the black covers.Note switch the T5 leds now.
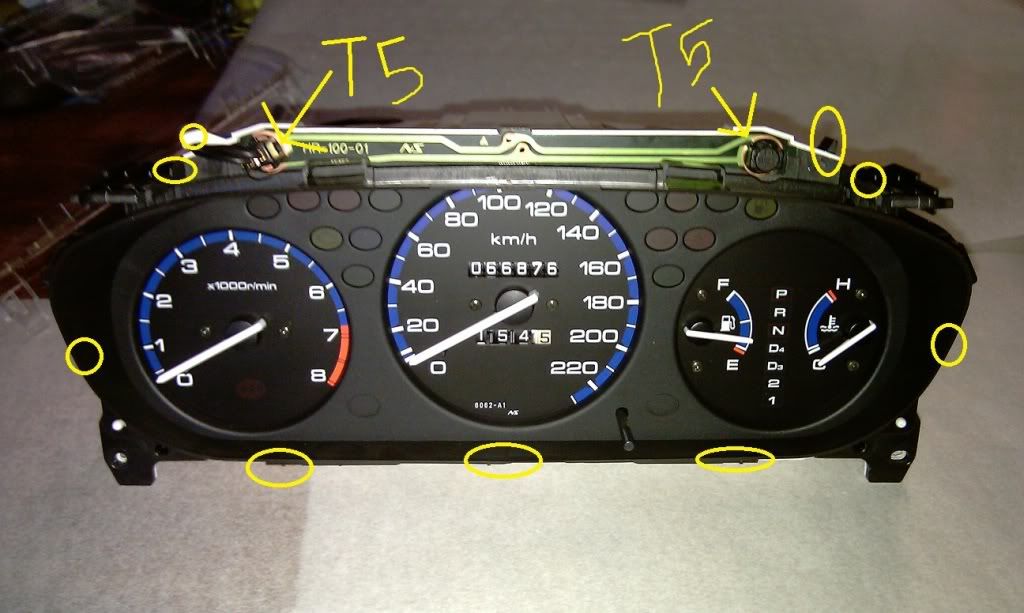
Now the fronts open flip it round and change out the bulbs for leds(Blue circles) and undo the screws(Red circles) to get your gauges out. Note if you have an auto you will need to undo the clips(yellow circles) to reveal the screws and bulb.
Once you have your gauges grab a light(i used an led torch but a fluro light would be good) and check if the light comes through white or amber, if you have a clear/white set of gauges you can skip this step as this is just to remove the Amber diffuser on the back of the gauges. if the light comes through amber whip out some acetone, cotton tips and a rag and work on the backside of the dials. Becareful not to get any on the front of the dial or it will peal off, acetone is like plastic paint stripper.
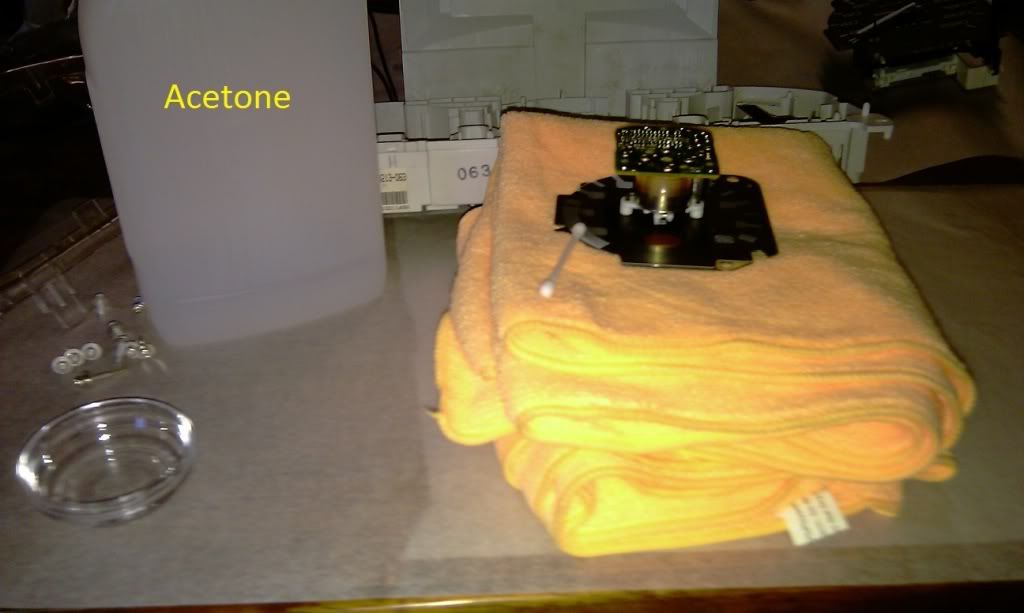
I just did the outer edge of the gauge and left the centre black, i used lots of cotton tips in a quick small back n forth motion dipping in a small bowl of acetone to keep it wet and used the rag to wipe off the excess chunks and to do a final wipe. You can try and do better if you like but this works and you dont need to remove the needles this way.

Repeat with the speedo and fuel/heat gauge. Note the fuel/heat gauge rubs off much easier so i mostly used the rag on that one. Once your happy with the gauges put it all back together by using this guide in reverse.
Note: once you have put the cluster back together plug in your cluster and check all the leds are working before you screw it back in, if they arnt just turn the bulb holder or the bulb 180 degrees as leds are polarised.
Step 4 Hazard and Rear demister conversion
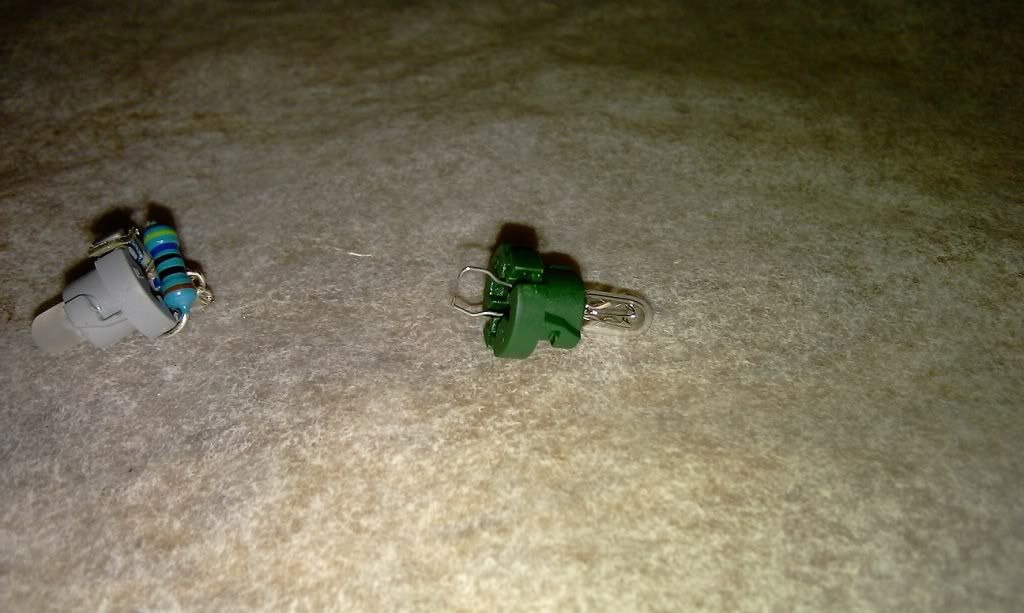
Grab the little lights out of the switches, The demister has 2 bulbs(The bottem one illuinates the demister picture and the top one lights up when the button is pressed) and the Hazard has 1 bulb that illuminates the Hazard Picture.
Remove the old bulbs by bending the wire straight and pulling the bulb out.
Now grab your led and jam it into the holder, then wrap the Negative leg(shorter leg) around where the old bulb wire went. Note i sanded my leds with a bit of 800 grit to diffuse the light and make them slot in the bulb holders.
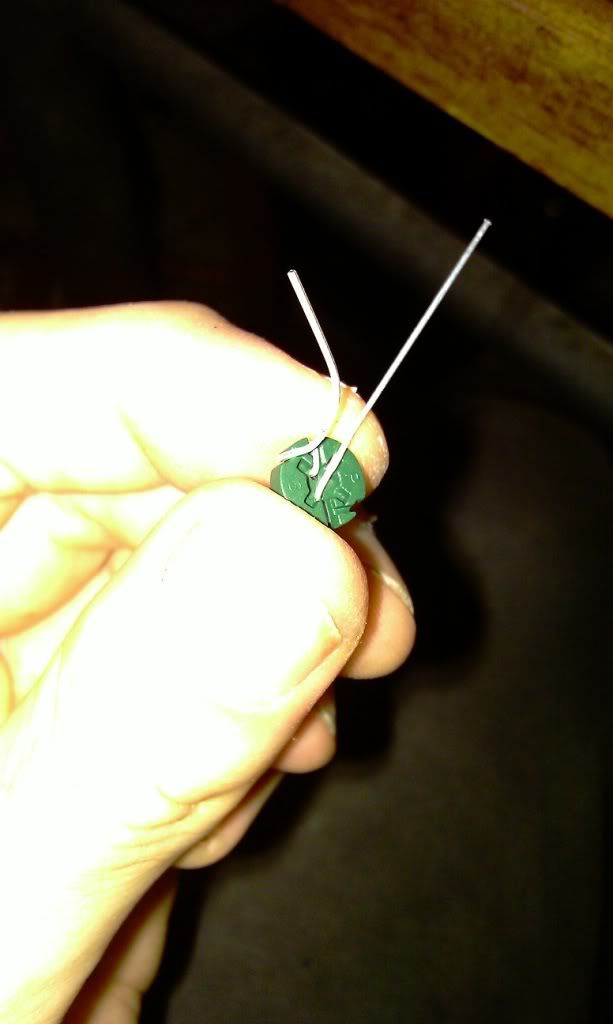
Now get your resistior and wire one end on the positive leg(longer leg) of the led and wrap the other end round the bulb holder so you have a circut.
Now solder it and cut any excess wire then your ready to put them back in.
Note: once your done plug in your switches check all the leds are working before you clip them back in, if they arnt just turn the modified bulb holder 180 degrees as leds are polarised.
Finished!
Now if you have followed all the steps properly you will end up with something like this. Dont mind the factory headunit it will be replaced by somthing a bit nicer shortly and ill be working on the amber clock to get it white too.
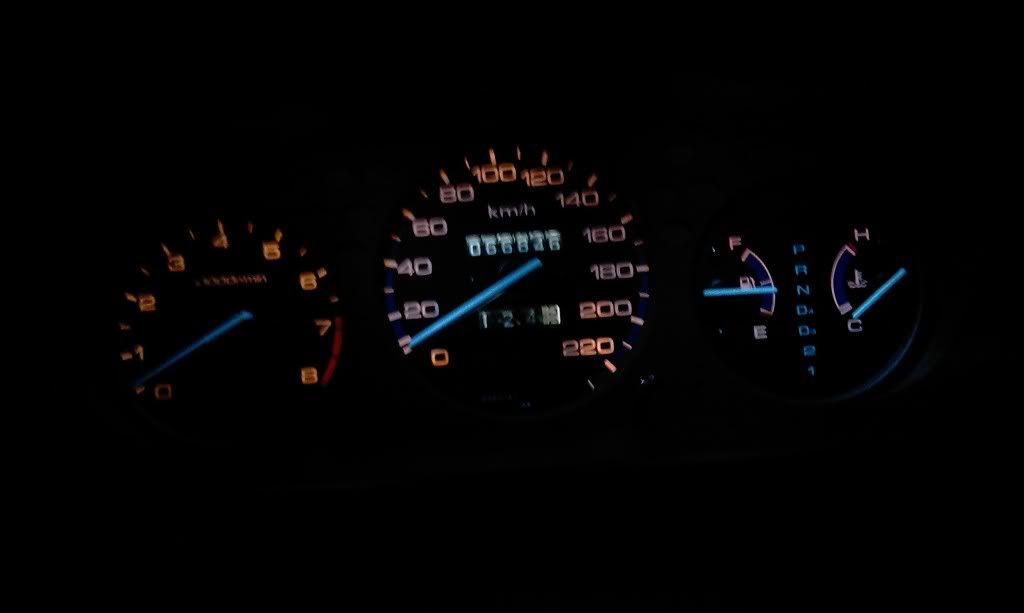
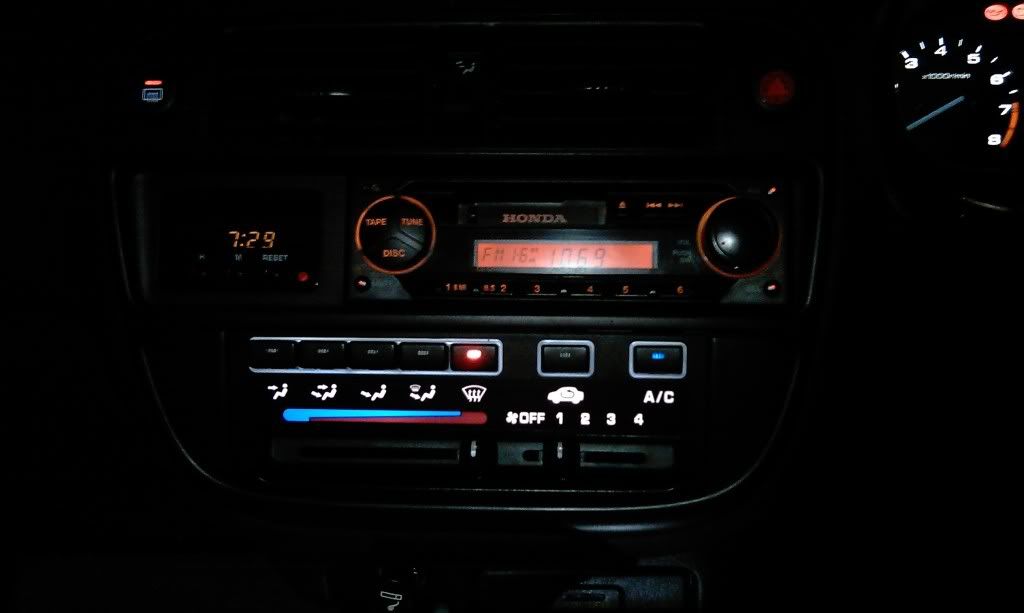
Before:Sorry for the dodgy pic my phone camera doesnt like taking pics in the dark, looked more amber than this in person.
After:
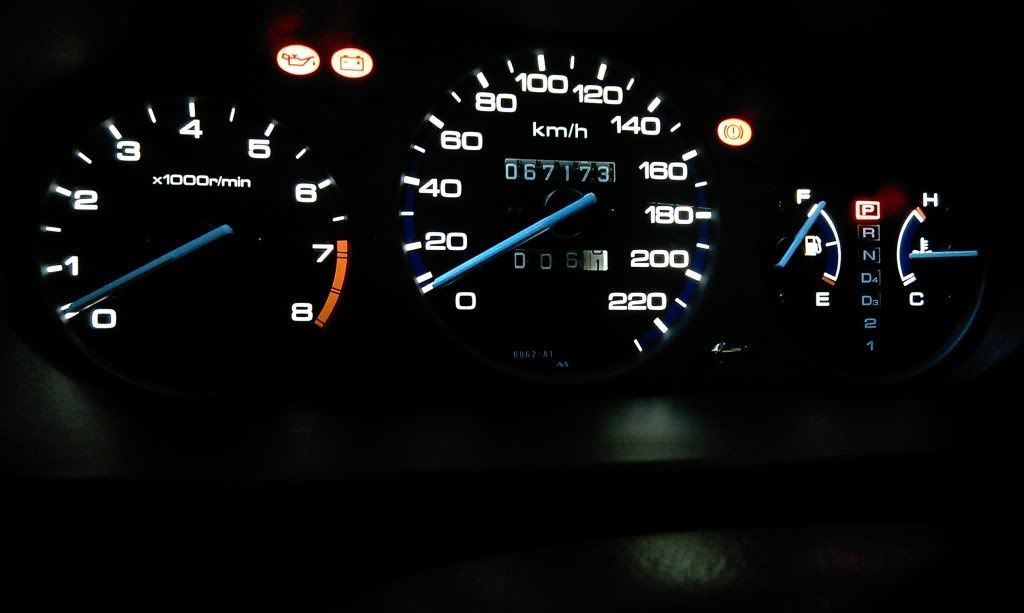
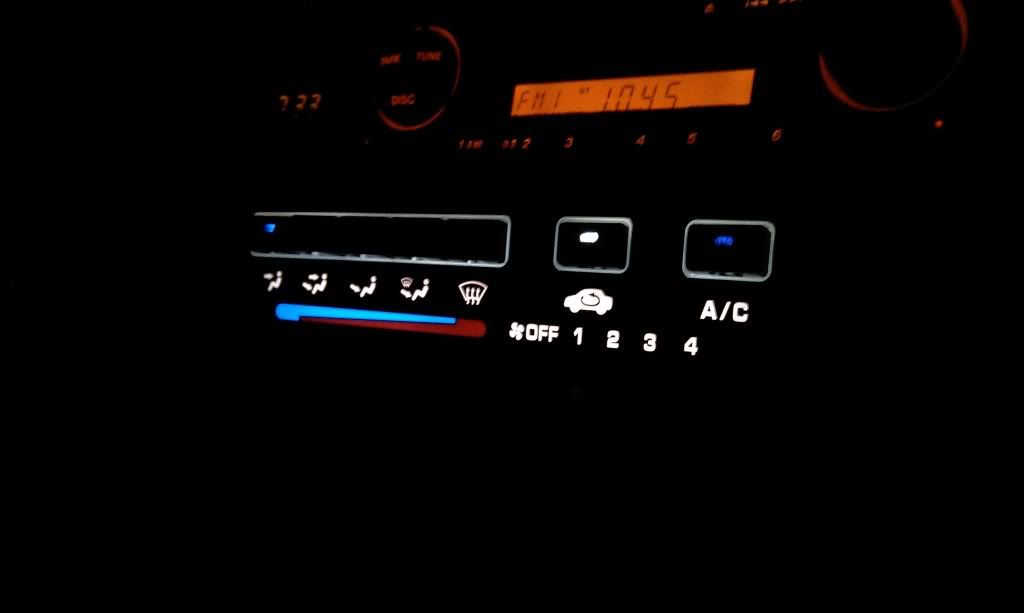
Ive got it set up so everything its white except the hazard and demistors are red leds and the AC and vent buttons are blue, but you can have any colour once you remove the amber backing from the gauges if your unfortunate enough to have it.
If there are any questions or if i have missed anything let me know and ill sort it out.
Last edited by TbM; 31-03-2012 at 07:58 AM.
-
Great DIY
+1 Rep
What size led's did you use to change the ac buttons?
Also what lights do u change in the A/C unit to get rid of the orange? ive already tried to take off the orange globe cover and it is still orange.
-
I used 3 mm leds behind the buttons and there was plenty of room so you could probably use 5 mm if you wanted.
There are two T5 Bulbs at the back of the Ac unit which i changed to white leds, if you just took the covers off your bulbs, the stock Incandescent bulbs will still emit a yellow/orange light rather than a white light.
-
Also does the demister and hazard buttons have 2 lights, 1 wedge type and 1 under the button?
Thanks
-
The demistor has two 3mm leds each with a resistor(one so the button lights up white and a red one so the little section lights up when its on) and the hazard has one 3 mm led with a resistor, i used a red led but i think i might change it to white.
-
Thanks alot
Another question where did you purchase the T5 and T10 leds? link?
Cheers
-
I got mine from http://www.superbrightleds.com/cgi-b...Fled_prods.htm
I used a bunch of these T5'shttp://www.superbrightleds.com/cgi-b...2F74-xHP3.html even used one in the t10 slot just by bending the contacts in the bulb holder.
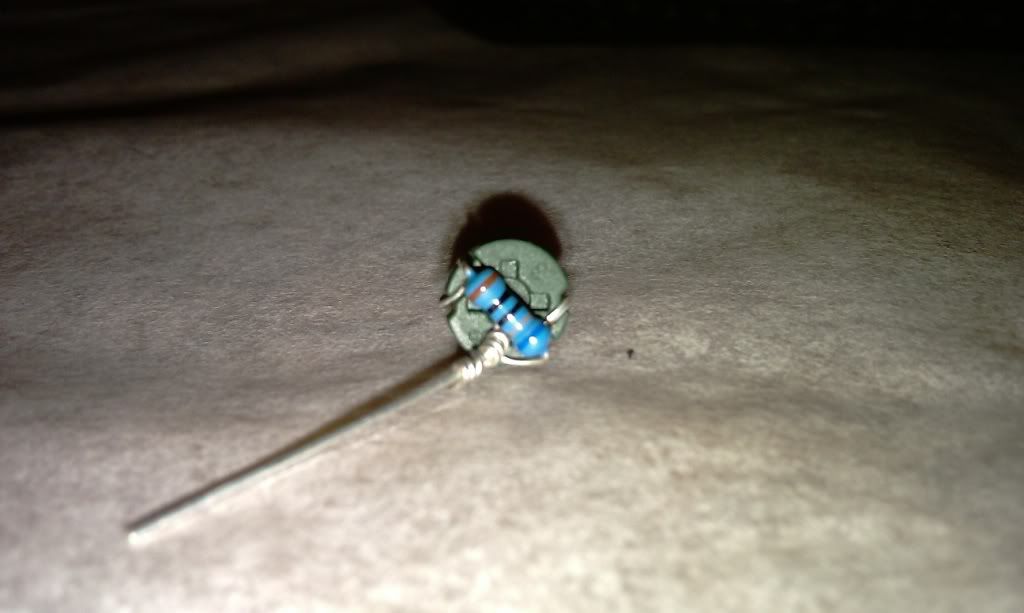
I had to modify some of the T5's to get rid of hot spots(bright patch). Pic below.
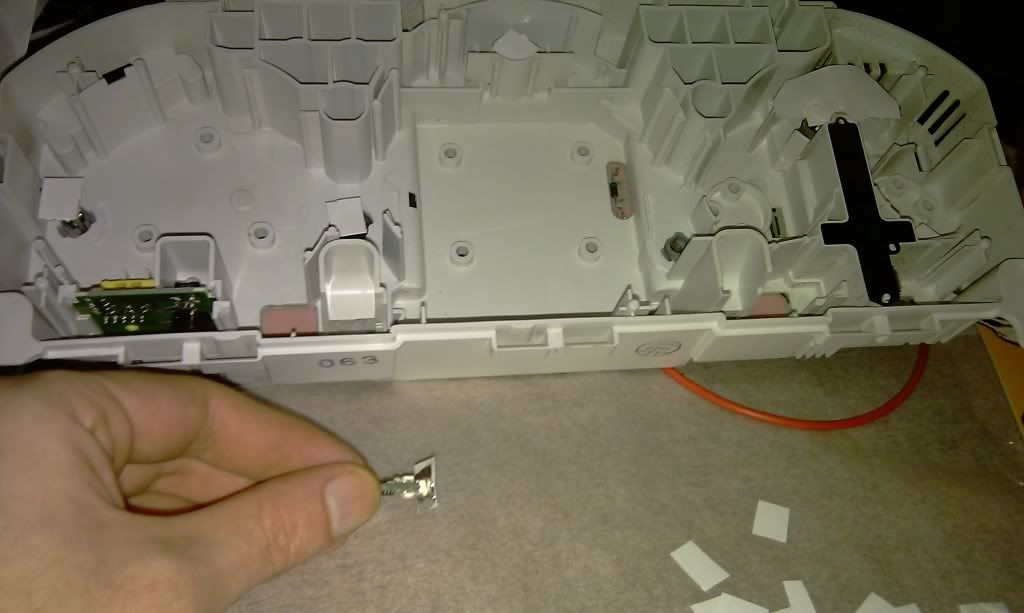
I just used a hot glue gun to put a drop of glue on the top then placed a small cutout of foil and paper on the top to reflect and disperse the light going forward.
Last edited by TbM; 07-07-2011 at 02:40 AM.
-
Good DIY mate, +1 rep goes to you. Very informative.
-
Thanks for the Rep points guys much appriciated. If anyone has any questions about the guide feel free to ask away and ill edit the guide with more detail.
Im pulling the EK's Digital Clock out this arvo to try and change the colour/brightness so if all goes well ill chuck up another DIY for that in the next day or 2.
-
Brilliant write up and wonderful news that you are doing the clock and writing it up because maybe then I can replace mine.
All I want to do is remove the facia to replace the globes in the demister switch and replace the broken clock but am having trouble removing the facia.
I levered off the switch like you explain but only the button came off, the switch is still attached and no access to the screws you talk about and although I was running out of light cannot see how to remove the switch.
So a detailed explanation of how to remove the facia to replace clock and globes would be brilliant
-
Any chance you can pm me a pic?
The yellow arrows in the pic point to where you lever the switch out from, once it pops out you wil have to undo the connector at the back of the switch then the switch will come out and reval the screw behind it.
Ive edited the guide with more detail and added a video i hope that helps.
http://youtu.be/lSZJvkGE3r4
Last edited by TbM; 08-06-2011 at 05:37 AM.
-
I didnt realise you levered the panel out thought you levered the switch/knob which only took the knob off, that video has taken it from confusion to me slapping myself for being an idiot, thanks a lot for going to all that trouble, it's really appreciated and will be tackling this on Saturday and later might try the LED conversion
 Posting Permissions
- You may not post new threads
- You may not post replies
- You may not post attachments
- You may not edit your posts
-
Forum Rules
|


 Reply With Quote
Bookmarks