|
-
Honda Accord Euro CL9 Non Navi to Navi Conversion Mod
Hi guys,
A lot of you have probably seen my posts on this topic and I figured I will document everything once and for all for everyone else.
To reply to some of the requests I've been receiving, I’ve been meaning to do this write up for awhile but just have not got around to it until now. You will have to excuse the shoddiness. I've moved onto a bunch of other things and fear I will forget if I dont write some of this down now (FYI pics coming soon!):
Objective:
To install a factory Honda Sat nav head unit into a non navi Honda Accord Euro. Intention is to install in a state that is entirely removeable without a trace and to have all the functionality of a navi Honda Accord Euro.
This gives access to touchscreen HVAC controls, navigation controls, gps routing, touchscreen audio controls on top of standard head unit capabilities.
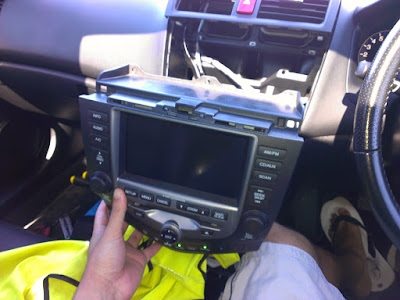
i.e. we are going from this:

to this:

Applicability:
Primary: Accord/Accord Euro MY06, 08 pre-facelift (all spec levels)
Extended: All Honda Accords/Accord Euro’s from MY03-MY07
Pre-requisites:
• A car as detailed in the applicability section
• Honda 06-08 Navi Workshop supplement (optional but good to have) - can be gotten from a simple google search
• A set of Honda tools for prying open trim bits…best $10 you will spend guaranteed
• Soldering iron + heatshrink + lengths of high quality wire of different color OR an electrician. Make sure you are confident at soldering as there are video cables that need to be soldered
Note, the install is probably a great opportunity to add an aux/usb/bluetooth module to your car since you'll be taking stuff out.
One of these Yatour modules will work great for the satnav head unit and give you steering wheel controls, bluetooth streaming, bluetooth steering wheel play/pause/dial/answer/endcall.
I've connected mine and and mounted bluetooth between driver seat and center console (near seat belt), aux in glove box and mic between steering wheel and instrument cluster.
http://www.ebay.com.au/itm/200855967...84.m1439.l2649N
• Access to the following components (note that most wreckers in capital cities that I called had one of these lying around. Prices ranged from $400 to $700 all up, including:
o Honda 06-08 satnav display unit - replaces main head unit
o Honda 06-08 upper sub-display – replaces top cover which includes hazard lights and air vents
o Honda 06-08 dvd navigation drive + disc. Note that these will come with two L shaped brackets and a housing (housing is not essential but preferred. If you dont have it, there will be a trip to Mitre 10 involved to pick up a ten pack of 7mm (TBC) washers and bolts)
o GPS Antenna + cable through to connector (try not to cut this one  ) )

o Trim piece that replaces the big center cubby (note this can have different colors depending on if your car has wood or silver trim)
o Wiring harness associated with the components mentioned above. The wiring harness at minimum needs to have connectors for (FYI Feel free to cut the wiring harnesses if required, they are easy to rejoin – what you need to ensure is you have all the connectors listed below with a decent amount of wiring:
Attached to display unit
Connector A 10pin (Green) – from sub display
Connector B 20pin (Black) – from navigation ecm - note this is not the blue 20 pin audio connector…this is provided from your car and needs some lines attached to it

Attached to Navigation DVD Drive
Connector A 20pin (Black) – goes to display
Connector B 14pin (Green) – goes to audio cable
Connector C 8pin (Black) – goes to a bunch of different places!
Connector E 1pin (Gray) – GPS antenna
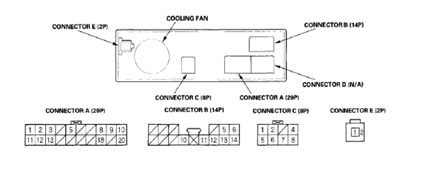
Attached to Upper Sub-display
Connector 10pin (Green) – goes to main display

Steps:
Once you have all your bits:
• Develop a wiring harness. I do not recommend going to Honda nor a general auto sparky. They will have little idea what they are doing until they figure it all out and will charge you $$$ for the labor and troubleshooting time. (FYI no offence to any sparkies out there). Once you know what needs to be done, then you can get them to do the work for you. The harness is the most important part and essential for a good install. Note that if you want to connect to the ECM, I would suggest buy yourself a five pin connector (male and female with crimp pins) so you can make you ECM connections detachable.
If you're stuck or want someone to sort this out for you, feel free to PM me for more details.
Here is my wiring harness (please note this photo does not show the sub display harness (I separated this) not the ecm connection (to the left of the image). This is also showing my 'retrofit' adapter harness to which my cars 20 pin audio harness is fed and gets additional lines from the navigation ecm.

• Remove the head unit in your car. There are hundreds of tutorials out there on how to do it and most people should be fairly comfortable with this by now if they are still reading!
In summary, start by removing the gear trim, remove the heating controls, then the ash tray brackets, undo the big compartment, then remove the upper panel (note there is a hazard light connector and temp sensor to remove) by pulling at the internal air vent sides with a levered hook.
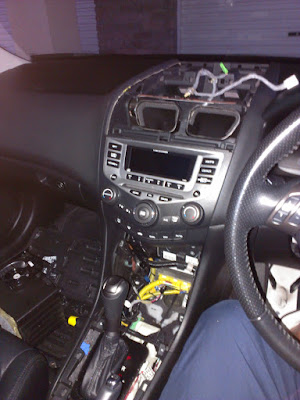
Finally remove the standard head unit. There are three connectors to remove:

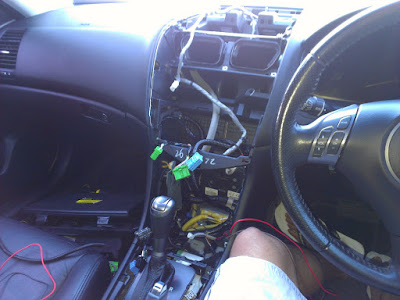
• Once everything has been removed, you will have a cavernous hole in your car! Route your wiring harness (note I did a series of tests to design my wiring harness to make the install as smooth as possible + build a separate plug for the ecm connector – happy to help anyone else who wants the same thing for their install).
Mount the navigation drive brackets using some 7mm (TBC) washers, 7mm bolts that go through the ‘ upper clips’ of the big center compartment. Please note this is only required if you did not get the proper housing from the wreckers. Also note that if you are doing this, you will need to space out one side with quite a few washers or a spacer to account for differences in the depth of mountings on each side.

• First connect all the applicable connectors on your navigation DVD drive. Remember to start with the GPS sitting under your sub-display and route the wires downwards, otherwise you'll be left with having to redo quite a few steps
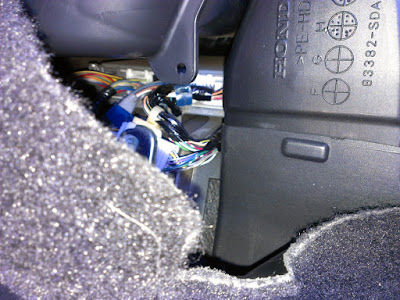
• Open the access cover to the ECM on the front passenger footwell and route the applicable ECM wiring connector through - this can be spliced and connected later, or not at all if you prefer.
Here is what it looks like:
Here is what my connector ended up looking like:

• Once the navigation dvd drive connector has been connected, mount it (if you do not have the housing, you will need to twist your wrist to rather difficult angles to get an appropriate bolt through the L-shaped brackets and into the dvd drive).
• Once this is done, position your wiring harness to lie flush with the rear wall, preferably closer to center as the display unit has two protruding tabs on either side. Everything already in your car should be a direct plug - in, depending on who and how your wiring was done.
Dont worry about the mess! It'll look awesome when its done 


• Connect your wiring harness, using clips and mounting points as you feel necessary to arrest all the cables. Due to how tightly everything fits in - you can get away without too much effort here.
• Insert the head unit into position, you may need to apply some extra force to correctly seat it. Remember there are two bolts that go in underneath the display unit (you will have to reach between the navigation drive and the display unit to access these.
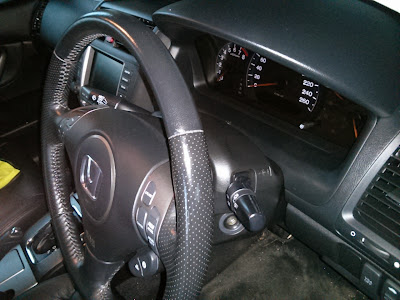
• Connect the upper sub display connector, hazard lights, temp sensor and mount your gps ( i simply detached it from its bracket and wedged it in a gap on the drivers side - the sub display holds it in place.
Your car should look something like this prior:

• Retrace your steps putting everything away after testing and fit the cover over the dvd drive. Note, the cover is held in place by the screws on the bottom as per the big center console pocket and held in place on top by the bottom lip of the head unit (i.e. do not put the head unit in all the way until you have propped the top of the trim piece in place (does not need to be secured at this stage). This may be easier for you if you got the proper housing from the wreckers but still, not very difficult to do.

• Splice a female connector into your car ecm wire (right most connector) on pins 11, 24 and 26 respectively for the relevant wires (ask before you do this!).

• Connect the ecm plug if desired (works fine without it)
• And...you are done. ENjoy the awesomeness of the new satnav! Plus the increased car value and the nice touchscreen definitely helps the feature count and aesthetics

• Further to the previous post, here is where I have decided to mount my bluetooth microphone.
...and a video link
So how this connects up is as follows:
- Satnav headunit 10 pin cd changer port connects the aux-bluetooth yatour module.
- Wiring is routed to the glove box ( may end up making a permanent 'enclosure' for this)
- Bluetooth module connects to the yatour module and is routed back on the passenger side, past the ecm, under the tranny tunnelcover, around and under the center storage console, back up the drivers side where it sits
- a mic is connected to the bluetooth module and wired up to the steering wheel - currently working a permanent mount for the mic between the steering wheel and instrument cluster - I've found this is a really good spot for the mic as the gauge cluster surround shields a lot of background noise.
Note:
Having done a couple of wiring harnesses now, I'd add the advice, try an maximize the lengths of wiring from the connector when you cut it out of the car - makes life wayyy easier when you are rebuilding the shielding for the wiring harness!!
Last edited by ozy944; 06-09-2013 at 06:10 PM.
Reason: New Note
-
WprHeader|J'intake|FLP100Cell|FGKcatback|NstPulley s|PivotRaizin|ProgressRSB|CuscoTypeI TB&StrutBrace|OkadaCoil|TeinSS|SpoonRigidCollar|Re flashedEcu|PWRtransmissionCooler|RE30|6pots+330mm rotor
-
ALWAYS REMEMBER THAT FRIENDS DON'T LET FRIENDS ROCK FAKESH*T
-
Top write up man, working up to get this installed. Now i know the 'go to guy' if i walk into any problems. Biggest thumbs up
-
 Originally Posted by Nikola14

Top write up man, working up to get this installed. Now i know the 'go to guy' if i walk into any problems. Biggest thumbs up
Haha, no probs mate. Give us a yell if you need some help and good luck!
Best upgrade I've ever done. Adds a huge 'cool factor' to the car.
-
great write up! Roughly how long did it take from start to finish to get everything done?
-
Johnniee,
You have to bear in mind there was a fair bit of time invested in figuring all this out. That took me a few weeks.
With all the parts ready to go, it took an hour to do the whole disassemble-reassemble and then 15 minutes to calibrate the gps. Pretty easy once you know how to do it!
Obviously this doesn't include time spent developing your wiring harness. What stage are you at in the conversion?
-
Great write up ozy, it's very hard to find technical stuff for the sat nav models! I've pm'ed you regarding wiring loom diagram.
-
helfr3z,
Thanks mate - not sure i got your pm though.
-
Sorry Mate, i left the pm open in another window. just sent it to you regarding pin location for Connector A from Audio Unit (20 pins)
-
Hello, Ozy944:
Great job man, I will try to do the same with my accord 2005, Can you give me more details about wiring harness? or do you can email me it please? I bought all the wiring harness together Radio, gps antenna, dashboard plus clock and DVD. I download the latest version satellite navigation DVD 2013 v3.70
Many thanks in advance for your help.
Jose
-
Originally Posted by jujobuca
Hello, Ozy944:
Great job man, I will try to do the same with my accord 2005, Can you give me more details about wiring harness? or do you can email me it please? I bought all the wiring harness together Radio, gps antenna, dashboard plus clock and DVD. I download the latest version satellite navigation DVD 2013 v3.70
Many thanks in advance for your help.
Jose
And how exactly did you download that??
Tags for this Thread
 Posting Permissions
- You may not post new threads
- You may not post replies
- You may not post attachments
- You may not edit your posts
-
Forum Rules
|


Bookmarks