|
-
Replacing 2003-2006 Dual Zone HVAC/Radio/CD Head unit with a 10.6" Surface Pro2
I'd thought I'd post a bit of this install as part of it pertains to controlling Dual zone HVAC after the Radio/CD Head unit has been removed.
I started another thread on removal and basic modifications here:http://www.ozhonda.com/forum/showthr...VAC-Head-unit.
More information here: Gen 7 HvacRelocate2
I've removed that 5 year old Car-PC system which was quite complex and requires a lot of wiring from the trunk which was the location of the PC, DAB/FM radio, Phone, Audio DSP, Audio AMP, various micro controllers for PC shutdown, start up, remote volume and 2nd battery control and more.
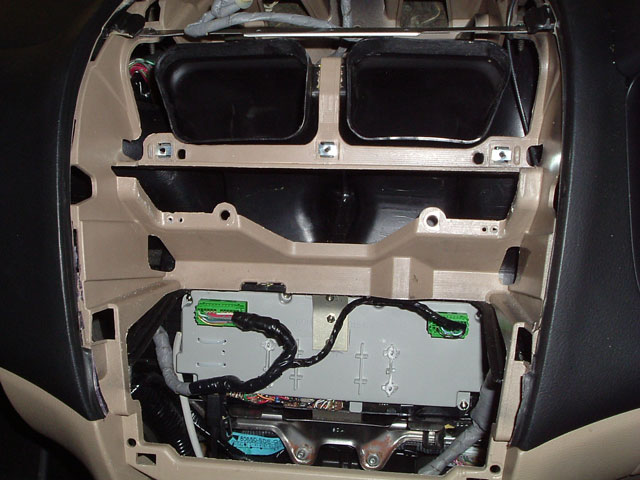
Here are the first pictures of the cut down HVAC board with HVAC remote control interface and optional PC interface - all in the now very small compact HVAC control unit. It's the Grey plastic box in the middle of the picture, the two green OEM HVAC Plugs & cables can reach to the top of the opening.
There are a number of locations where this smaller board will now easily fit. For anyone not familiar with the Audio/HVAC unit, it completely fills the area from just below the AC outlet vents near the top of the picture and down below the bottom of the picture. The HVAC board, before I cut it half, was almost the same size as the opening, it looks so small now because it is now mounted on the back wall of the opening.
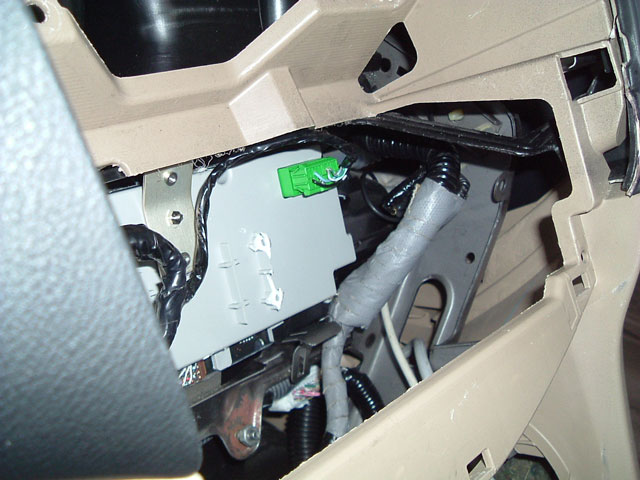
Side view to give an idea of depth - The Grey cable on the right is the Audio interface cable just hanging around after I removed everything.
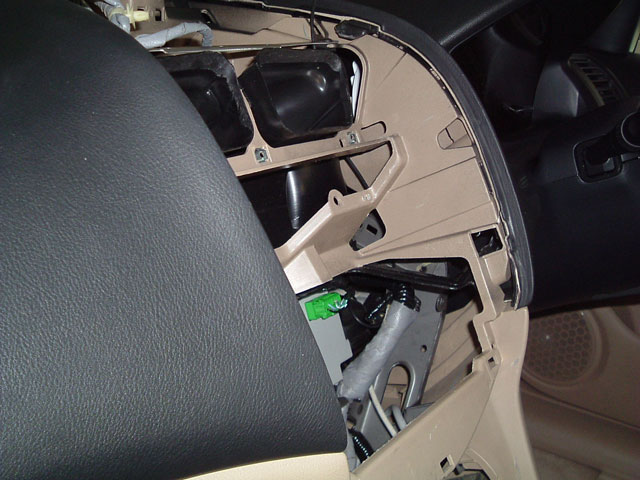
Same as above.
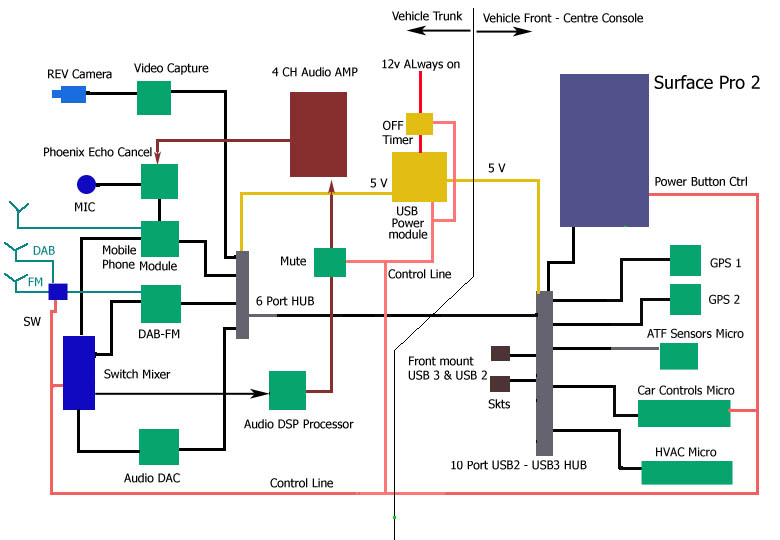
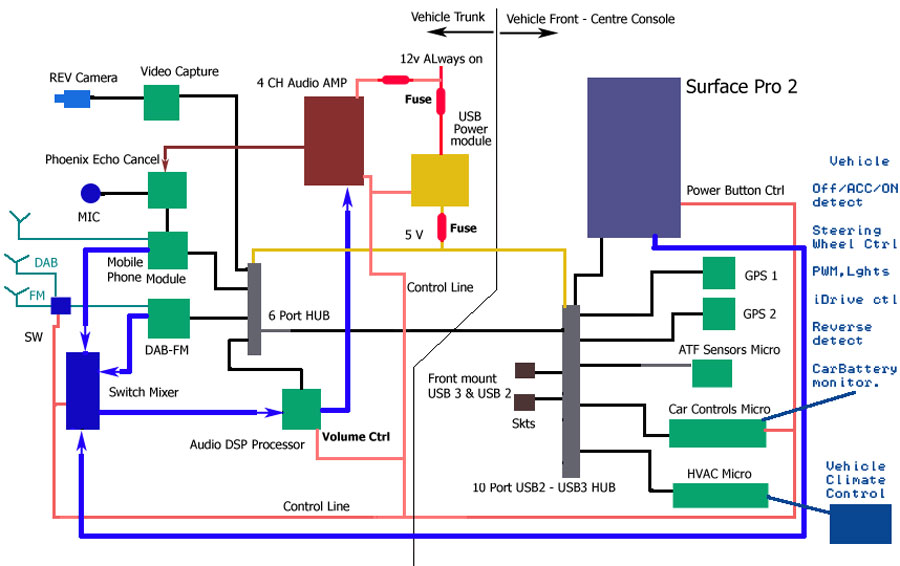
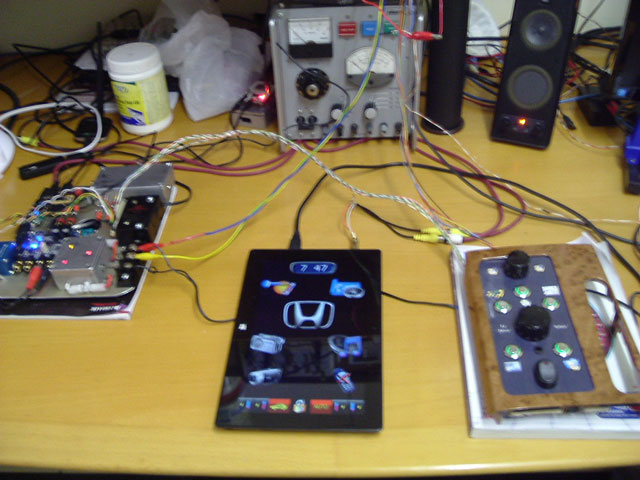
I have the Surface pro2 working on the test bench with everything plugged in. The next step is to run the 3 required cables to the rear mounted USB components which again are - Mobile Phone module, USB DAB/FM Radio module, USB DAC Module for audio from the tablet, USB DSP audio processor, and Remote volume/ AMP mute/Audio source control and mixing (PC- Phone - Radio) module along with USB power control.
Only wires needed from the front mounted tablet are 2 USB cables, one going to a 6 port HUB and the second USB cable dedicated to the Audio DAC, and the 3rd wire is for some hardware feedback status.
Here is the basic layout of this system - Not shown is the Hardware Control/Display for the Climate Control in the event of a computer failure.
-
serious work there.
Good job.
2003 CL9 5AT *ECU REFLASHED*
CT-E Icebox|Ralco RZ pulleys|K&N filter|DC Header|250cell Cat|Cusco Tower & H Brace| H.Drive Coilovers | Rays RE30 18x8.5 | S/S Brakelines | Rigid Collars
-
Awesome work. i love this level of commitment. I am suprised there aren't more manufacturers bringing out 7" Car DVD Players running Android and the facility to run an internal 2.5" hard drive (to keep it small). If they use a quick start Operating system it shouldn't be much of an inconvenience for the person using it.
Would love to see how you go with this. Subscribed 
-
Fredoops, cl9_luxury, thanks for comments.
Biggest problem for the Dual Zone Climate 2003-2007 Accords, is that you can't fit anything in place of the OEM Head unit - Well there are some Chinese units that are supposed to replicate the OEM Climate Control system, but of course they don't. Single AIR Accords models are easy - Full climate control is a different beast.
Lot of guys doing Android tablets in the lower cubby or mounted in a modified AC-Vent cover top unit. This is all fine if you just want a GPS-Media-Connected device but not if you want to interface to, for example, the OEM Climate Control Microprocessor as I am doing - and you have to if you remove the Accord Head Unit - or integrate a DAB-FM module or interface directly with various vehicle sub systems - and not be limited by OBD2.
I hope to have everything but the Tablet in by the weekend, the tablet will be mounted in a basic test frame until I work out viewing angles / tilt and how deep to recess it. Also need to get the Vehicles PWM dash-light signal controlling the Tablets Backlight for correct Night time viewing. I had this with my Previous install and feel that it's an absolute must have. The Front End software completely hides the fact that it's a Tablet, it looks and behaves like an integrated Head Unit. I'll get post pictures as the install progresses, hopefully in a positive direction -still a bit of SW re-coding and hardware to sort out though.
-
FYI for anyone into DIY electronics and Car computers.
Ran in to a few problems with the +5v USB supply:
The 30A device I had on hand has a FATAL FLAW in the design - As 12v dips below its input level threshold - think starting SOME vehicles - this Switch mode supply pulls (not drops) but actually pulls its output +5v rail to ground for a few hundred milliseconds. That means any USB HUB that passes the TABLET or PCs +5v USB voltage will cause the TABLET or PC to see a momentary short to ground. Even if a HUB doesn't pass +5v (most do) it will causes OS corruption as some drivers fail as ALL USB devices either reset or power up in an indeterminate state.
I didn't want to waste time for something on line to be delivered, so I decided to build one myself.
This is so simple and ended up having a really elegant way to power the HUB's under full control of the Tablet/PC.
This supply is simply an LM2576 - either an adjustable version or a fixed 5v output version. I could only get the Adjustable version which adds two resistors to the build. Local Jaycar had them at a rip off price of $14.00 but it's 5 minutes away so I went for it.
Circuit is simple - the Fixed 5v version only needs 4 external components.
Input is 7 to 40 volts. - I can get down to 6.5 volts and still hold 5v with USB fully loaded.
Output is 5volts @ 3A. You can also get a 5A version.
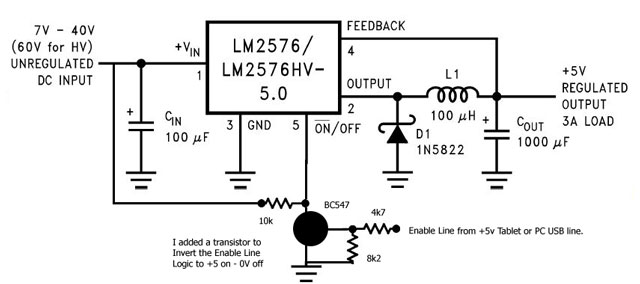
Now the best part, this device has a ENABLE pin, however the logic needs to be inverted with a transistor (as I've shown in the crude drawing) This simple control solves all timed start-up and shutoff problems that I was going to have with the other inverter.
Reason: Some of the 12 USB devices and 3 HUBS that I have connected to the ONE USB output available on the Surface Pro 2 Tablet, are very particular about supply rail timing with USB data flow.
How: In the 1st HUB, I simply unsoldered the +5 USB wire that's in the cable connecting the HUB to the Tablets USB port.
This does two things:
1: Stops the Tablet or PC from trying to supply 1.3A to the USB devices (before the HUBs are powered) - and therefore corrupting the USB devices and its own port.
2: The unused +5v line from the tablet now controls the enable line, this turns the 3A 5v USB supply on and off fast enough to look exactly like the Tablets own 5v supply timing.
Yes you can power the USB ports first - BUT - as I have found out the hard way, every so often a USB device will disappear or be incorrectly initialised. Then you have the problem of when to power off the external 5v USB - you have to wait until the PC/Tablet has powered down or Hibernated - this time varies, before removing 5v USB power.
With this simple mod, as soon as the Tablet or PC powers on it immediately enables the 3A USB supply via the Tablets USB 5v output. When a Tablet or PC is ready to power off, it drops USB 5v, which immediately switches the external USB supply off.
No relays, no timing problems - simple!
Another bonus - NO interference to DAB or GPS signals like other commercial devices I have used.
-
Small Update:
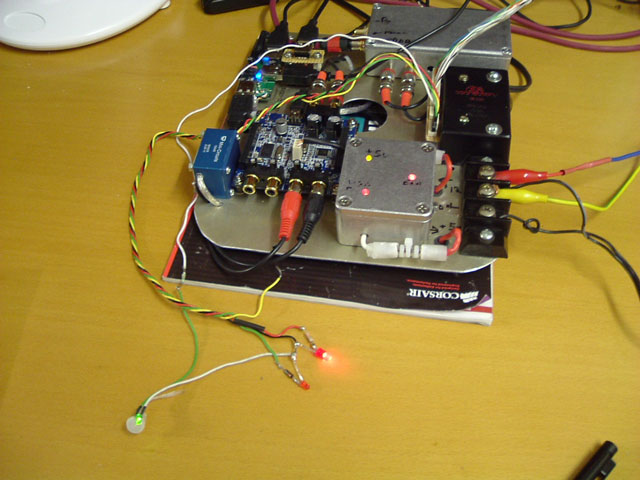
Got the rear control unit almost finished and running on the bench. This unit fits behind the Amplifier in the rear left recess in the trunk.

Also the installed DAB-FM radio, Mobile Phone and Hands free echo canceller mounted underneath the rear parcel tray. Easy to get at, easy to replace or work on. Completely out of the way, far below the level of the speakers and the rear seatbelt housing.
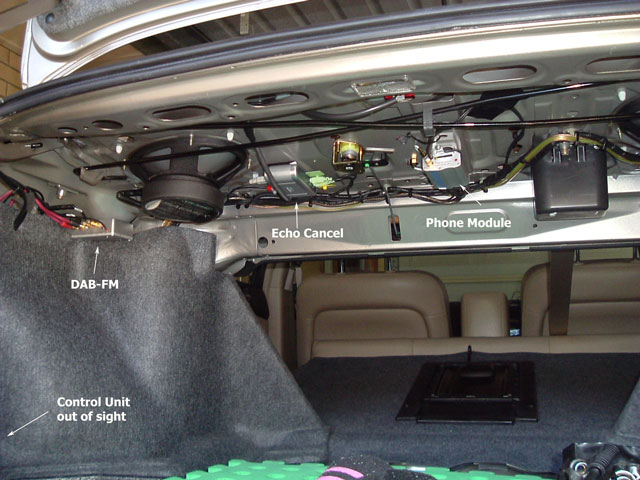
There is almost nothing to mount in the front of the vehicle - Just one HUB and a couple of USB cables. The two GPS receivers are in one case and share an external aerial so that's just two USB plugs. Same for the HVAC and Vehicle interface Controls micro.
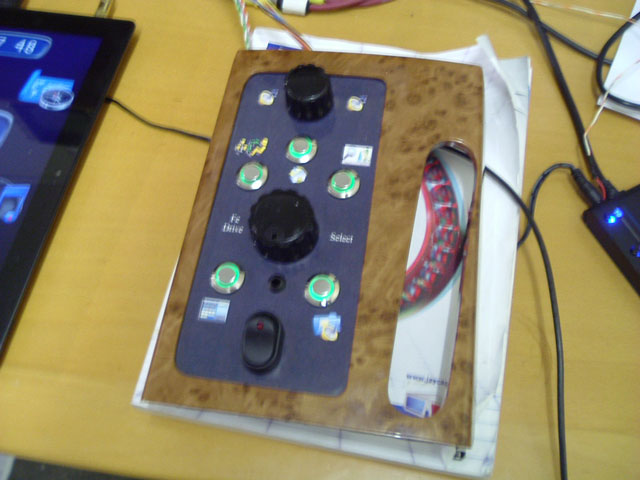
Only real wiring is the connector to the Controls micro running to the trunk I/O box on the rear controller. Once again on this install I retain the iDrive system I built that sits between the front seats and controls everything without the need to touch the screen - obviously full steering wheel button control retained, a REAL volume control - and auto volume level with vehicle speed.
-
Also new layout:
I got totally sick of the USB DAC not randomly initialising or chopping sound for no reason. Tried the Line out from the Tablet and it's as good as the DAC on this unit, tested with my high quality double shielded audio cables from the front to the trunk mounted Amp / DSP unit and it's perfect - no noise just perfect.
New Layout:
-
Some damn fine work going into all this,....well done indeed!
-
Finished the following recoding my FE. FE = Front end Software. IE Software that makes it look and act like a fancy vehicle integrated display screen/head unit.
1. Auto Reverse camera detection, capture and display.
2. Auto selection and control of DAB or FM aerial relay.
3. Auto Hibernate - Sleep or Shutdown (depends on what default action has been preselected in FE setup - totally independent of Windows settings.
4. Auto selection of Phone/DAB-FM audio and override of DAB-FM audio when Phone rings or is in use.
5. Auto Enable of the 4ch Amplifier under FE control and auto Disable on Tablet (FE) closing, no noise clicks or pops.
6. General recoding for the - totally simplified - power on/off requirements with a Tablet.
Thing of interest:
A: Total USB and Tablet consumption in Sleep is 3.5 watts.
B: Total USB power when running is 7.6 watts.
With the vehicle in accessory position and listening to music, radio or doing a bit of web surfing, total computer power is 7.6 watts. Add amplifier consumption, dependant on volume of course. The Tablet runs on it's internal battery in Accessory position and will last 5 to 6 hours. In other words, the vehicle battery should see no more that a typical head unit.
Power on to FE running with music playing is 6.5 seconds from Hibernate.
From sleep - well - it's almost instant.
Cold Boot is around 3 seconds - BUT - it takes time for all background tasks to complete.
BTW I ended up having to do a work around for this POS Video capture device for the Reverse camera.
The problem is with the driver to Hardware capture device interface. The capture device/driver makes the familiar sound of a USB device being plugged in at resume or cold boot, it then either works or fails with a message that the USB hub has device with no HW identifier and the device itself disappears from available Video devices.
There is no way to software reset or restart a device that is not there - resetting the unknown USB device in device manager Hub list does nothing because the Device hardware is locked and will only operate if physically removed and reconnected.
Solution A: Get a different device, but most appear to be a few years old in design and based on Win7 drivers (as this one is) although stated to be verified as working in Win8.
Solution B: I fitted a tiny 3 pole relay (5 volts, Data +, Data -) in an equally small case in line between the Capture device and the USB port - actually looks quite good - it's controlled by my FE.
I coded the FE to energise the relay for 500ms, this disconnect and reconnects the Capture device - same as unplugging. It does this as soon as the FE has control, no more problems or hangs when the reverse Display SW tries to talk to the flaky driver in an indeterminate state, or shows nothing because the device has not initialised. Ridiculous that I have to go to this trouble.
Anyway - everything is now working 100% - all I need to do is terminate the control plug in the trunk and plug this Rear control unit in.
Next is fitting a new control interface processor to my version of an iDrive that is sitting in the console between the front seats - going to re do this once everything is in and running, then its on to fitting the Tablet.
Last edited by MikeCl; 27-11-2014 at 03:51 PM.
-
This needs to be stickied
-
-
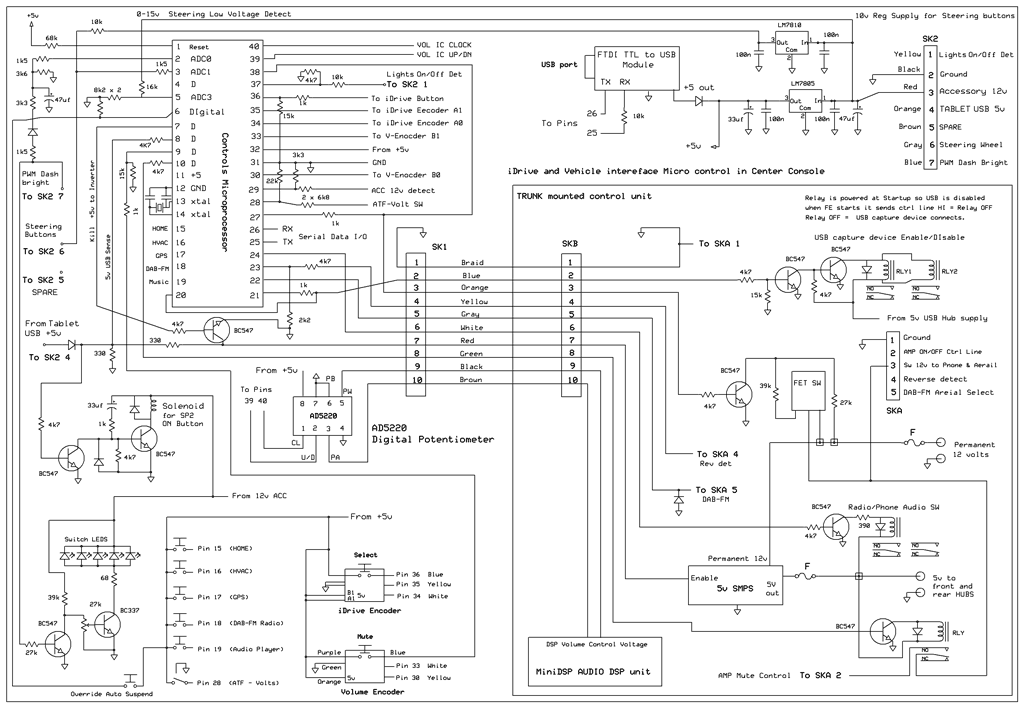
FYI for anyone interested in more technical information:
This is the circuit of the Controls Micro and iDrive panel. Combined with it is the Rear Trunk control panel. Tends to make it look more complex that it really is.
Of interest is the Digital Pot (variable resistor / volume control) I found. Very simple device to use and can be used on it own with two buttons. I'm driving it from the control micro, the micro is decoding an optical rotary encoder (volume control). The FE also drives the device via the control micro and this is used to auto adjust audio levels with noise and speed.
 Posting Permissions
- You may not post new threads
- You may not post replies
- You may not post attachments
- You may not edit your posts
-
Forum Rules
|


Bookmarks