|
-
Generation 1 Odyssey RA1 / RA3 RHD - Manual Conversion Guide
This is an old write up from years ago. From recent videos on the Boostedboiz youtube channel it seems you can instead alter some wiring near the ecu to fix the wiring for bypassing the auto tranny instead of how I have described. Also the interior heater plastic piping piece that block the shifter cables can probably just be totally removed.
------------------------------------------------------
Thanks
Thomas from Fast Eddies Racing for inspiration and guys at RA1 Ody Owners group for some assistance (particularly Jose).
Background
I bought a Generation 1 Odyssey RA3 with F23a7 earlier this year, on the test drive it seemed to be fine,but after buying it I found out that when it got hot the auto transmission would turn to shit. I later found out that the auto transmissons of 90s to early 2000s Hondas were known to die early. This is why you can find heaps of Hondas of that era for sale at low prices that are stated to be in good condition but with problems with the transmission.
Anyway, after finding out the transmission had issues I considered my options. Either get a used transmission and drop it in, pay thousands to have the transmission rebuilt or attempt a manual swap.
Swapping in a used transmission didn't make sense as it probably wouldn't be long until it died. Paying thousands to have a transmission rebuilt, that is known to be dodgy, in a car I paid just under $5k for didn't make sense.And of course, being an idiot who can't seem to escape project cars,doing a manual conversion seemed like the wisest option.
Before starting, the conversion seemed like a fairly easy job given that Left Hand Drive Odyssey's had been converted, and even a kit had been made by 'Fast Eddie's Racing'. See below video.
https://youtu.be/NLxdEmfnv_Q
However, the mechanical aspects for RHD differ a bit compared to methods for LHD.
Information on Generation 1 Odysseys
Generation 1 Odysseys were sold from around 95-99. The design of the engine bay is meant to be extremely similar to the CD Accord. Odyssey's only came in automatic. In Australia and the US there are two types of Generation 1 Odysseys, the 95-97 RA1 with F22 non vtec (I think OBD1)which is basically the same as the CD Accord, and the 98-99 RA3 with F23a vtec with a SIMILAR engine to the accord after the CD Accord,the 6th generation accord. Japan and other countries came with other variants too, like the RA5 with a J series V6, but anyway.
Guide for RHD conversion.
Parts needed
- Manual gearbox to match engine (I used an F22 out of a CD accord, but any F or H is meant to bolt up fine).
- CD Accord Manual Driveshafts and Matching Midshaft (word is prelude shafts and other accord shafts may work too).
- H/F series Flywheel with pivot bearing/race, Clutch and Pressure Plate.
- Flywheel bolts (these are longer than auto pressure plate bolts)
- Manual gearbox bolts to engine (differ to auto bolts)
- Matching Shift linkage and Shifter with all the washers and bolts (I used CD accord, but others state certain prelude shifters work, however the linkage andshifter have to match).
- Rear main seal (I believe Honda F/H/B are all the same I used: 91214-PLE-003)
- Willwood brake pedal (part number 340-1287*note, this is NOT the same as the pedal that comes in the FAST EDDIES manual conversion kit that some people use to convert LHD gen1 Odysseys)
- DC integra Master cylinder or Honda Master Cylinder with outlet facing passenger side.
- Imperial 5/16-24 threaded Master Cylinder Rod ( this is to match the Wilwood pedal thread and will replace the one in the DC integra master cylinder)
- Generic gasket material
- M8 coupling nut, M8 40mm-ish bolt and M8 nuts
- m12? Nut to match gearbox mount bolt.
- Slave cylinder (accord/prelude)
- Manual Starter motor (differs to auto)
- Manual CD accord gearbox mount and bracket
- Clutch fluid reservoir 90's Accord/Integra/Prelude will work fine.
- Manual ECU depending on if you have RA1/RA3 (there might not be one for RA3 though).
- Custom braided clutch line that is right angle with thread (m10 I think) to match the master cylinder and straight m10 for the slave (I used HEL performance custom line) Mine was 98cm with quite a bit of slack.
Tools needed
- Metric tap and die kit
- Calliper ruler
- Approx 38mm+ hole saw for steel
- Approx 32mm+ hole saw for metal
- 13mm drill bit
- Spanners
- Socket Set
- wobble extensions
- deep sockets
- impact sockets
- 36mm socket for wheels
- Whiteout pen/marker
- Grinder
- Drill
- Drill bits
- Torque wrench/wrenches
- +MORE STUFF I CBF REMEMBERING
STEPS
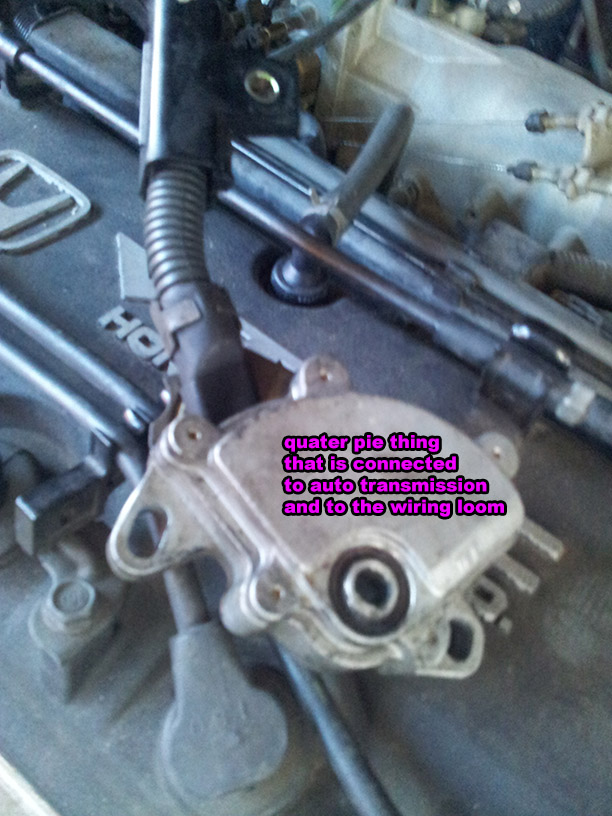
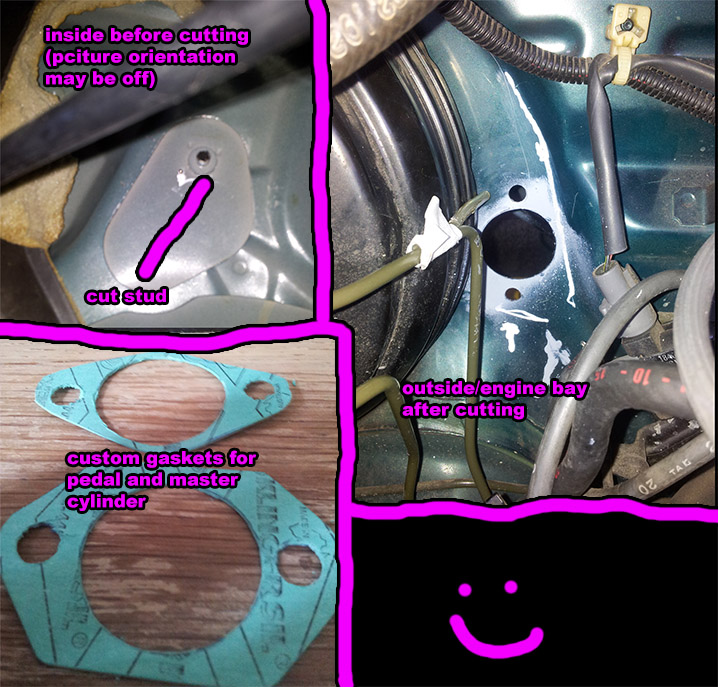
1) REMOVE AUTO AND SHIFTER - Put the car in park and remove the auto transmission. Follow the steps in the CD Accord workshop manual or possible 6th generation Accord or Prelude manuals. Also remove the column shifter for the transmission including the cable, and put the firewall grommet that goes around the cable back in place (I cut the cable to keep the grommet in good condition). You will not need the transmission, drive shafts, or shifter. However, when removing the transmission keep the quarter PIE type mechanism (pic below) connected to the wiring loom as this tells the car the the transmission is in PARK which allows the car to start, if you want you can change from PARK to N or D by putting a screw driver in this mechanism and turning.
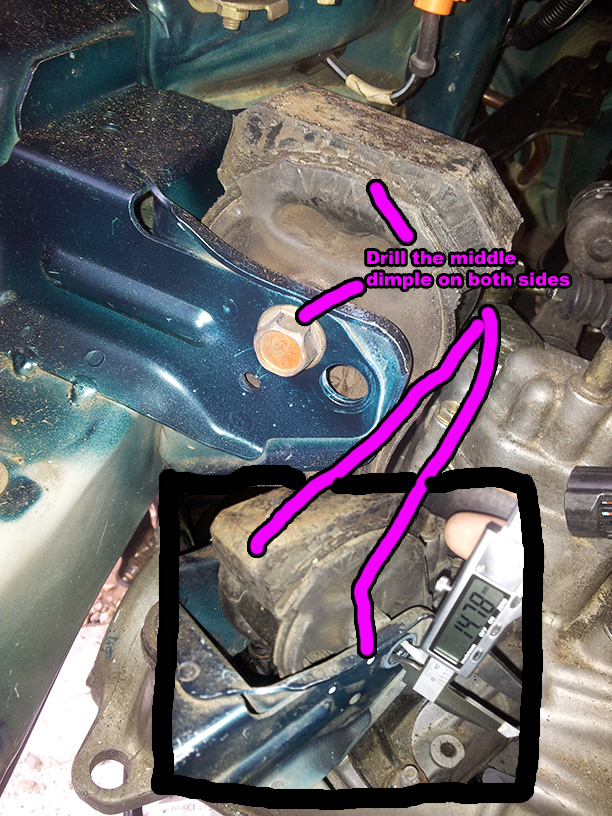
2) DRILL CHASSIS FOR MOUNT - The manual gearbox and mount connect to the chassis slightly differently than the auto mount does. On the chassis there are two dimples/dots (I marked these in white in the below pic), you need to use a 13mm drill on the dimple closest to the original hole used by the auto mount, there is a corresponding dimple on the other side. Because my 13mm drill bit was long I had to cut it shorter so that I could get the drill in place. Note, you can do this step later if you wish.
3) INSTALL NEW REAR MAIN SEAL - Pull the rear main seal and replace it with a new one. My method was to tap/smash a flathead screwdriver through the old seal and use pliers to pull it out. Note that the seal has a metal ring in it, so be careful not scratch the crank or the casing around the seal. I then cleaned the surfaces, lubed the seal with oil and tapped the seal on in a circular and step by step motion.
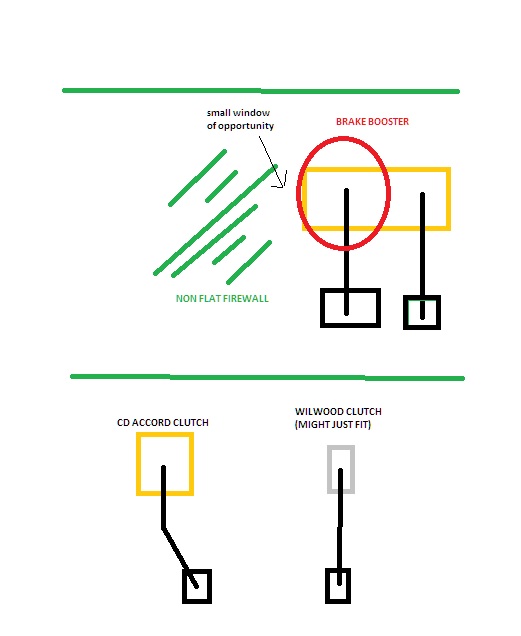
4) PEDAL AND MASTER INSTALL I have seen a few different methods of installing a clutch pedal in LHD generation 1 odysseys. Some people use the CD accord clutch pedal, however the CD accord clutch pedal won't work in RHD odyssey's because it is a curved shape, and where it would meet with the firewall on a RHD is not flat. After a bit of testing with CD Accord clutch pedal, the Wilwood floor pedal which comes with the FAST EDDIE's kit, and a Wilwood Firewall Brake pedal, I found that the pedal that will work is the Wilwood firewall brake pedal (part number 340-1287  [IMG]file:///D:/CarManuals/WORKLOG/Odyssey%20manual%20guide/DIY%20Generation%201%20Odyssey%20%E2%80%93%20RA1%2 0_%20RA3%20%E2%80%93%20RHD%20-%20Manual%20Conversion%20Guide_files/wink.png[/IMG]. This is because lines up with a flat part of the firewall right next to the brake booster. See below picture I used when working out which pedal to use:
Now the two studs that come the master do not match the Wilwood pedal as they are too far apart. So measure the gap of the Wilwood pedal holes (from memory a few mm over 50mm) and mark that on the Clutch master. Then drill and tap the Master so you can put the studs in there so it can mount to the pedal. I suggest doing 1 stud, then mounting the pedal, then usea phillips head screwdriver though the other hole of the pedal to punch a mark on the master so you can accurately drill a hole for the second stud. Because the the Wilwood pedal uses imperial thread, you have to remove the metric rod from the master and install the 5/16-24 threaded rod this is done by removing the rubber cover and un-cliping the clip in the master. You will most likely have to cut/shorten the rod when it comes time to install so that you can get the correct pedal position.
See below of a pic of modded DC integra master cylinder.
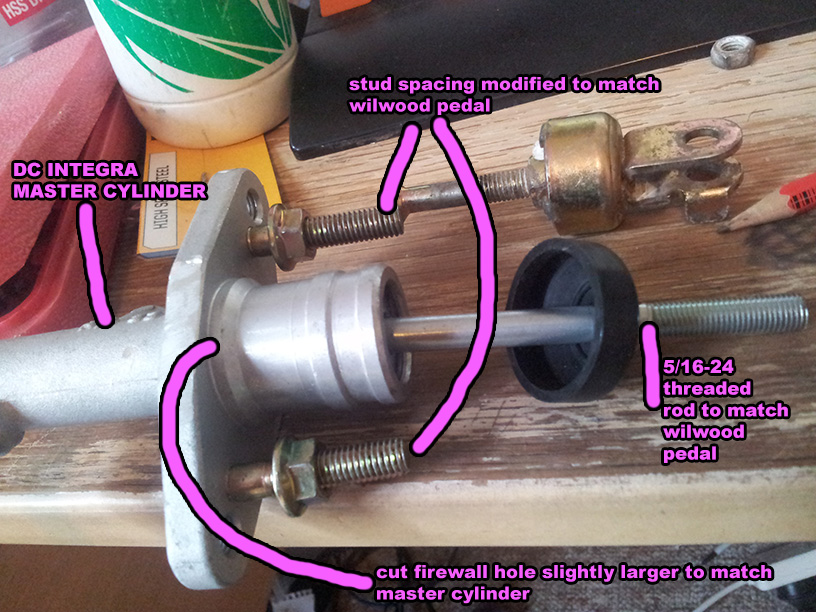
After drilling the hole, remove the studs from the modified master cylinder and put itin place, and use the holes in the master cylinder to make a mark onthe firewall so that you can drill holes for the stud to go through.I did one hole first, then mounted the master with one stud and marked the second hole by pushing a phillips head screwdriver through the hole to make a mark for drilling.
Once drilled, check everything lines up ok. You can them make some gaskets for the pedal and master cylinder so that they seal against the firewall. I also glued some steel where the pedal so that it was an even connection,and bashed down the high points of where it mounted too.
Last edited by Dxs; 06-05-2018 at 11:09 AM.
Reason: addeded sd sdasdfas
 Posting Permissions
- You may not post new threads
- You may not post replies
- You may not post attachments
- You may not edit your posts
-
Forum Rules
|


 Reply With Quote
Bookmarks