Page 1 of 21 123411 ... LastLast
Results 1 to 12 of 245
  1. #1
    Member Array
    Join Date
    Apr 2006
    Location
    Melbourne
    Car:
    EK>DC5R>S2K&JAZ

    Lightbulb |DIY| EK9 taillights for $$10

    Disclaimer: The following is provided as a GUIDE ONLY, and neither myself nor Ozhonda take any responsibility for the outcomes of someone else doing the following. You follow these steps at your own risk!

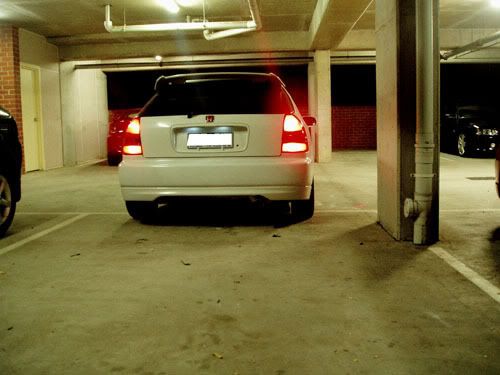
    always wanted the EK9 taillights but couldn't afford it?
    here is the cheap alternative to rice up your car

    aim:
    wannabe EK9

    tools:
    2x universal bulb holders suitable for tail/stop lights (3 wires) // 3bux ea.
    2x tail/stop light bulbs // 2bux
    1x ranchet for removing nuts
    1x PVC tape
    1x hot blade/knife or blow torch or anything that cuts plastic

    steps:
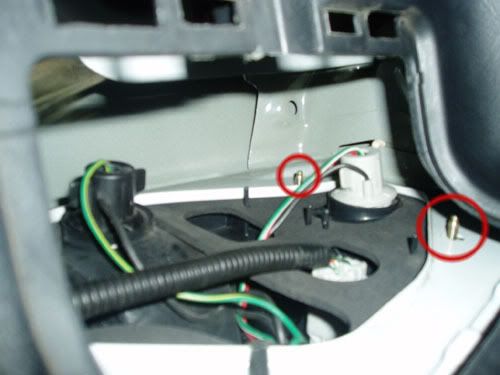
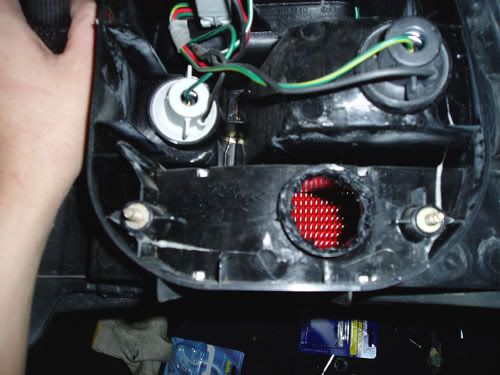
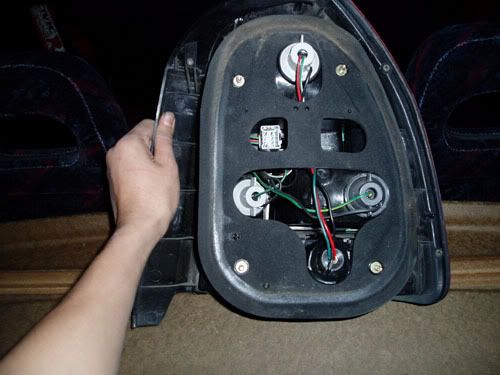
    1/ Remove your taillight - open your boot and tape of your plastic covers and undo the 4 bolts holding your taillight. (circled in red in picture. note: picture taken with the bolts already REMOVED)


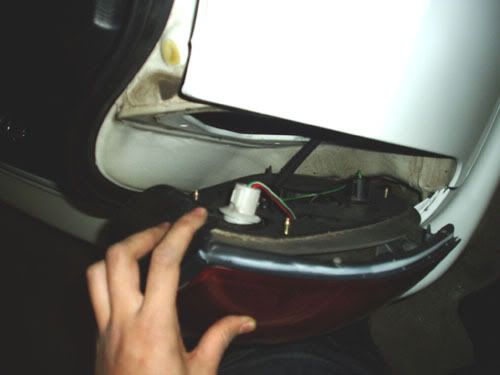
    2/ undo the harness that connecting your tail light wire. its light grey in colour. note: should have a lil button you hold down and pull out.


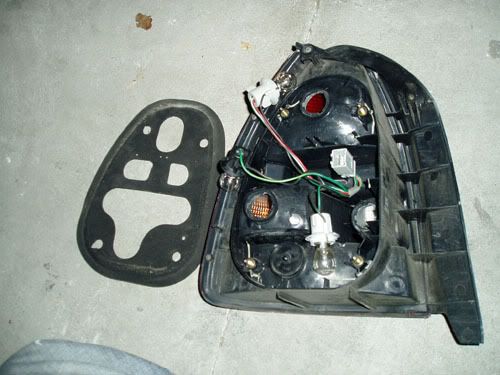
    3/ CAREFULLY undo the foam cover from your tail light assembly. some parts might seem to be glued on so be gentle, should come off.


    4/ cut a hole where the new htail light will be fitted. make sure its big enough for both the bulb and bulb holder. dont worry if the bulb holder wont click in place, you coulse use tape to stick it on. hard to cut the perfect shape i know i used my lil hot blade to cut it, works well on plastic


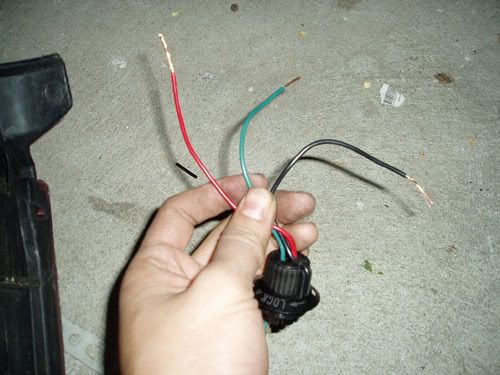
    5/ cut the end of your new wires so about 1/2 inch of metal is hanging out.


    6/ cut your existing stop/taillight wires in the middle so that about 1/4 inch of metal is showing.

    7/ CONNECTING THE WRIES!!! * important *
    now here is the fun/hard part. you need to make sure which wire on your new bulb are brake light or parker light. the black wire usual is the ground wire.

    to know how, go to your car battery and place the black wire on the negative terminal, and place each other wire on to the red/positive terminal one at a time to determine which is brighter in output. obfiously the brighter the output is the brake light.

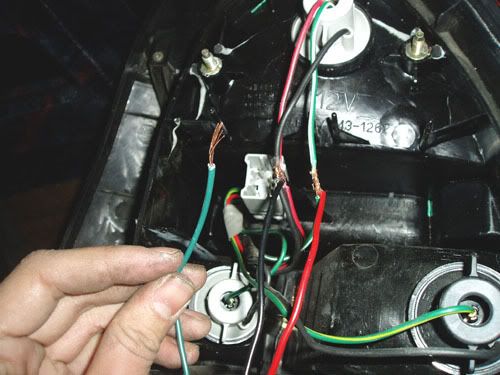
    now just conect the corresponding wires to the existing wires.
    existing wire : black = ground wire, green = brake light, red = parker light

    so in my case, the new wires were black = ground, green = parker light, red = brake.

    i conected my black with black, green with red, and red with green.
    (hope it made sense)

    NOTE: even if you did connect the wires wrong, just go back and re-correct it, its 50/50 chance so no worries. no bulb will be blown. just make sure your black wire is connected properly.


    8/ cover the wires with PVC insulating tape to protect and hold it in place.


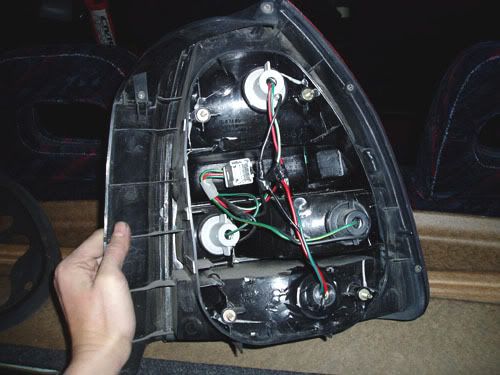
    9/ put foam cover back on and put your headlights back. then repeat for other set and your done!!!


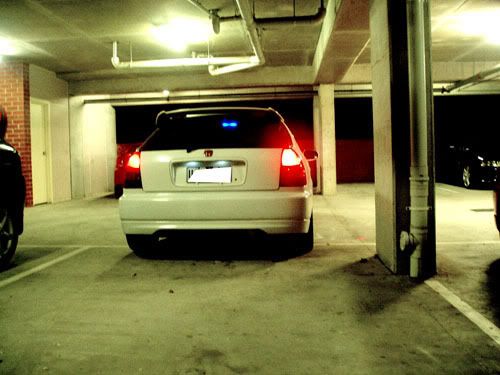
    heres the end result.

    before....


    after!

    Last edited by EK4R; 12-10-2006 at 12:15 PM.

  2. #2
    fark man thats really realyl awesome stuff.

    i would suggest placing a bit of solder on teh connections as well

  3. #3
    Member Array
    Join Date
    Apr 2006
    Location
    Melbourne
    Car:
    EK>DC5R>S2K&JAZ
    thx jeff.

    regarding the solder, its abit old school and im no good with that stuff nor do i have the tools. i was actually reading Claymore's Jazz lights and he mentioned this way was just as good. its not hard to redo so i guess if it fails just redo it :P only 10 bux

    gl all

  4. #4
    Member Array
    Join Date
    Apr 2005
    Location
    Central Australia
    Car:
    Prelude Vtir
    good stuff dude.

  5. #5
    wow thats good stuff man. =)

  6. #6
    gud stuff..
    ill be doing this soon
    ozhonda.com = ozhomo.com

  7. #7
    TRIPLE OG Array
    Join Date
    Aug 2004
    Location
    MEL/JPN
    Car:
    b18c crx/that's
    awesome
    www.lozzz.com - car spotting, food and other random crap from Japan

  8. #8
    looks sexy as!

    really makes a massive difference imo


    EK9 y0!

  9. #9
    Member Array
    Join Date
    Apr 2006
    Location
    Melbourne
    Car:
    EK>DC5R>S2K&JAZ
    thx all for the comment

  10. #10
    Member Array
    Join Date
    Aug 2004
    Location
    Melbourne VIC
    Car:
    .
    Good stuff!!!!!!!

    but change the words headlight to tail light or rear light, mate:P

    cheers champ

  11. #11
    Member Array
    Join Date
    Jun 2004
    Location
    syd
    Car:
    ek
    the real ones lgiht up brighter than the DIY ones. its because of the bulb you use. and when you break, the bttom but doesnt light up either.

  12. #12
    Member Array
    Join Date
    Apr 2006
    Location
    Melbourne
    Car:
    EK>DC5R>S2K&JAZ
    Quote Originally Posted by zco
    the real ones lgiht up brighter than the DIY ones. its because of the bulb you use. and when you break, the bttom but doesnt light up either.
    looks the same to me. maybe its your the photo.
    and with regardsing to bottom dont light up i dont know what you mean, but mine do light up? and if your refering to real ek9 lights, then no i dont want to be a ek9 where the buttom bit dont light up. i like it both lighting up. way better.

Posting Permissions

  • You may not post new threads
  • You may not post replies
  • You may not post attachments
  • You may not edit your posts
  •  
Powered by vBadvanced CMPS v4.1.3


Terms and Conditions
Ozhonda.com is in no way affiliated with the Honda motor company or Honda Australia in anyway whatsoever.