|
-
 [DIY] Accord Euro Centre Console Lighting Colour Modification [DIY] Accord Euro Centre Console Lighting Colour Modification
Disclaimer: The following is provided as a GUIDE ONLY, and neither myself nor Ozhonda take any responsibility for the outcomes of someone else doing the following. You follow these steps at your own risk!
Aim:
To change the stock/boring green lighting to something more sporty/racey
Tools Required:
Paint scraper
Small/Medium Flathead screwdriver
Medium Phillips head screwdriver
Jewellers Phillips head screwdriver
Fine tip temperature controlled soldering iron
Fine sandpaper (200-300 grit)
Long nose pliers
Needle point tweezers
Plastic containers so you don't loose screws
Small Torch (optional)
PCB stand (optional, but handy)
Items used:
Surface mount diode (SMD) LEDs white x 7
SMD LED red x 1
3mm LEDs white x 14
3mm LEDs red x 10
Resitors to suit (these will vary for different LEDs see notes for how to calculate correct values)
Fine leaded solder (0.4mm-0.7mm)
Removing the centre Console:
1. To remove the centre console first open the cig lighter compartment and remove the ashtray. under ther you'll find two screws, remove them. You now need to remove the gear boot surround (not sure for autos). this is simple, place your fingers on the inside of the leather, hook them under the edge of the plastic as marked by the red arrows in the picture,

now just pull up, theres four clips, one in each corner holding it in. once thats out you should be able to unclip the entire cigarette/ashtray piece by pulling it up and slightly out in the same manner.
2. Now to remove the cargo compartment, at the bottom of it there are two or three screws, remove these, then open the door and grabe both sides, pulling out directly towards you should unclip it. now you have to close the door and you should be able to wiggle it out. put it some where safe for now (it won't be needed till putting everything back)
3. Underneath the console unit you should now be able to see two silver hex screws, remove these. note the auxilary connection for the headunit 
4. Next step is to remove the centre console top panel, this is probably the most fidly part, so be cautious! cover the paint scraper with a soft cloth, making a levering tool that wont scratch anything. slip it above your radio between the console top plate and the rest of your dash. being very careful not to damage it. very carefully lever it up, you need to unclip the front three clips, once these are free, slide the panel towards the back of the car, this unclips the other 4 clips, the positions of the clips are marked in the picture below. The two white circles on the outside show where you must lever up to pop the clips out, the third middle one can be unclipped by lifting from the other two. The white arrows show the slots where u must slide the panel forward (towards the boot) to take it off.
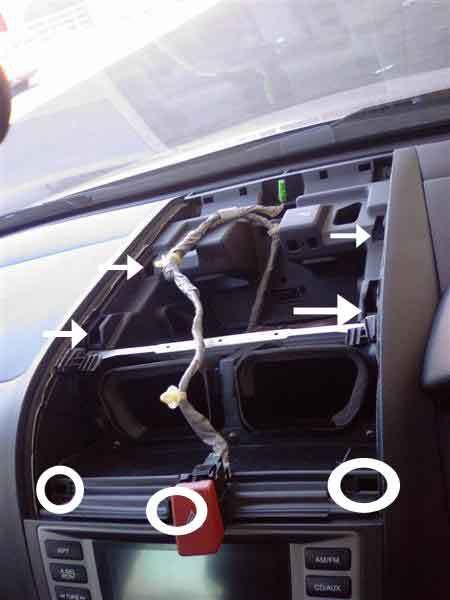
5. Once removed unclip the hazard light switch, sun sensor, and the two clips holding the wiring. Place somewhere safe.
6. At the top of the radio/climate control unit there are three screws, undo these, the unit should now be free and easy to remove, unclip the cable connections on the back (3x) and the cable clips. place the whole unit where you'll be doing the soldering of the new lights.
Removing seat heater switches:
1. Unclip the leather boot from the gear knob by rotating and pulling down gently. Then unsrew the gear knob counter clockwise till removed. slip the boot and surround off the shaft.
2. Turn the unit upside down, remove the top two screws that hold the boot in the holder, then undo the two screws on each side holding the switches in, remove switches from the rear
Removing VSA and sunroof controls:
1. Simply slide a fingernail (or carefully use a small flathead screwdriver) under the plastic surround that hold the VSA, Sunroof and blank plate on the dash. I find it easy to lever it from the bottom, marked in the picture by the red arrows.
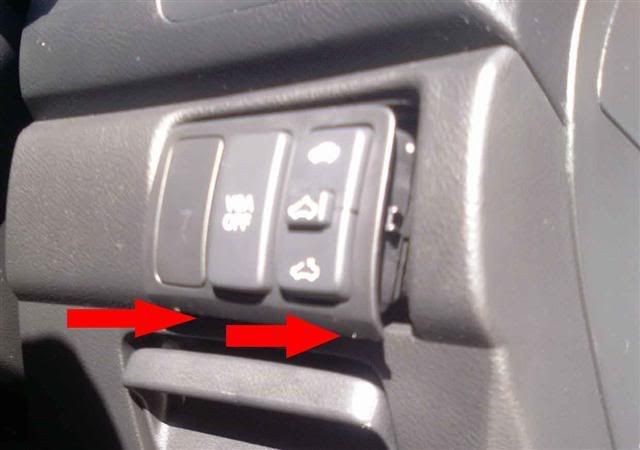
Lever it out and it should just unclip. Then disconnect wires, now push in clips on top and bottom of the individual switchs and slide switch out.
Removing Driverside door switches:
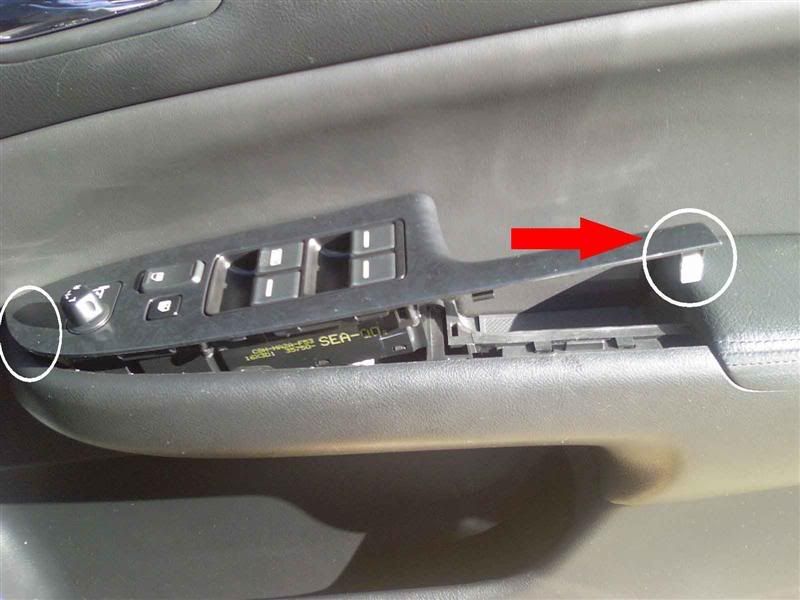
1. Use either a fingernail or flat head screwdriver to unclip the patterned surround around the switches (woodgrain/marble/silver). I find lifting from the inside of the handle (marked by the red arrow) is the easiest spot. There are two main clips, one at te very front closest to the front of the door, and one at the rear (both marked by white circles), once these are uncliped it should just slide out.
2. Unclip the cables and remove the whole unit. place unside down being careful not to break the mirror controls. Undo all six or seven screws on the back and remove the controls from the top panel. then using the flathead screwdriver unclip the plastic backing plate to reveal the circuit board.
3. From the front pull off the window locking button, you should only have to get your fingers under it and lift up, dont force it off. Theres a tiny phillips head screw inside the top black plastic square bit, remover this with the jewellers screwdriver and then you should be able to remove the PCB board easily.
Removing Passenger and Rear window controls:
1. Exactly the same as step 1. for the drivers door
2. Disconnect the cable and flip the unit upside down, using the flathead screwdriver unclip the square backing plate and the blue cable socket. The PCB board should just fall out into your hand.
Changing the radio/climate console:
1. This is the time consuming part, first, unscrew the six big screws holding the CD player on. Once theyre undone, lift the entire player straight up and off the panels. its only connected by two surface mount sockets, so be careful not to bend any pins. undo all screw on the back of the main PCB. taking note of where they go. Unscrew and unclip from the top most plastic panels first, then start removing the underlying PCBs.
2. Once all screws are removed (including the two holding the black plastic CD guide inplace) turn over and pull off front volume, temperature, and passenger knobs. you should be able to slip a fingernail in and just lever them off. if not, check that you have removed all screws (theres two holding in each knob).
3. You should now be able to take out the PCB board, exposing the back of the console. Disconnect the climate control buttons by uncliping the vanilla coloured clip at the end of the ribbon cable. You should now have two seperate boards
4. Begin desoldering the OEM lamps on each PCB. You may use either the long nose pliers or tweezers to help pull off the globes. Be very careful not the ruin the solder tracks. Remember you have to solder the LEDs back on there!
5. Once all globes are removed, grab the centre panel back plate. turning it so the buttons face down, you can see three seperate clear panels. Remove only ONE of these segments at any one time by removing ONLY the two screws belonging to that segment (as shown in the picture below marked by yellow dots).
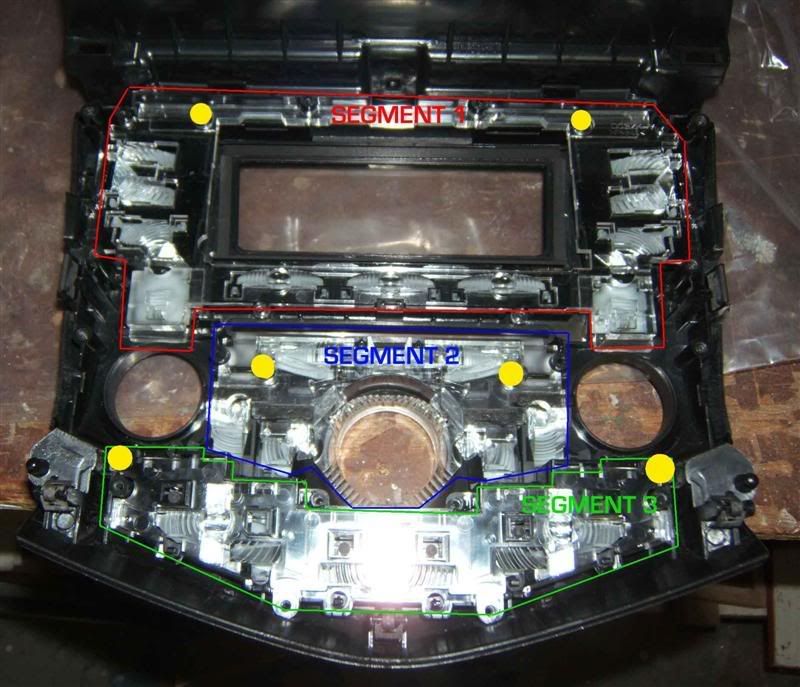
the reason you do one at a time is if you bump the unit all the bottons, reflectors and so on will fall out and are nearly impossible to work out how to put them back in. much safer doing it this way!
6. Use the sandpaper to grind down each 3mm LED. LEDs are very directional compared to lamps, u need the light output to distribute evenly. so rough up the LED so its no longer clear (looks like a frosted light globe) this will aloow for even lighting of the dash. The picture below shows how they should look (and the position of the red and white LEDs)
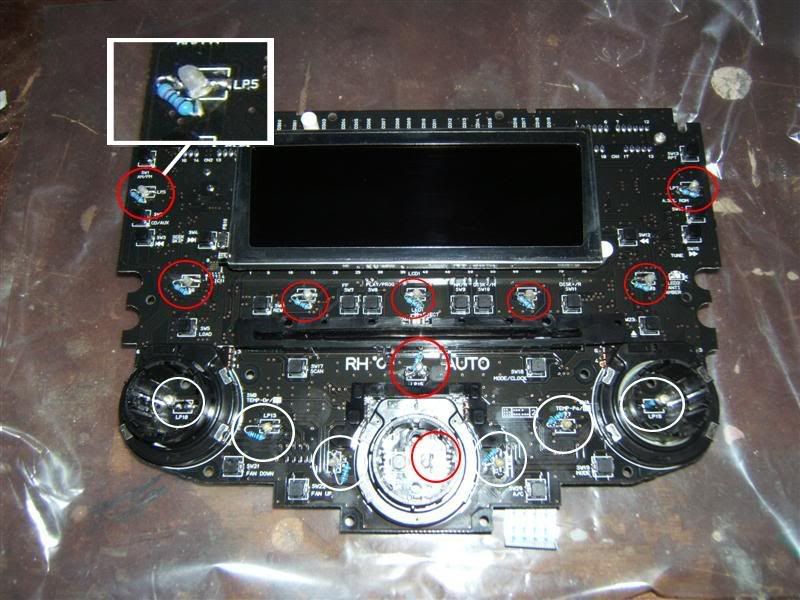
7. Using the clear segment you previously removed, place it over the PCB where it would sit when together in the console, check the clearance around each lamp point and work out where your resistor will sit so as not to get in the way. do this for each LED, before and after soldering on. The picture above also shows where i placed my resistors (the little blue things)
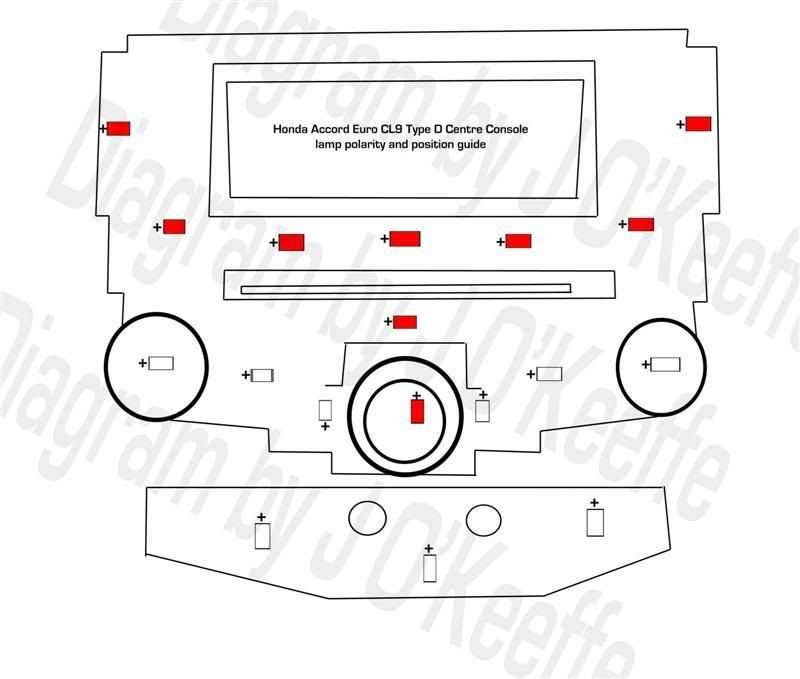
8. Begin soldering on each LED and resistor pair. Note: when working out resistor values, your starting voltage is 6v! not 12v! Be sure to observe the correct polarity as shown in the circuit diagram below.
Remeber to keep checking with the clear plate whether its all fitting underneath.
9. Once you've fitted all the LEDs, it might pay to test theyre working before screwing everything back together. for this you'll need the main PCB and the Cd player unit. take them both to your car, plug in the CD units socket (its the one on its own cable), there is no need for the other two to be connected at this point. now line the control PCB up with the plugs onthe front of the CD player, and push together gently. do not force! Now just turn on your parking lights and check all LEDs are working.
10. When doing the LEDs that fit inside the dials (LP18, LP12 and LP19) remember these ones need to stand up straight to fit inside the knob housing. next you have to do the bottom PCB that contains LP203/202/207... these light up the bottom climate control settings. do these in the same manner as the LEDs as the top board, remembering to keep checking clearance with the clear plate.
11. If you with you can test these LEDs by plugging it all in just like in step 9. If not, place all clear segments back, screw them back and and place the PCBs back into their spots.
12. Place the knobs and dials back onto the front panel, making sure u line up the centre piece correctly. When screwing it all back together, the short screws (there should be eight) go into the holes marked on the board by a white circle. all other holes take the longer screws. Replace the two plastic covers, and screw tight. Now place the CD player back ontop, once again lining it up as nt to break the plugs/sockets on the back. Screw it back on. Thats the centre console finished.
Driverside panel and window controls:
1. Very similar to the main PCB so i won't carry on. Desolder the OEM LEDs, you'll definately need the needle nose tweezers to get these off. They may be slightly stuck as they glue them on in the factory to assist in soldering 
2. Replace with your new white (or what ever colour you choose) LEDs, no need for resistors here (nominal voltage on the OEM LEDs varies from 1.8-2.5volts). Pay attention to polarity, as shown in diagram below.
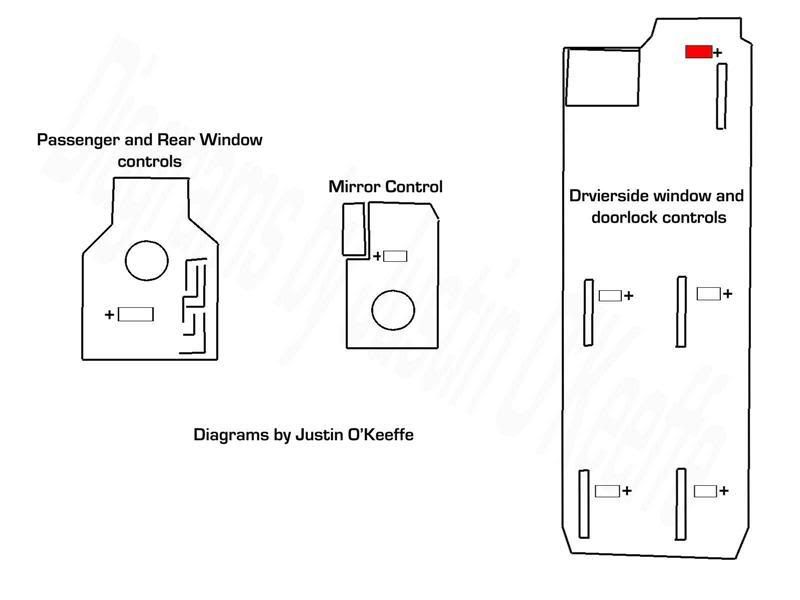
3. To make the LED that replaces the right angle 3mm which lights up the mirror controls, just sand down a normal 3mm LED and then bend the legs to make it fit, check with the mirror control housing whether itll fit before reassembling.
4. To test LEDs, plug in PCB board and switch car to ignition. If youre testing passenger or rear door controls, the main driver unit must be pluged in and the window lock swtich OFF. You'll also notice that central locking wont work without the driver unit connected. The brains behind the central locking, and the RF antennae (that little black thing that required the jewellers screwdriver to remove) for it is actually in the driver control panel.
Seat heaters, Hazard Light, VSA, and Sunroof buttons:
1. These ones are pretty simple, just use the flathead screwdriver to undo the globe holder by twisting it anti clockwise.
2. Remove the globe by undoing the wire around the holder, then pull the globe straight out.
3. Sand down an LED so its nice and frosted, once again, you need it to be an even light source.
4. Now replace with LED and resistor (remember the starting voltage is now 12v). push the LED and resistor legs through the holes inside the holder, and wrap them around the base, just like the original globe was. to get them to fit you might find it easier to unclip the front button (two clips either end of each switch) and use the pliers to position the LED inside the housing.
Now put everything back together, and youre all done. This may also be a good to change the globes in the cigarette ring and ashtray. Theyre just T5 mini wedge globes, available from Autobarn.
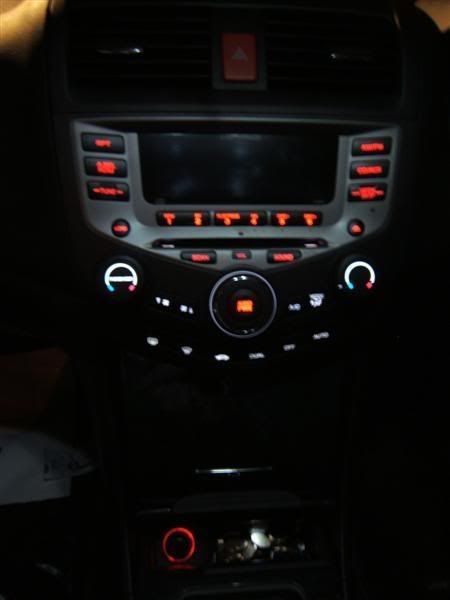
The completed product (excuse the poor quality pic, taken on mobile phone)
Notes and Erata:
Calculating resistor values required
Use this simple formula: R=(V-Ve) x (1000/vf)
Where R is the resistor required, V is the base voltage (6v for the audio/climate console and 12v for the rest of the switches), Ve is the voltage drop of the LED (usually 2-3v) and vf is the current draw of the LED in milliamps (varies between 20-50ma).
Example:
133 = (6-2) x (1000/30)
I used 1% 0.5W resistors, however, depending on the LED, 5% 0.25W resistors should be fine
Other Comments:
Please don't hesitate to ask if you need further advise or help in the matter. This guide covers the entire process, including centre console, vsa and sunroof controls, window buttons, door lock, seat heaters, and mirror controls. Obviously not all tools and equipment will be needed if your not doing all the changes i did, likewise, you may choose to use different colour LEDs. I had to cut the guide short as i exceeded the 15000 characters, but putting it back together should be easy, just follow the intructions backwards
PLEASE NOTE: Some users have mentioned polarity may be incorrect on one of my diagrams, please confirm correct polarity yourself prior to attempting any changes...
Last edited by EUR003act; 14-04-2010 at 05:56 PM.
-
wow that looks awesome!! good job...if only i could do that too!!
-
hey you live in canberra right ? LOL wanna travel up to sydney and make mine go red galore? LOL
-
lol im glad you guys like it makes it worth while lol
and yes i live in canberra... id also be happy to show you (or anyone else for that matter) how to do it some time... if i have to! :P
-
Holy! I've been talking about doing that for a long time, but I don't know which bulbs it uses...
More info PLEEEEAAASSEEEEE!!!!!!
What bulbs etc... How many required etc...
+Rep for your effort!
Last edited by EuroAccord13; 01-08-2007 at 11:01 PM.
146.8Kws @ Wheels Diesel CL9 Euro (SOLD), 2009 Honda VT Shadow, NC PRHT Mazda MX-5, Boxing SG Forester, Honda Civic Sport RenaultSport RS265 Trophy+
Team Yum Cha Daily - The Dim Sum Revolution
OzHonda's Public Relations Guru
-
nice one. i wanna make all my lights red as well., like a BMW.
-
Seriously man you need to please post a diy
-
www.lozzz.com - car spotting, food and other random crap from Japan
-
Yeah looks good.You need to post a DIY with pics so we can all have a go at it.
-
thats awsome!!! gotta post a DIY!!!!!
-
Nice work 
-
nice indeed.. DIY would be awesome!!
 Posting Permissions
- You may not post new threads
- You may not post replies
- You may not post attachments
- You may not edit your posts
-
Forum Rules
|


 Reply With Quote
Bookmarks