Page 1 of 5 1234 ... LastLast
Results 1 to 12 of 56
  1. #1
    Member Array
    Join Date
    Nov 2007
    Location
    In the pit
    Car:
    A black one

    Gli cluster install into Cxi with genuine K's from your Cxi!

    Disclaimer: The following is provided as a GUIDE ONLY, and neither myself nor Ozhonda take any responsibility for the outcomes of someone else doing the following. You follow these steps at your own risk!

    Aim: To fit a Gli cluster (with taco) into a Cxi whilst using your own odometer and not the one that came with the Gli cluster.

    Required: Phillips head skrewdriver, Gli cluster.

    PLEASE NOTE: The speedo face is connected to the odometer. Just telling you as this may clear some questions up There is also no rewinding used or needed at all

    After a lot of research and a lot of help from ozhonda members i have found a way to get the genuine K's from your old cluster which is going out, to the new cluster which is going in. This would have been done before but i couldnt find a DIY so i have decided to do yet another DIY to repay OZHONDA and its memebers.

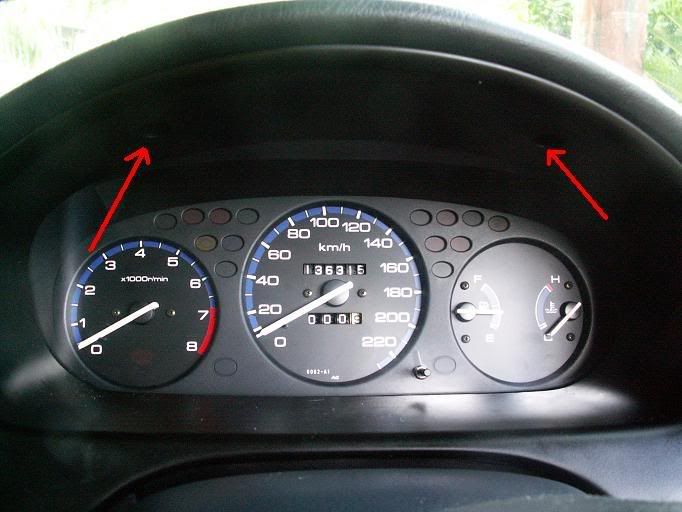
    Step 1: Sit in the drivers seat facing the cluster which is in your dash. There are 2 skrews located in the top of the cluster's case (hard to explain lol). The arrows in the picture below point to the 2 skrews i am talking about. (This picture is from when i completed mine so its of the gli cluster not the cxi cluster).


    Step 2: After removing the 2 skrews the casing around the cluster will come out, jiggle it bit by bit and the clips will become un clipped.

    Step 3: After pulling the clusters casing out you will be able to see 4 skrews, 2 up the top of the cluster and 2 below the cluster. Undo all four of them.

    Step 4: Pull out the cluster a little bit then undo the 3 connections, one up the top, one to the left and one down the bottom left.

    Now you can pull apart the cluster. (Same process for both the gli and the cxi cluster)

    Step 5: Take off the clear casing on the cluster by undoing the clips.

    Step 6: Do the same to take off the black casing. The black plastic face with all of the warning signs should now just come off.

    Step 7: Flip the cluster over and unskrew the 4 skrews on the back of the cluster that hold the odometer and speedo in.

    Step 8: Remove the whole speedo (Speedo and odometer will be in one piece )

    Step 9: Repeat steps 5, 6, 7 on the Gli cluster.

    Step 10: Now replace the Gli's odometer and speedo with the one from your vehicle (The cxi speedo that u pulled out earlier). So your are now using the Gli cluster with your speedo and odometer.

    Step 11: Now skrew your speedo with the odometer attached to it into the Gli cluster, via the 4 skrews in the back.

    Step 12: Now put the Gli cluster with your speedo and odometer in it back together again by placing back on the black face with the warning lights on the cluster, then clip the black cover back on the cluster, now clip the clear cover back on the cluster. The Gli cluster (your new cluster) should now look the exact same as when you brought it, exept it will have your odometer and speedo in it.

    Step 13: Re-connect the 3 plugs into the new cluster (Same plug holes). Push cluster back into the dash.

    Step 14: Skrew back in the four skrews that hold the cluster to the car.

    Step 15: Slowly slide the black cluster housing back into the dash.

    Step 16: Skrew back in the 2 skrews to secure the black cluster housing.

    Show your GF, mum, dad or who-ever, makes u feel smart

    CHA CHING! Take it for a spin and make sure the odometer is ticking over and all the hazard lights work as well as headlights etc.


    Chris.


    EXTRA INFO (incase you get stuck) - Thanks to Neo_phase

    Quote Originally Posted by neo_phase View Post
    Just some additional info + pics to help others!

    Once you've done the steps to detach the cluster as per Gio's instructions here, you'll need to remove the plastic covering the speedo as per the image below:


    I've already removed the clear plastic on this picture but the clips are sitting next to one another. Just use a screwdriver to push the clips down and pull it out.

    Flip it around and this is what you'll find:

    Blue circles: Where the wiring clip came out from and they need to go back into the same place.
    Yellow circle: To remove the black plastic cover you'll need to turn this bulb holder and pull it out of its socket as it is attached to the black cover. Be delicate here.
    Red circles: The 4 screws that the speedo is attached to.

    Then you can remove the faceplate once the black and clear plastics are out:


    So now you can turn it around and remove that 4 screws and remove the speedo.


    Now just follow Gio's steps in putting everything back in your dash!

    Hope this helps
    Last edited by Gio; 27-03-2009 at 02:11 PM.
    Anyone selling a black ek1 facelift Hood (OEM)?? PM ME


  2. #2
    Newcomer Array
    Join Date
    Sep 2007
    Location
    Brisbane
    Car:
    '96 EK1
    awsome work Chris, really good step by step right up,

    im so going to use this if i decide to put the ctr cluster in my gli haha

  3. #3
    Member Array
    Join Date
    Nov 2007
    Location
    In the pit
    Car:
    A black one
    Thanks ryan. Hope it helps you out.
    Anyone selling a black ek1 facelift Hood (OEM)?? PM ME


  4. #4
    Member Array
    Join Date
    Sep 2007
    Location
    CQ
    Car:
    Civic
    Nice read, will come in handy when I install my Spoon Cluster when such an item arises from the depths of the rare, lol
    Last edited by EK1.6LCIV; 12-01-2008 at 12:57 PM.
    WTB: EK oem JDM Visors

    I love J-Cups

  5. #5
    Member Array
    Join Date
    Nov 2007
    Location
    In the pit
    Car:
    A black one
    lol as in ur sig
    Anyone selling a black ek1 facelift Hood (OEM)?? PM ME


  6. #6
    Member Array
    Join Date
    Nov 2007
    Location
    Brisbane, QLD
    Car:
    2005 Accord Euro Luxury
    NOTE: The matt black paint on the dial of the gauges and mask attracts fingerprints like a mofo. Do *not* touch them where it can be seen!

    Handling it with tissues is best. If you get prints on the mask or dials do *NOT* use thinner, kero, contact cleaner, etc to get them off. You could use CRC VCR head cleaner, but test it on a non-visible bit first to make sure it doesnt melt the paint or plastic. Spray some on a tissue and then wipe the print off, but it might not come off all that well anyways.

  7. #7
    Member Array
    Join Date
    Nov 2007
    Location
    In the pit
    Car:
    A black one
    Yeah i was careful to only hold it by the edges
    Anyone selling a black ek1 facelift Hood (OEM)?? PM ME


  8. #8
    Banned Array
    Join Date
    May 2008
    Location
    Vaucluse NSW
    Car:
    EKB20 > EGB18C
    hey guys,

    Thanks to GIO i did this tonight.. actaully 10 mins ago and it was very good.. everything is fine and everything if running correctly.. honestly it sounds hard but its so easy.. 9 screws and some clips thats it

    nice work Gio

  9. #9
    Member Array
    Join Date
    May 2008
    Location
    Sydney
    Car:
    Honda Civic EK
    i was wondering would the CXI already have the RPM wiring there already

  10. #10
    Quote Originally Posted by Frankie View Post
    i was wondering would the CXI already have the RPM wiring there already
    Direct plug and play rpm will work.

  11. #11
    Member Array
    Join Date
    May 2008
    Location
    Sydney
    Car:
    Honda Civic EK
    okay so it there already

    how much does the cluster cost

  12. #12
    Quote Originally Posted by Frankie View Post
    okay so it there already

    how much does the cluster cost
    Ring any good honda wrecker eg. Ultimate Jap Spares 0296815066
    Hontoys 0297294400

Posting Permissions

  • You may not post new threads
  • You may not post replies
  • You may not post attachments
  • You may not edit your posts
  •  
Powered by vBadvanced CMPS v4.1.3


Terms and Conditions
Ozhonda.com is in no way affiliated with the Honda motor company or Honda Australia in anyway whatsoever.