|
-
[DIY] Install Dynaudio MW162 Woofer into a jazz GD 3 door.
[DIY] Install Dynaudio MW162 Woofer into a jazz GD3 door.
________________________________________
DISCLAIMER: The following information is provided as a GUIDE ONLY, and should only be used as a reference. If you do not have the skills required for such a task, please take your car to a professional. Neither myself or OzHonda take responsibility for your actions and carry out these actions at your own risk.
Aim: To install and hide the woofer without hacking into to door panel.
Tools and parts: (all obtainable from Bunnings hardware store)
- Angle grinder
- Round file
- 1 x Camping mat
- 16 mm MDF
- Drill
- Drill bit
o 1 x 8 mm
o 1 x 2 mm
- G-Clamp
- Dynamat door kit
- 4 bolts – 5/16 x 2 inch
- 8 washers – 5/16 inch
- 8 nuts – 5/16 inch
- Spade bit – 25mm
- Jig saw
- Pen
- Permanent marker
- Compass
- A4 Piece of paper
- Stock speaker
- Scissors
- Sticky tape
- Tracing paper
- Glue stick
- Nail punch
- Small spirit level ( I used a 15 cm one)
- Double sided tape
- Thin packaging foam sheet
Additional information: SAFETY FIRST! & Good to have a mate to be there to help if anything goes wrong.
-
I was a bit stuck with the speaker installation after I bought my set of speakers. Since the dyn woofer had spider bracing the magnet, the original hole in the door was too small to occupy the speaker. So I decided to either exchange them for some focal krx’s, or stick with dyn and put in some effort to get these into the door. I had a read on a previous post http://www.ozhonda.com/forum/showthr...t=jazz+speaker
made by ‘kit’ back in 2004 to give me an idea on removing the door panel and OEM speaker. There are some pictures which I did not take because I did most of the step listed here in one go – but I tried my best to make the explanation very logical. So here it is
1. Before removing the stock speaker, grab a permanent marker and trace around the entire bracket. 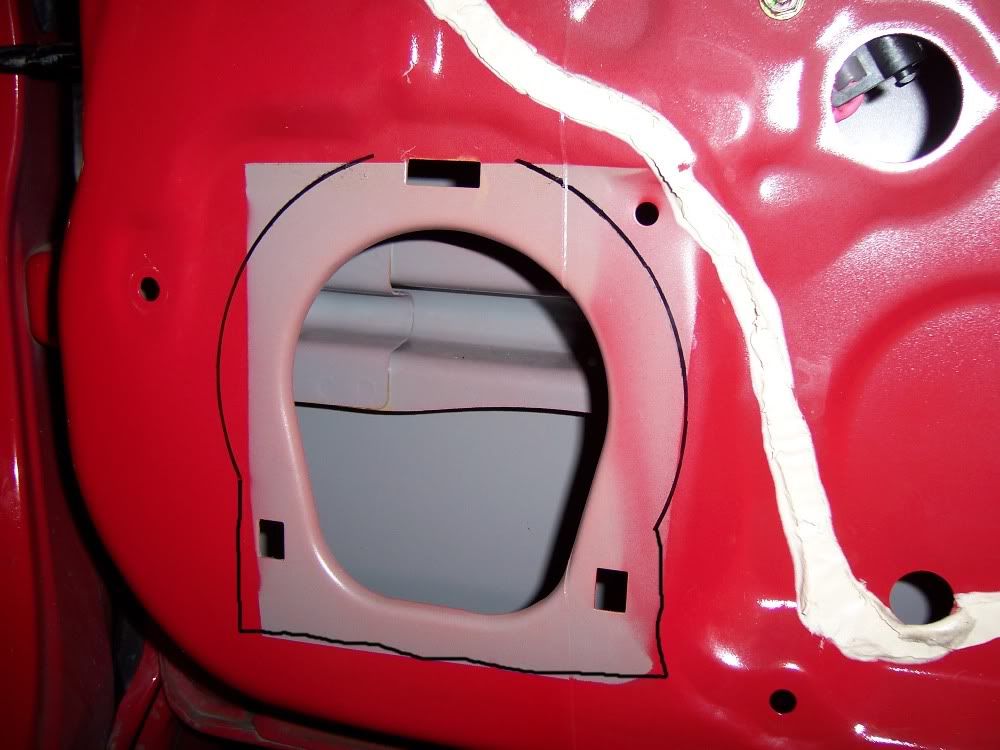
2. Use a compass and draw a circle of radius 6.8cm on the A4 sheet of paper and carefully cut it out. This will be the speaker template. 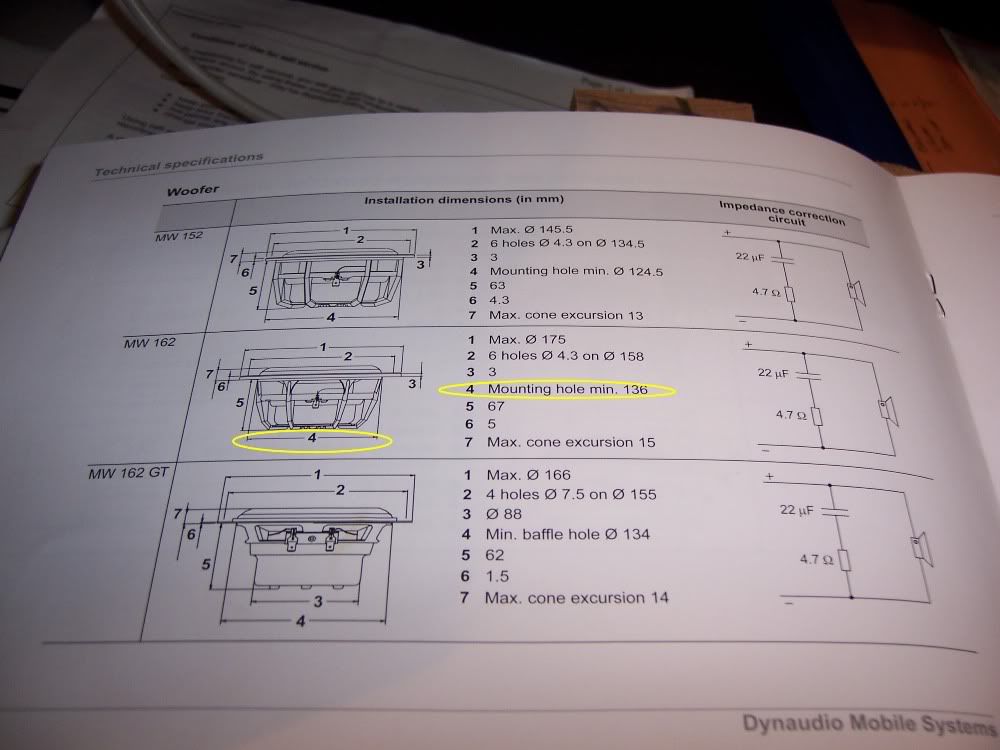
3. Place the template over the door and align it in a way so that the distance from the edge of the template to the marked line is equal all the way round. 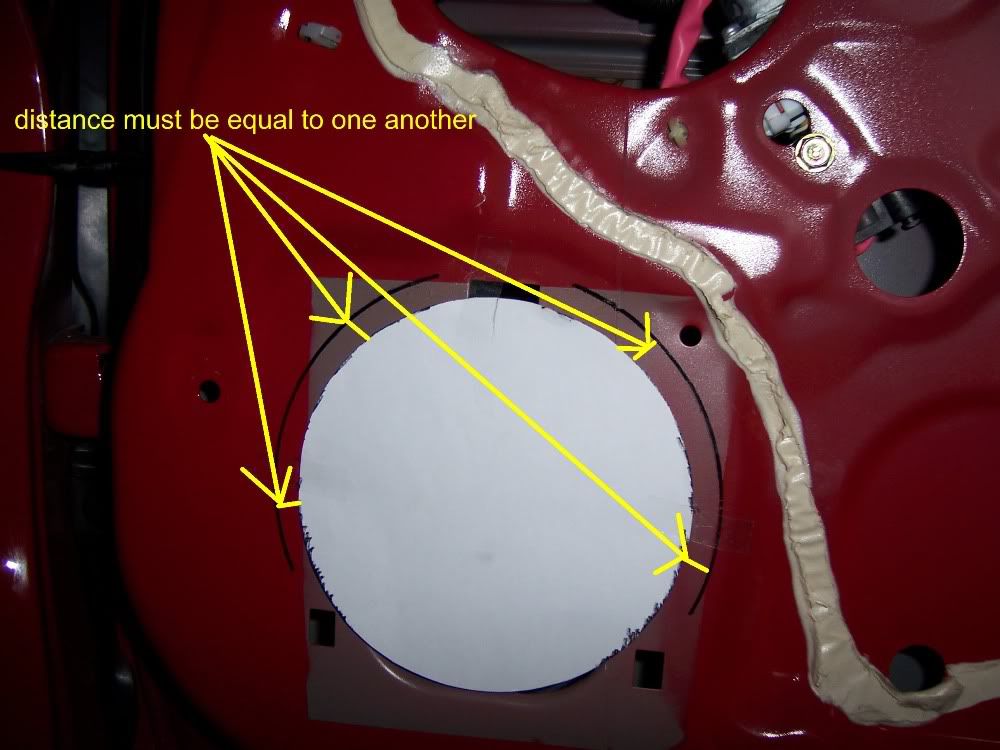
4. Secure the template with sticky tape.
5. Trace around the edge of the template with the permanent marker. And remove the template (taking care not to damage it – you will need it later!)
6. Stick some tracing paper onto the door and trace the lines (created in step 5) onto the tracing paper. Also, notice where the speaker is position is, it lies on a flat plane and there are boundaries where the door protrudes, trace along theses boundaries onto the tracing paper. (this will be a stencil for you speaker bracket) Make an extra copy of this for the other door.
7. Get and angle grinder and grind the door.  (PIC) Cut using multiple stokes perpendicular to the line rather than trying to cut along the line. I did not take a picture of this cause I did it all in one step. Please refer to the picture if you don’t know what I mean (PIC) Cut using multiple stokes perpendicular to the line rather than trying to cut along the line. I did not take a picture of this cause I did it all in one step. Please refer to the picture if you don’t know what I mean
8. File down the edge with the file to remove any burrs. 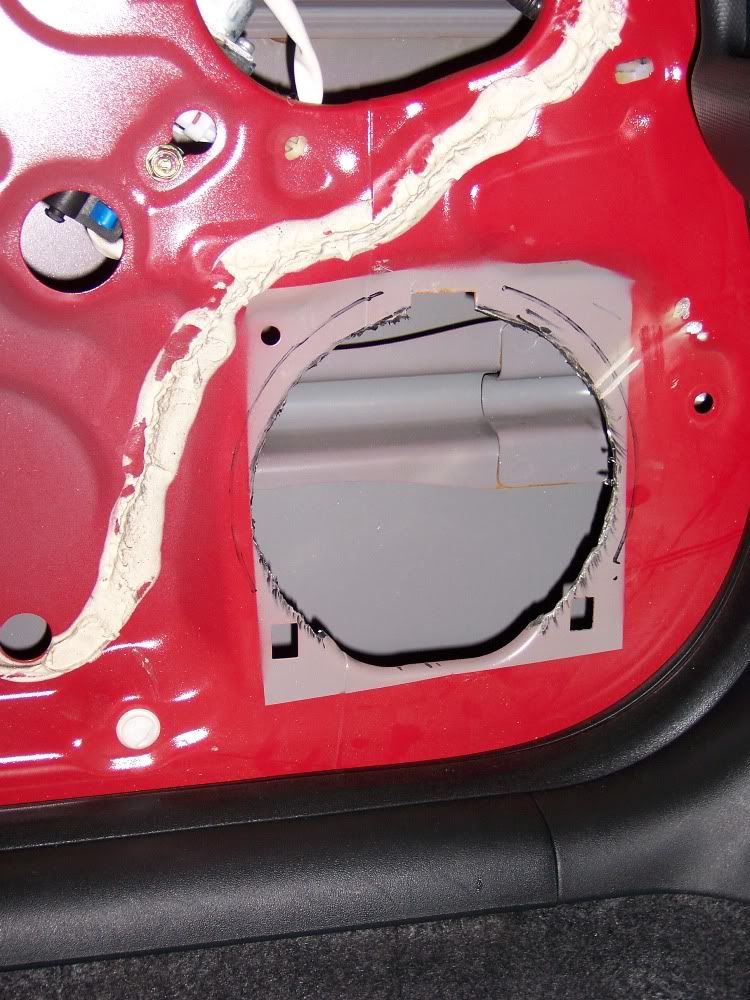
The speaker bracket
9. Place the stock speaker flat onto a piece of mdf and trace around the edges
10. Glue the tracing paper stencil onto a sheet of mdf. Wait for the glue to dry.
11. Cut the centre circle out first. Drill a hole in the centre of the circle first. Stick the jigsaw into the hole and cut along the lines.
12. Next step, it doesn’t really matter how you do it. You can make the bracket into what ever shape you please. Just keep in mind you need cut within the boundary lines (this ensure the speaker bracket lies flat onto the door). I choose this shape (Note how I left a small portion jutting out – this is to accommodate the top screw of the speaker) 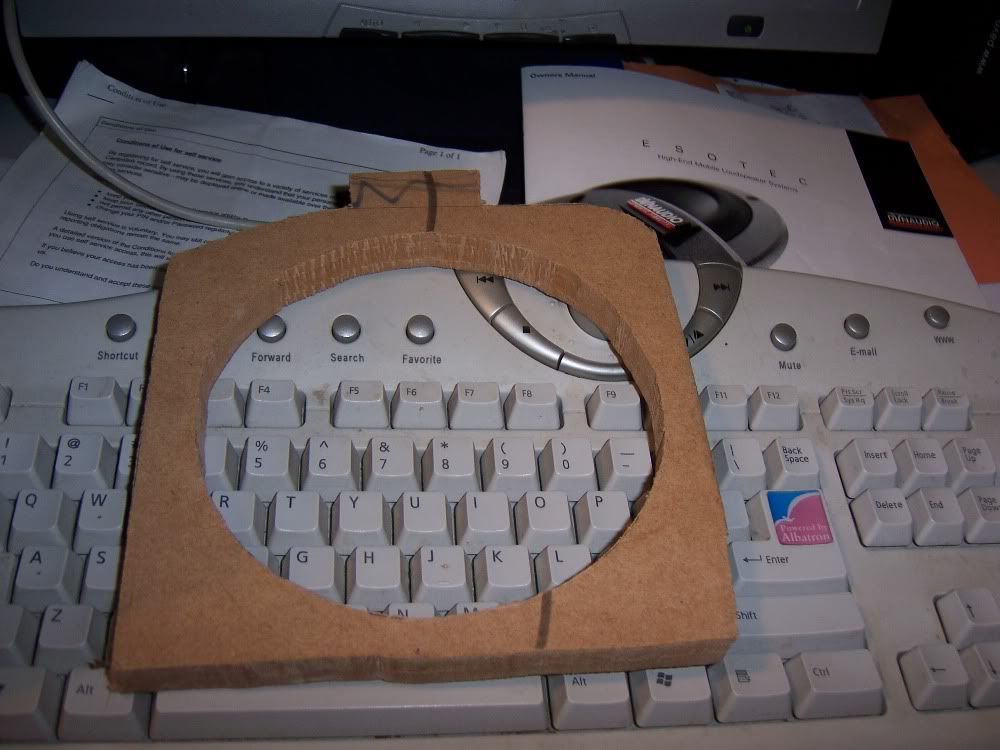
13. Drill holes for the 4 screw to go into place – I used an 8 mm bit. Use a 25mm spade bit to create a well for nut and washer to sit in without interfering with the speaker rim. 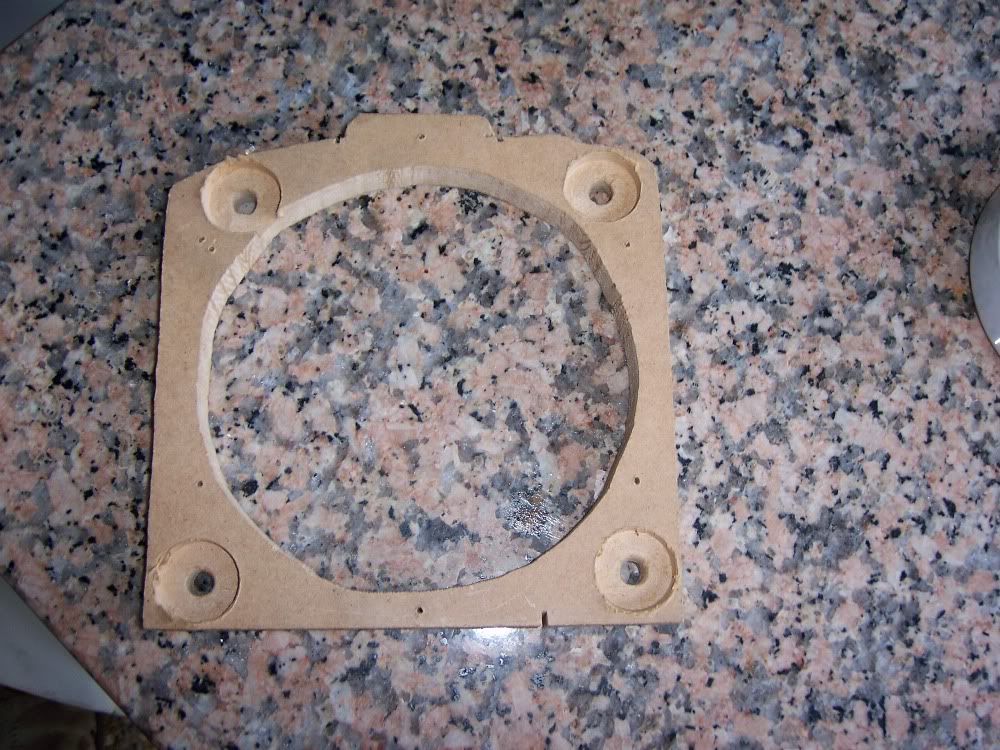
14. Place the speaker bracket onto the door and use a spirit level to ensure the bracket lies horizontal. Align the bracket so that the hole in the bracket lines up with the hole in the door. NB: Depending how you have cut your bracket, it may not perfectly fit flat onto the door – so use a file to take down any edges so that the hole in the bracket align exactly with hole in the door.
15. Once the speaker bracket is flat and aligned, clamp it down
16. Use a punch to make indents onto the door via the holes drilled in step 13.
17. Remove the bracket
18. Place a few layer of carpet behind the position to be drilled – this stops you from drilling into the other side of the door and making an ugly dent into the door panel which could be seen from the outside.
19. Drill the 4 holes using the 8 mm bit.
20. Get 1 piece of dynamat from the door and place it on the door.
21. cut out the centre hole
22. poke holes for the bolts to enter.
23. trace the bracket onto some mdf and cut it out the same way you did for the first backet – this makes the bracket which sits inside the door.
24. Place this second bracket onto the camping mat and cut it out along the bracket – this prevents the rear bracket from vibrating against the door.
25. place the washer onto the front bracket,
26. place the second washer onto the rear bracket.
27. Place the two brackets onto the door like so. 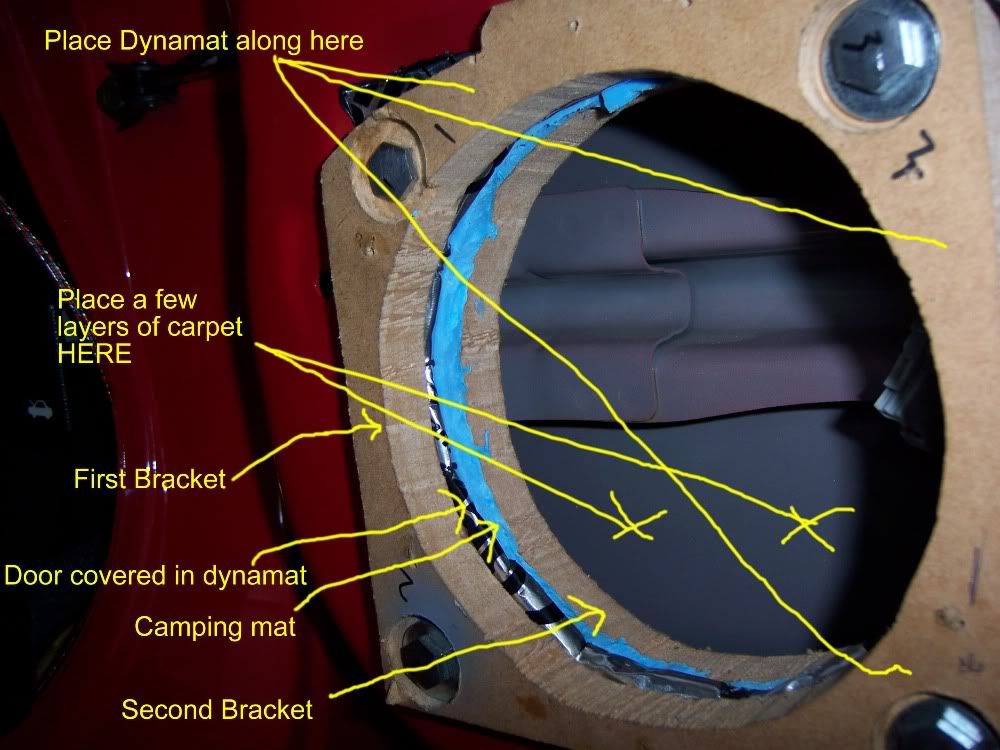
28. bolt everything together and use the second nut as a locking nut.
29. use any excess dynamat to line the top of the speaker bracket
30. Place the woofer cone ontop of the bracket and use a pencil to poke 6 positioning holes. Remove the woofer.
31. Drill pilot holes using the 2 mm drill bit
32. Place a few layers of small pieces of carpet directly behind the bracket to act as a diffuser plate.
33. Connect the speaker
34. Replace the speaker and screw the speaker into place.
35. dynamat the entire door.
36. This next step is optional however, if you choose to you can put camping mats into the door panel like so. 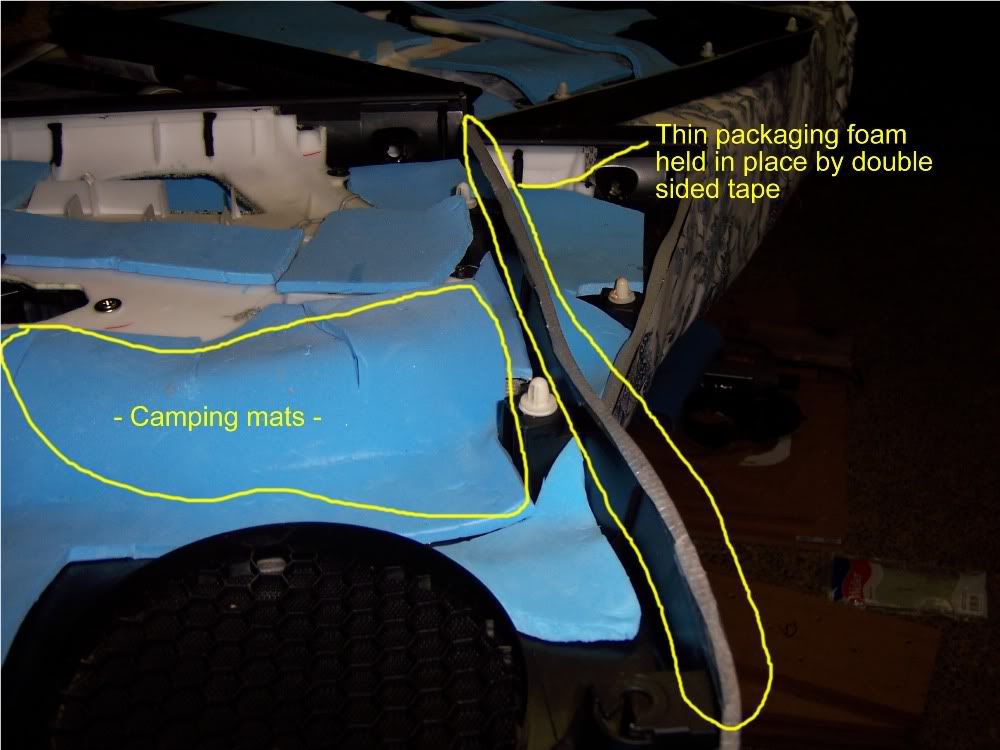
37. Run double sided tape along the entire edge of the door panel and apply the thin packaging foam ( I found this with my new lcd tv) on top of the double sided tape – this ensure that the door panel doesn’t rattle.
38. Use a razor blade to cut off any excess.
39. now there is a gap between the speaker rim and the door panel. Use the camping mat to cut out a donut shaped insulator. It should measure inner diameter of 14 cm and outer diameter of 170. (SORRY NO PICS FOR THIS ONE)
40. Place this over the speaker with double sided tape – it should fit perfectly around the speaker rim ONLY. If it touches any moving part/s of the speaker, cut it down and refit. – This will provide an air tight seal between the speaker and door panel
41. refit the door panel and enjoy.
42. 
Last edited by redmugenjazz; 08-06-2009 at 12:58 AM.
-
very very very professional install! and ever better speaker! dyns FTMFW yo!
Is this the end of my car modding days? Buying a house says so...
-
thnx man, i hope you use this article some day. hehe
-
Wow.
I'd so fail at this. not that im gonna do it, but was pretty creative stuff!
-
 Originally Posted by redmugenjazz

thnx man, i hope you use this article some day. hehe
maybe lol. no car is the same but what you do is basically the same but to the best quality. props to you on the packaging foam to seal it up. i have always used the closed cell foam you buy in strips from bunnings. stick it on with its self adhesive and shes good to go.
pic of my ek door. speaker mounted into door card, deadned with flashtac, and door card screwed into door deadened with dynamat, so still solid mount. then i put these closed cell foam on all the parts on the door that make contact with the door card. over kill but so has everything that i've done concerning car audio has been. do it once do it right. foam around speaker. i did one level higher than this. worked very well. much more solid midbass just from this alone.

Is this the end of my car modding days? Buying a house says so...
-
Originally Posted by xntrik
Wow.
I'd so fail at this. not that im gonna do it, but was pretty creative stuff!
You'd fail? i didnt even know a 3 door existed.... does it?? 
-
good thread! well explained!
-
it says 3 door on ur topic.. the jazz came in a 3 door?.. =S
-
Originally Posted by warwick108
it says 3 door on ur topic.. the jazz came in a 3 door?.. =S
lol, i write this ages back,dude, its the door of the gd3 jazz. not 'gd 3 door', my bad - misinterpretation, lol. its a four door hatch back.
Last edited by redmugenjazz; 12-05-2009 at 07:41 AM.
-
guys just be careful doing this as cutting the actual metal of the door is illegal and inroadworthy and in case of an insurance claim they pick it up insurance will not cover you!
a part from this great write up
-
Just a question on powering the speakers.
Did you have to connect an amp to help power those speakers? I really want to upgrade the sound system on my 04 jazz and I'm concerned with the power issues
-
Originally Posted by japa_VTEC
Just a question on powering the speakers.
Did you have to connect an amp to help power those speakers? I really want to upgrade the sound system on my 04 jazz and I'm concerned with the power issues
jazz power about 25-60 watts not even that - power to power the dyn speakers, 100w rms, i ran them off a 260 watt at 4 ohm amp.
 Posting Permissions
- You may not post new threads
- You may not post replies
- You may not post attachments
- You may not edit your posts
-
Forum Rules
|


 Reply With Quote
Bookmarks