Page 1 of 2 12 LastLast
Results 1 to 12 of 24
  1. #1
    Member Array
    Join Date
    Jun 2007
    Location
    Adel
    Car:
    DA3->EK1->DC2->

    DIY: Custom Stereo Harness for DC, EG & Others

    Disclaimer: The following are provided as a GUIDE ONLY, and neither myself. nor the original writer, nor Ozhonda
    take any responsibility for the outcomes of someone else doing the following. You follow these steps at your own risk!


    DIY Custom Stereo Harness
    By specialst


    Ever changed a stereo in your Honda and had to destroy your factory loom?
    - Maybe you spliced your new cables into the factory loom.
    - Maybe you got fed up and just didn’t give a shi*t and cut off the factory plug off completely and hard wired it straight in.
    - Perhaps you took it to the shop to be done.

    It’s time to create your own custom ‘adaptor’ loom. This concept is for making any and all harnesses. But for today, I will focus on making a stereo harness in my DC Integra in order to install an Alpine CDE-6881 I’ve had sitting around for about 2 years now.
    Honda used an identical loom plug for all their vehicles from 1986- 1998ish. The loom’s plug is the same shape and is perfect to use as our female end. That means all you civics and preludes as well!!

    What you need:
    - Wiring diagram for the target vehicle, my ’94 Teg. http://installdr.com/Harnesses/HA-Wiring.pdf
    - Wiring diagram for the new loom. Usually found attached to the deck via sticker.
    - Pen and Paper
    - Cable Joiners (approx 20), Supercheap Auto $3.97 15pk
    - Pliers
    - Cable crimpler/stripper thingy (I used scissors cos I dun have a cimpler LOL)
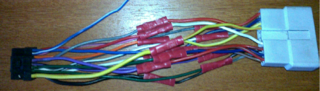
    - New head units loom (I’ve got one from an Alpine CDE-9881)
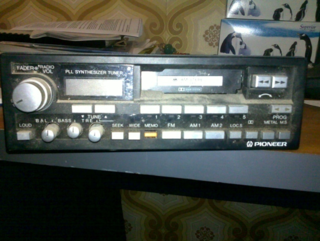
    - Old factory Honda stereo ($20 from wreckers):
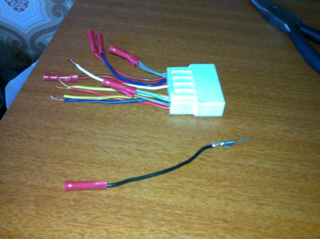
    We want the stereo loom (female side) hanging out the back. Source one out of a DA3 integra, BA prelude, ‘80s accord. Looks something like this

    This one is out of a ’89 Prelude. Its Pioneer with a Dolby System… OMG! Bargain!

    Preparing the Old Honda Loom:
    - Cut off the loom with ALL the cable attached, off the rear of the old Honda stereo.
    - Toss that deck into the trash can. After all we only wanted the female side loom plug.
    - Compare the positions of the wires on the installdr.com wiring diagram and the ’89 loom. This is done to ensure all the wires are in the proper position. DISREGARD THE COLOUR OF THE CABLE FOR NOW.
    - It appears that 1 cable needs relocating for my ’89 loom. Thus I need to remove pin N and relocate it to position G according to installdr.com’s diagram.

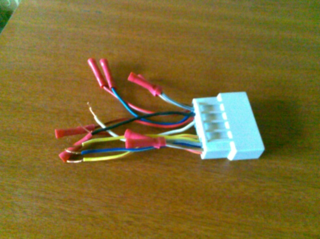
    - Now the loom is ready to accept the ’94 Teg Male plug.
    - You may choose to re-pin the entire loom plug so all the pretty colours match. I didn’t bother at all because the important thing is just to have cable in the required position.
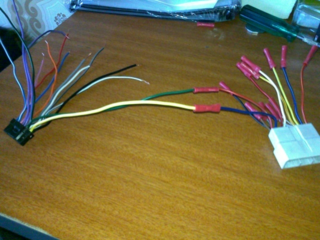
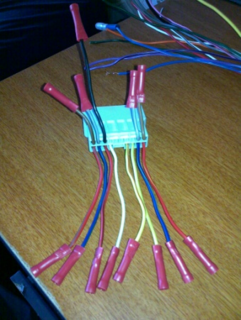
    - As you can see, I’ve trimmed, stripped and attached the cable joiners. Now is a good time to do so. Be careful not to trim the cables too much! Just a bit to even the cable lengths out. Again, minimal trimming since there is only about 5cm of cable to begin with!
    - This side of the loom is all set to go. Put it aside and lets move on.

    Preparing the Alpine Loom:
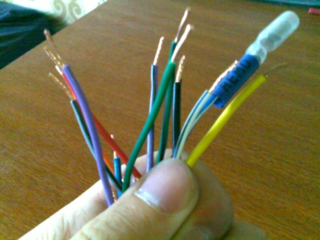
    - Trim and strip all cables
    - You can trim your cables here to a specific length and compensate for any odd lengths in the ’89 loom. Otherwise you will get a loom which looks like a mess.
    Eg. You want your Honda-Alpine in between cable length to be 10cm. Your Honda side ground cable is 3cm. Your alpine side ground cable is 12cm. You can trim your alpine side ground cable 5cm. Once you join the 2 cables, the overall length will be 10cm. Do this for all your cables and the end product will be quite neat.


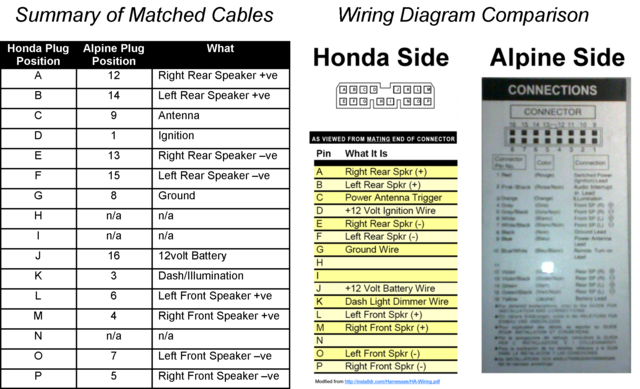
    Paperwork – Matching the cables between the Honda and Alpine Looms:
    - Pull out the Install Dr diagram and Alpine Diagram and put them side by side. I just printed mine.
    - Write out which cable position corresponds between the 2 looms.
    - Here’s one I prepared earlier…


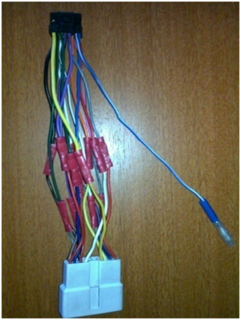
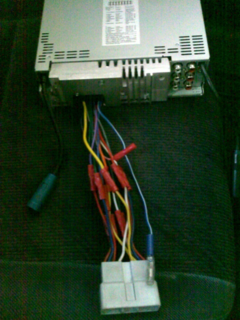
    Making the Custom Loom:
    - Here's where it all comes together.
    - Now that you know which cable will correspond to which between looms, time to carefully begin joining corresponding cables together.
    - Make sure you check and double check before crimping cables. Otherwise you will need to cut and re-join. I made a few mistakes and thus my loom doesn’t look as neat as it should.

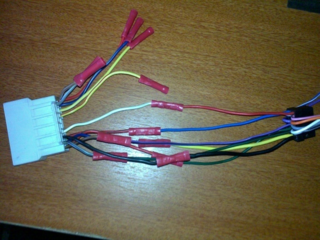
    - Sit back for a moment and admire your custom loom.
    - If all cables have been joined correctly…. Plug ‘n’ Play
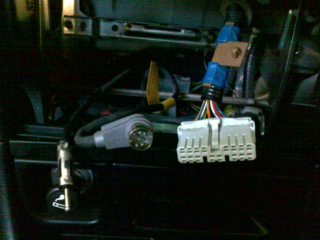
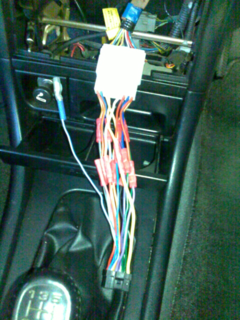
    In the Car:
    - This section is a bunch of pics which illustrate how it looks when it all fits together

    DC Integra in Car Plugs:
    left to right: Antenna, Factory Honda Stacker, Stereo Male Loom Plug


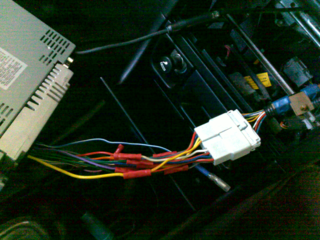
    Custom Harness Attached to DC Integra Male Plug:


    Custom Harness Attached to Alpine Unit:


    Custom Harness Attached to DC Integra and Alpine Unit:


    Conclusion:
    And thats how you can create your own custom stereo loom without sacrificing the factory male plug. Hope you found this DIY useful and please feel free to leave comments. If ive left something out please point it out because this is my first DIY write up.

    Cheers.

    PDF: http://www.megaupload.com/?d=SS1AS1X0
    or: http://rapidshare.com/files/20280006...EG_DC.pdf.html
    Last edited by specialst; 28-02-2009 at 07:50 PM.

  2. #2
    Member Array
    Join Date
    Jul 2007
    Location
    JDMD15B
    Car:
    14EGs/8EDs/3EKs
    Decent writeup.

    I wasn't bothered to do this, I just spliced and hardwired + soldered my own harness preety much the same as this without having to use anything else

    +1 rep for your effort though
    JDM D15B - you wouldn't understand

    No K-SWAP ? No worries - Unfriend

  3. #3
    Member Array
    Join Date
    Aug 2005
    Location
    Brisbane / FGH AUTO & TYRES
    Car:
    Ek
    or you can goto auto barn and buy the connectors harness plug and play for $25 each
    no need to chop and join... and looks way neater

  4. #4
    Member Array
    Join Date
    Jun 2007
    Location
    Adel
    Car:
    DA3->EK1->DC2->
    Quote Originally Posted by tiksie View Post
    Decent writeup.

    I wasn't bothered to do this, I just spliced and hardwired + soldered my own harness preety much the same as this without having to use anything else

    +1 rep for your effort though
    thanks bro

    Quote Originally Posted by lenz View Post
    or you can goto auto barn and buy the connectors harness plug and play for $25 each
    no need to chop and join... and looks way neater
    if only i knew earlier i could buy these pre-made for $25... sigh. it was fun at least to DIY.

  5. #5
    Member Array
    Join Date
    Jun 2007
    Location
    Victoria
    Car:
    Civic EG4 GLi
    it's good to see you put the effort in to have a go. I just hope it didn't cost more than $25.
    this DIY article is put together well also, no one could have a problem following it.

  6. #6
    Member Array
    Join Date
    Sep 2006
    Location
    Out in Nature
    Car:
    91 eg5 b16a
    Great DIY!!

    $25 is still $25.

    DIY is always fun!!

    Well done!

  7. #7
    Newcomer Array
    Join Date
    Oct 2007
    Location
    Melb
    Car:
    FD2
    Quote Originally Posted by beeza View Post
    Great DIY!!

    $25 is still $25.

    DIY is always fun!!

    Well done!
    so true... viva DIY

  8. #8
    yeah but do it properly! did a DIY headunit install on the weekend and bought two wiring harnesses, one for the deck and the other to the honda harness HOWEVER the previous owner spliced and diced and soldered the honda connector ( between the connector and the main honda harnes?? i dont know wdf for) anyways speakers cut in and out so i assume i got to find out the speaker wires and trace it....

    anyone know any way of replacing this cut up mess? with new harness?

  9. #9
    Member Array
    Join Date
    Jun 2007
    Location
    Adel
    Car:
    DA3->EK1->DC2->
    Quote Originally Posted by dtrang View Post
    yeah but do it properly! did a DIY headunit install on the weekend and bought two wiring harnesses, one for the deck and the other to the honda harness HOWEVER the previous owner spliced and diced and soldered the honda connector ( between the connector and the main honda harnes?? i dont know wdf for) anyways speakers cut in and out so i assume i got to find out the speaker wires and trace it....

    anyone know any way of replacing this cut up mess? with new harness?
    sometimes shops (not naming any) will solder into your original car loom as well. might not have been the last owner. if your car loom has been soldered into, not much u can do man.

    u can always solder ur new deck into the existing exposed wire =D and wrap it in shrink wrap/elctrical tape. or find another male loom and cut n splice.

    as for speakers cutting in and out. trace the line and i rckn its where you did your connection. else, speaker fckd? a dead leg in the cable is unlikely.

    if u want to cut out and replace ur car loom, i have a spare male loom from a BA4 which has an identical plug to your dc4 if u want it. (except a couple of cables in a different position). i wont be using it for anything. i chopped it out of the BA4 along with the deck when i sourced it from the wreckers.
    Last edited by specialst; 07-04-2009 at 08:32 PM.

  10. #10
    Member Array
    Join Date
    Jun 2007
    Location
    Adel
    Car:
    DA3->EK1->DC2->
    if u really having troubles, i can give u a hand during the uni holidays dude. give me a buzz if u need a hand. u got my number anyhow.

  11. #11
    Cheers for the reply will check it out when I have time. I have your number? Really? Who's this?

  12. #12
    Member Array
    Join Date
    Jun 2007
    Location
    Adel
    Car:
    DA3->EK1->DC2->
    Quote Originally Posted by dtrang View Post
    Cheers for the reply will check it out when I have time. I have your number? Really? Who's this?
    PM Sent.

Posting Permissions

  • You may not post new threads
  • You may not post replies
  • You may not post attachments
  • You may not edit your posts
  •  
Powered by vBadvanced CMPS v4.1.3


Terms and Conditions
Ozhonda.com is in no way affiliated with the Honda motor company or Honda Australia in anyway whatsoever.