|
-
Cold Air Intake - DIY DC2 stealth intake < $150
Hey Guys,
Quick disclaimer, I'm not pro at this or fabrication and definately not photography, so don’t take my word for anything and don’t expect much from the pics I have been building my CAI over the last couple days and I just thought I'd document it in case there are any other DC2 peeps who have been wanting a washable pod in their ride. My aim was not to add Xhp or YNm, the purpose was to fit a washable K&N pod to the vehicle and improve induction sound for the driver without affecting roadworthy-ness for the silly modification laws that we have to suffer on the east coast I have been building my CAI over the last couple days and I just thought I'd document it in case there are any other DC2 peeps who have been wanting a washable pod in their ride. My aim was not to add Xhp or YNm, the purpose was to fit a washable K&N pod to the vehicle and improve induction sound for the driver without affecting roadworthy-ness for the silly modification laws that we have to suffer on the east coast  The vehicle is my newly aquired 1999 DC2 VTi-R. The vehicle is my newly aquired 1999 DC2 VTi-R.
Sooo here goes...
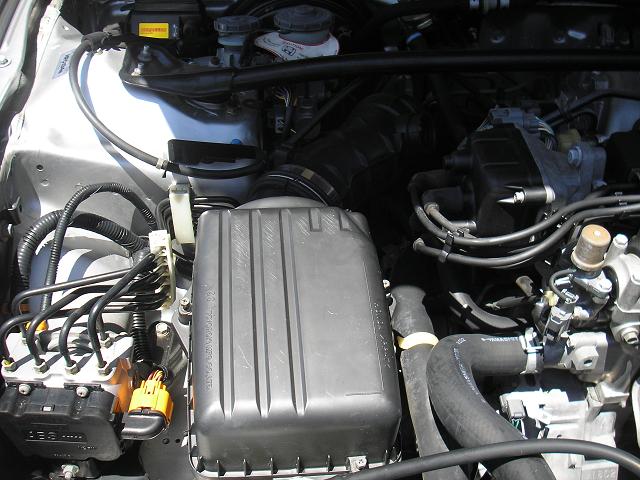
STAGE 1 (Install pod filter and remove stock resonator):
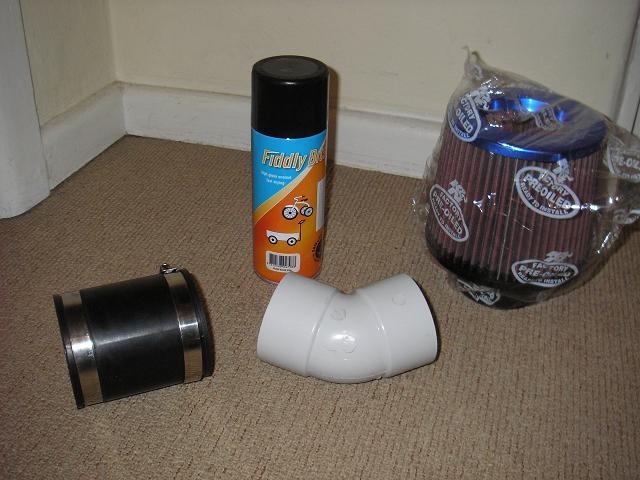
1) Obtain supplies! All I needed was a pod (I am loyal K&N fan after my last car) and some stuff from bunnings to build the adaptor. My dockets looked like this:
Supercheap Auto: K&N RR3002 ------- $ 80 (obviously that wasn’t all I bought, supercheap is awesome during sales ) )
Bunnings Warehouse: Sandpaper ---- $ 1.53
Jenco Joiner-Rubber 65mm ------------ $ 18.13
Spray Paint ------------------------------ $ 3.15
PVC Bend 65mmx45 -------------------- $ 6.75
------------------------------------------------------------
-------------------------------------------- $ 109.56 (read, bargain)
------------------------------------------------------------
Obviously the paint and sandpaper are optional, the rest of the stuff can be found in the plumbing isles (at Oakleigh South, its close to the drainpipe and sewage piping).
2) Assemble adaptor! First step was to cut the Joiner-Rubber thingy in half, otherwise it’ll be too long to fit nicely in the stock airbox. I used my dremel which I DO NOT recommend – it makes a massive mess and I had one cutting disc explode on me. If you are going to use something like that, use eye protection – if it wasn’t 10pm last night I would have gone for a thin hacksaw. Sand it afterwards to remove any rubber filaments that could get into the engine. Then, after masking the section of the pipe that you want the (halved) joiner to go on, sand it back and spray it up (optional)!
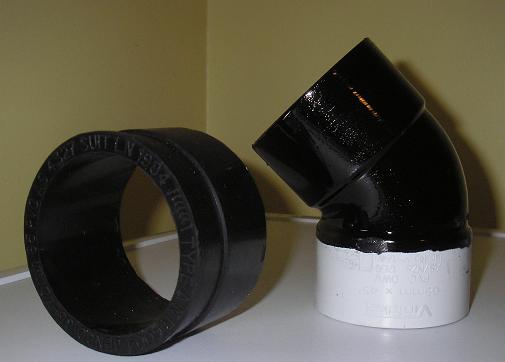
After the paint is dry (or before if you don’t mind some finger marks and you’re impatient like me) the fun begins. It was a bit of a struggle to get the joiner on but with some patience and strong fingers you can “walk” it down the pipe, I took it over the drying paint a little to super seal it You can also use a table and push down gradually letting your weight do the work. Now your adaptor is ready and you can install the pod!
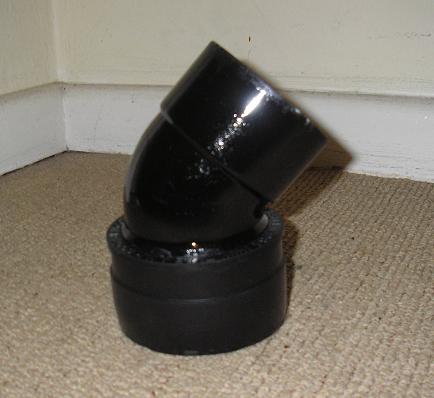
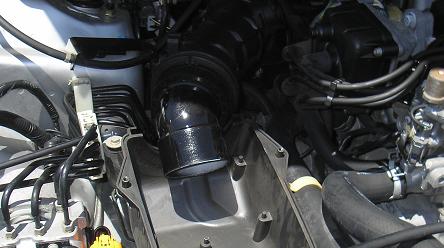
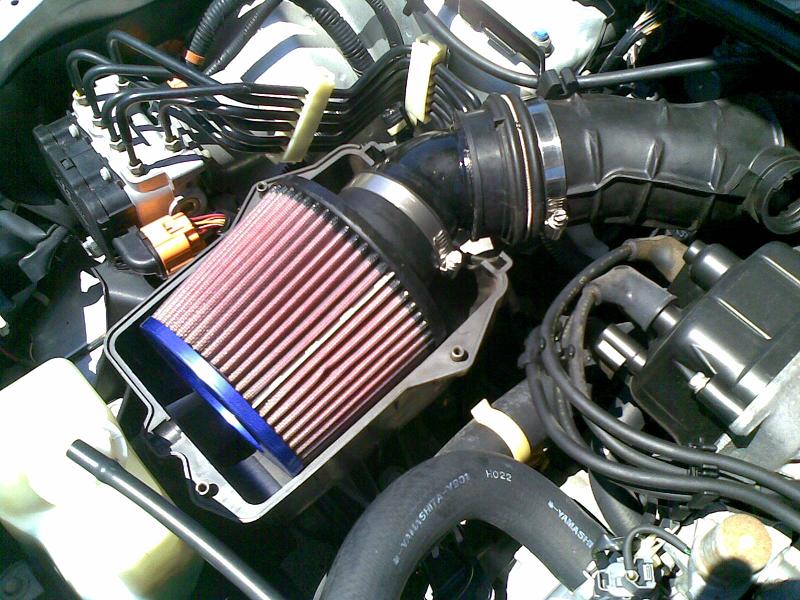
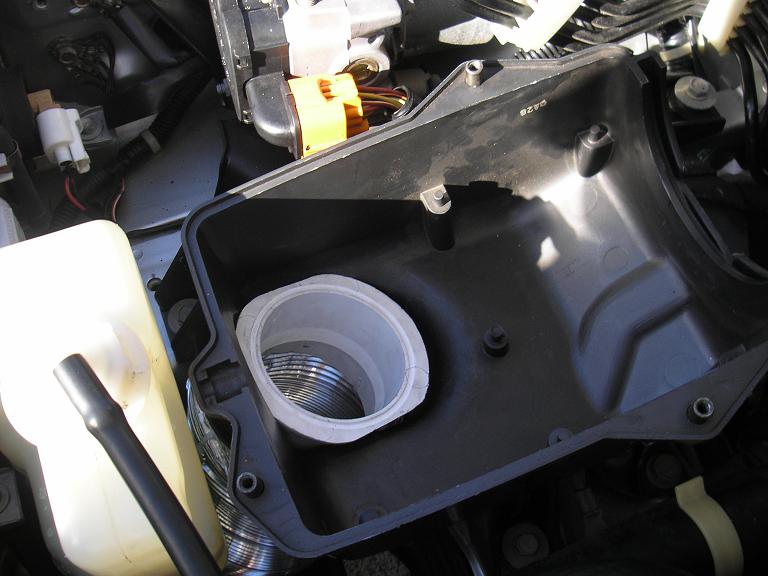
3) Installing the pod is not rocket science either. I put the adaptor in first, after taking off that springy thing that’s on the stock airhose. Afterwards you can stretch the springy thing back on, my technique was to use two screwdrivers to stake it in the groove that it lives in and work my way around the pipe. I added one of the clamps from the joiner for good measure (and cos it was shiny). The pod slips onto the painted end of the PVC pipe no worries, replace the airbox lid and that’s the filter installed! Mine is a very tight fit but I wouldn’t worry – I’m not a pneumatics engineer but I reckon the K&N flows much better than the standard paper filter and even though it is touching the sides, there are gaps to allow air around and through the upwards facing sides of the filter (circle in a square kinda styles). In fact I’d suggest that some restriction on the intake is good, seeing as the standard restrictions have been removed…
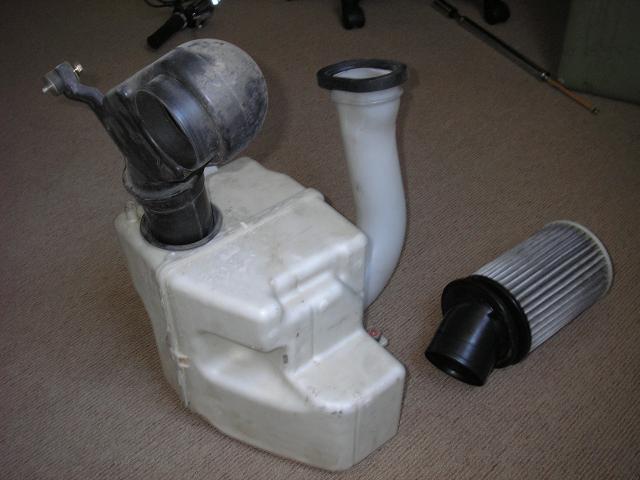
4) Removing the standard resonator is free and good for induction noise. I didn’t take many photos of this – its bloody hot out there today and I was struggling just to get the work done First step is to turn the front wheels all the way to the left (hot tip). Then its not hard, you only have to partially remove the inside guard trim and the forward splash protector. I think it was 3 screws (one in the front underneath, two on the inside of the wheel arch) 2 funny Honda fasteners (they look like bolts but screw into plastic “expanding bevels” and are required to pull back the forward splash protector) and one different Honda fastener (a lil plastic pin in an expanding bevel, for the inside fender guard).
Then you can gently bend the guards out and get to the resonator bolts – there are two. Once these are out, you can pull the resonator down, it requires a little bit of jiggling but should come fairly easy. Finally, there’s an intake “scoop” that goes back into the engine bay, one more bolt out and your sweet!
STAGE 2 (CAI ducting)
1) Shopping list:
Bunnings Warehouse:
Gutter Outlet 75mm ----------------------- $1.98
Gutter Access 80mm Dropper Outlet ---- $2.95
Airflex Rangehood 100mmx3000mm ----- $ 28.79
30cm cable ties ---------------------------- $2
(and i used a teeny length of old vacuum hose ~0.4m and some cable ties I found)
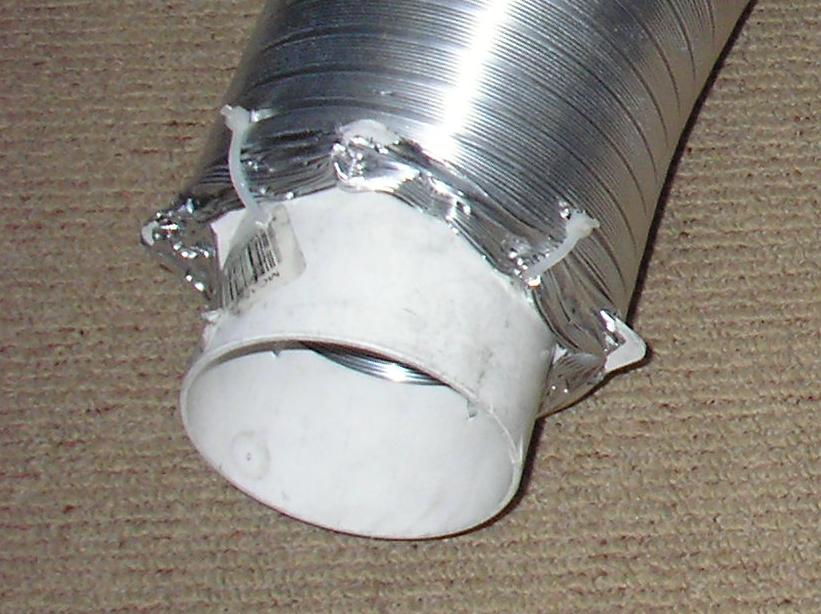
2) Assemble adaptor! Soooo to get the pipe into the airbox, (the pipe is 100mm, the airbox opening is a wierd oval) I decided to use the PVC pipage. I cant remember which one from above but yeh the picture makes it obvious. The ducting is not fun to work with, next time (or when it breaks) I'll be trying a rubber equivalent (as someone has mentioned below). Drill a few small holes in the PVC bit and then cut slots to allow the rectangular flange to slot into the ally ducting. Take some care with this, the ducting can cut u up and tears a little too easily. I started with a slot, then guess the position of the next one, make a small hole and work your way around. It might take a few gos but dont worry, the 3m of pipe allows for lots of mistakes (you only really need a 1-1.5m length).
3) Then get it in the car! I jacked the front up as high as my baby trolley jack would go and took off the driver side inner fender guard and front splash panel. For the front splash panel, just taking it half off it really enough, it depends on you (will post pics from under the car soon). The mouth of the adaptor you built above should be forced into the bottom of the airbox (it goes a little oval shaped). Then the other PVC part slots in from above and forms a press fit. I think the press fit should be enough to keep it all in place - but I've only done a couple days testing up until now.
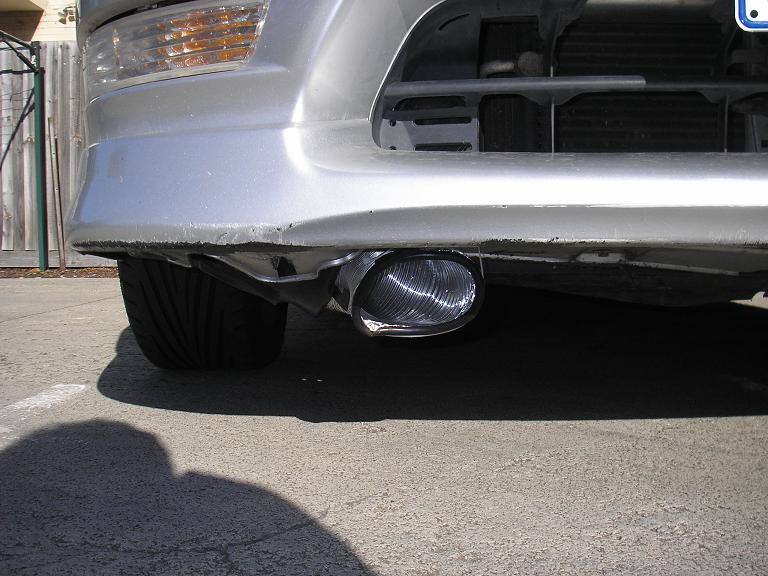
4) Fix the duct opening. I just used 2 30cm cable ties from the 2buck shop joined together and bound to the splash panel. You need to carefully push the circular opening into a bit of an oval to ensure that your ground clearance is OK. As long as its 10cm above the ground, its legal. I also used some vacuum hose, split down the middle as edging for the ally opening so that no people or cats could end up cut on it.
Since stage 1, I've had the thermostat fixed and the car is running better. I had been driving around with the paper filter back in so that I didnt get busted by warranty (paranoid! ) and now, with both the pod and ducting, the sound is definately improved and I have subjectively felt a definate improvement in throttle response. No dyno results but I dont believe in them All I care is now I can wash my filter and my car goes vrooooom without a stupidly loud zorst. yay!
Toix
Last edited by toix; 13-01-2010 at 05:46 PM.
Reason: CAI stage 2
-
Is that the stock dc2r airbox? I never knew a pod filter like that fits in there LOLS.
I wonder if the 3A racing one fits in the stock airbox =/ I dont want an exposed pod.
Too much hassle.
Rep to you with useful info on what item is needed for this DIY.
cheers mate 
-
-
im positive the K&N make a pod specifially for the dc2 that directly replaces the stock 1.
-
title is wrong. this isnt a cold air intake. its factory airbox with a pod
-
 Originally Posted by tct

im positive the K&N make a pod specifially for the dc2 that directly replaces the stock 1.
Yes you are right.
GSi_PSi is right too, LOL.
Sorry Toix I know this was a lot of effort, but this actually does nothing special. You could have simply bought a K&N replacement filter. It's a pod to begin with, and just replaces the stock one without modifying the hose. Then if you want just go under and remove the resonator.
-
Cant you just buy one of those metal connector pipes for like $10.
Anyways, good to see ghetto domestic market is back in town.
-
all u had to do was break of ur old air filter and stick the pod to the end of it or buy the replacement k&n
Last edited by imratedpg; 31-12-2009 at 08:46 AM.
-
hehe thx for feedback, i might have searched a bit harder for that k&n drop in had i known about it and not wanted this on the car immediately... regardless, this is just the kinda thing i like to do in my holidays
@tct - where do you get this from, i didnt see one anywhere (admittedly i did not look vey hard)? if its not at supercheap or repco its a moot point, I didnt want to have to wait for shipping etc
@GsiPsi - a cold air intake by definition is an induction system that recieves cool air from outside the engine bay and directs it into the engine. the presence of the factory airbox does not change this fact (and has been included to comply with draconian laws in a cheap and easy fashion). granted, until "stage 2" when I get the ducting in, it is not a true CAI but the first post clearly stated STAGE 1 - i mean all the other CAI products out there are just tubes with a pod arent they?
@imratedpg - i considered this first off. however i could see a few small issues with this, namely; the inside diameter of the factory air filter is larger than the k&n inlet, not guaranteeing airtight seal, gluing plastic to the rubber/polyurethane pod is not ideal and finally, the height offset of the factory filter, to put it lower in the airbox would probably mean the pod would not fit. Lastly, it would look s&^t and it was a major requirement that this looks factory on inspection by any pigdog...
-
interested to see how u go about designing the ducting. what type of duct r u using?
i had a look at using semi rigid aluminium ducting
kinda cheap at $50 for 3m

-
what are you guys all have in your what's the best air intake to buy or material. i've been looking i was thinking of getting AEM V2 but people say its better to make your own and cheaper. so this DIY intake will not improve any performance. where will you be able to purchase these steel pipes or allumium ones and anyone keen on taking pics of how to make one  . .
-
buy an injen or fujita cold air intake, dyno proven performance,
 Posting Permissions
- You may not post new threads
- You may not post replies
- You may not post attachments
- You may not edit your posts
-
Forum Rules
|


 Reply With Quote
Bookmarks