|
-
DC2R muffler fitted to EG civic hatch (Lots of pics)
Disclaimer: The following is provided as a GUIDE ONLY, and neither myself nor Ozhonda take any responsibility for the outcomes of someone else doing the following. You follow these steps at your own risk!
Aim: Fit a quiet muffler with good flow, instead of a drone canon ect. I could have paid a muffler shop to fit it, but if i do it myself i know its going to be the way i want it and also to save money 
-Car is an EG5 B16a, i am not sure but it most likely the EG5 B pipe
-There are many people who say it will fit but without proper visual evidence and there are even more people who say it won't fit.
-The opportunity presented itself and i took the challenge

Required: DC2R muffler, old muffler, welding gear, die grinder, angle grinder, paint, drop saw with a grinding blade, mechanical experience, common sense and patience
Steps:
-Disconnect battery
-Unbolt the sway bar and let it hang down, unbolt the two 12mm spring bolts from the flange, spray the mount holes on the body side, not muffler side with wd40 and pry them off and test fit the dc2r muffler, she will not fit.
-By cutting of the hangers from the old muffler and welding them to the existing hangers, extends the muffler towards the rear. Remember to weld the hangers on the side so you retain the muffler drop height, as its perfect


-Once the end of the muffler is in place, measure approximately how much shorter it would need to be cut, keeping in mind, we are cutting off the flange and leaving a bit extra to slip inside the flange.
-Both mufflers side by side
-Cut the flange off after weld on the flange side, as if you cut the other side you will not be able to stick your pipe inside.

-Then bolt the flange temporarily onto the exhaust, ensuring its straight and even.
-Vaseline the mounts as the muffler will be coming out a few times
-Refit the muffler and measure by eye where to cut, i cut right before the pipe bends, but after that found it to be bit too long so i cut it a little bit extra, total about 35mm.


-Remember to leave slight length to miss the rear sway bar (if fitted)

-The muffler will come very close to the bumper, touching it in my case, but thats ok, shaving a bit off the bumper will stop it from rubbing and look much neater as the standard cut outs in the bumper don't quite match the dc2r muffler.

-Once the muffler is cut to length, it fits inside the flange (which might have to be done outside of the car), once you are happy with the distance from the sway bar (mine is about 1cm gap) and you have shaved the bumper slightly and you are happy with how close it sits to the bumper.


-Fit the muffler as if it were the finished product.
-Make sure the flange is straight and the bolt holes are lines up

-Put a couple of spot welds on the flange.

-As the tip does protrude horribly, a measurement is to be taken of the cutting points, keeping in mind the very upper section of the tip is to be inline with the lower section of the bumper. BMW's theory is the air traveling from the draft cut the sounds waves slightly, reducing noise slightly. Plus it keeps with the look


-With the muffler out of the car, weld the flange all the way around, clean up the inside of the flange with a die grinder and emery tape or better yet don't blow a hole the the pipe lol (its been a while)


-Do not use a clamp style pipe cutter (the ones that look like a pair of vice grips with bike chain attached) to shorten the tip, i should have used a drop saw or angle grinder. Its much thinner and squeezable than i thought

-I ended up cutting another tip i had spare and funny enough it was the exact same diameter

-There is a large chrome pipe on the outside (visible) and a small pipe on the inside (not so visible)
-The entire tip assembly is cut off just after the weld on the muffler body side

-This is what you end up with, i painted it to prevent rust
-The new tip cut to length
-Muffler again fitted to the car, tip located central and longer portion at the very top with the aid of another person sighting, tip marked or spot welded if possible.
-Muffler removed again, welded all the way around but the bottom, i like to leave a hole at the bottom to deter water from sitting.

-Test fit again, start the car and check for leaks at your flange.
-Taped off the tip, after the weld of coarse and painted it to prevent rust on the welds and so it looks nice.


-Before fitting, i bended the fuel tank seam up slightly to prevent knocking, clean up the section cut at the bottom of the rear bumper

-Fit the muffler, fit the sway bar with the aid of a friend pulling the muffler back a bit to you can start the bolts and tighten it up with a 1/4" ratchet and 12mm socket.
-Stand back and behold its glory
Other comments
-I do believe it was worth the effort, good, quiet muffler, fitted just the way i wanted
Thanks for reading, hope this helps others
Last edited by chowdaa; 08-06-2011 at 08:47 PM.
-
Will post the final shot soon, forgot all about it, sorry everyone
-
Does it offer any improvement to how it sounds?
This is on what engine? and have you modified your exhaust system at all?
-
Quiet with a bite when accelerating, the car is an EG with b16a, possibly a standard EG5 SI exhaust.
-
I can appreciate all the effort you put in to this, but was it worth it at all ?
JDM D15B - you wouldn't understand
No K-SWAP ? No worries - Unfriend
-
For me yes, but your average joe, i would just pay someguy to do it lol but it was just something to show people it can be done.
-
i love the sound of stock Dc2 exhausts =)
-
got a video slip of how it sounds ? it be great if you did .
-
what kind of welder did you use? - sorry noob
Mind posting up pic of your welder?
-
Awesome DIY.
But more effort than it's worth imo. Aren't EK9 mufflers the same as DC2R but the correct length and size to fit EG.
-
ek9 muffler isnt as readily available as dc2r.
chowdaa, much respect for your effort. you did a really awesome job.
S P A M | W O R K S
With our special rotational tires, it will allow you to drive very fast. - JK Tyre
-
may i ask, why not use the piping from the other muffler and jsut weld it near the muffler ?
EDIT
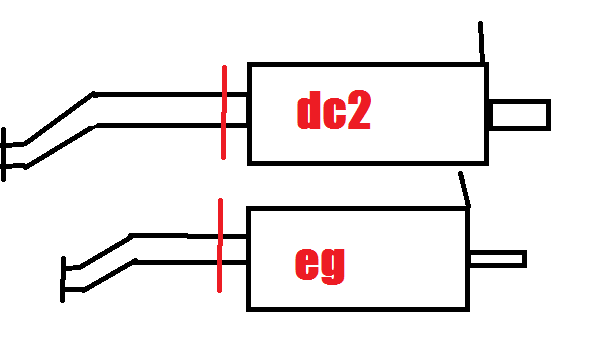
like where the red line is ?? or somewhere long there ?
Last edited by viinnh; 15-06-2011 at 09:22 PM.
 Posting Permissions
- You may not post new threads
- You may not post replies
- You may not post attachments
- You may not edit your posts
-
Forum Rules
|


 Reply With Quote
Bookmarks