

These instructions are for wiring a PAC SWI-X into a 2009-2012 Honda Odyssey.
The SWI-X is designed for head units that do NOT have a rear socket input for the adaptor - i.e. head units that rely on an IR remote only.
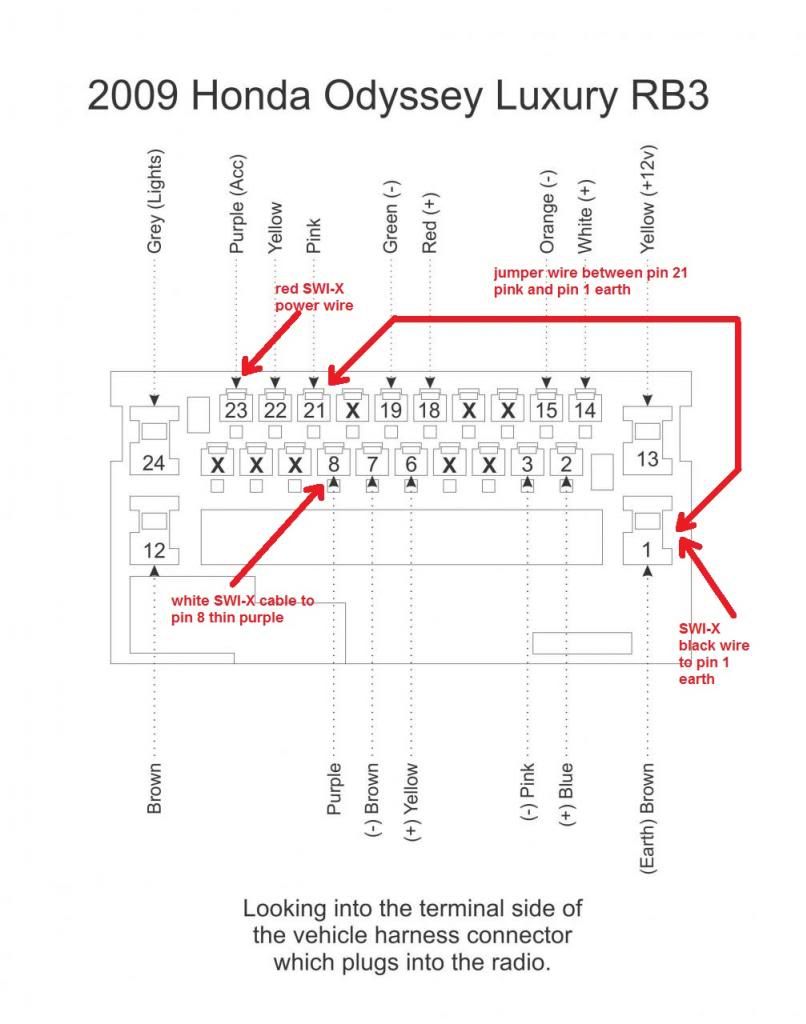
Preparation and wiring in;
Disconnect the earth in the engine bay
Locate the wires you'll need on the factory harness/loom
- Pin 1 - black - earth/ground
Pin 23 - purple - Acc
Pin 21 - pink (thin)
Pin 8 - purple (thin)
Connect the red SWI-X Acc power wire to pin 23 (purple) on the car loom
Connect the black SWI-X ground wire to pin 1 (ground) on the car loom
Connect the white SWI-X signal sender wire to pin 8 (other purple) on the car loom
Connect a jumper wire between pin 21 (pink) and pin 1 (ground)
(Thanks to Mr Honda for the original plug diagram)
On the SWI-X, cut the purple loop wire and connect the 560 Ohm resistor (with green, blue, brown stripes) that came in the packet between the inner length of the purple loop wire and the white sender wire. Here's mine from tonight
Reconnect the ground on the battery.
Programming;
1. Press and hold down the programming button on the SWI-X
2. Turn the key in the ignition to Acc
3. Let go of the program button on the SWI-X
4. Within 7 seconds, push the program button nine (9) times and then wait
5. After a few seconds, the SWI-X leds will flash back at you 9 times to confirm the version number - version 9.
6. Turn the Acc off with the car keys
7. Turn the Acc back on
8. Press and let go the program button on the SWI-X
9. Press the Mode button on the steering wheel and let go of it once the light on the SWI-X goes out
10. Within 7 seconds, aim the head unit remote control at the SWI-X sensor located next to the program button, pressing the corresponding Mode button on the IR remote at the same time
11. Let it go when the SWI-X light goes out
12. Press the volume up on the steering wheel
13. Within 7 seconds, aim and press the correspondng IR remote control button until the SWI-X light turns off
Repeat steps 9-13 until all the steering wheel buttons are programmed
14. When finished, let the SWI-X time out after 7 seconds and it will flash to confirm programming is saved and completed.
15. Position the SWI-X remote sender bulb (on the end of the long cable that comes out the opposite end of the multi-coloured SWI-X loom) within eyesight of the remote sensor on your head unit. Try to avoid direct sunlight or bright light on the sender and receiver otherwise the function will be impaired. If this cannot be avoided, try fashioning a small half round plastic cap peak out of a texter pen to shield each sender/receiver.
I did this tonight for my Clarion HX-D2 in my 2010 Ody Lux and it works perfectly. Here's my sender mounted neatly into my front ceiling light
I hope this helps someone.
Any questions, feel free to ask.


 Reply With Quote
Bookmarks