|
-
 [Cl9] How I swapped my cloth interior to leather in 04 Accord Euro [Cl9] How I swapped my cloth interior to leather in 04 Accord Euro
Okay, so I have noticed a few people around (including myself till recently) wondering how they can swap over their cloth interior to leather (manual to electric seats). After buying a leather interior online, I was hoping to get an auto electrician to install the front seats (at a reasonable price). I got quoted 700 up to a thousand to do it so I decided to do it myself. After a fair bit of research on roughly how, I spent an afternoon installing the fronts and I took some pics to make into a rough guide.
Firstly, I am not a professional auto electrician and this isn't the tidiest method.
Secondly and more importantly, I ended up with an airbag warning light at the end of the installation despite disconnecting the battery during the whole process. Following my steps you will most likely get a warning light on as well and something you need to weigh up before doing this swap following this guide.
Apparently there is a way to fix it.
http://www.ozhonda.com/forum/showthr...Warnings-(CL9) Kreston's post in the DIY thread on his method of bypassing the SRS errors
When buying an interior make sure:
1) It is complete i.e. four door inserts, center console armrest, two front seats, back seats with side bolsters (part between back seat and door)
2)Make the front seats come with wiring harnesses' and seat belt buckles. If not, you could probably harvest the belt buckle from your current seats(not the wiring harness'), but that will need to include all the wiring etc. which would be a real pain.
3)Get a sense of the condition of the interior, usually when buying from a wreckers the interior may get scratched and damaged at some point which will stick out like sore thumb when installed in your car. So be aware of this, especially if ordering online, ask the seller questions etc. I bought mine off ebay and there were a couple of scratches here and there despite being listed in excellent condition (it was used after all).
Before I get to how to install the front seats (the hardest part) I have included some sources I used to install the door inserts and rear seats.
Rear Seats
yes it is a different model, but it is essentially the same process
additional source: http://tsx.acurazine.com/forums/showthread.php?t=688184
Door Inserts
The center console armrest is quite easy to remove and put in using a phillips screwdriver.
Front Seats
So this is where is gets a bit tricky and set aside a good 3-4 hours to get it done.
Tools required:
1)Ratchet (extension is highly recommended) or equivalent with a 10mm fitting
2)Heavy duty pliers
3)wire strippers (you can buy automatic ones for jaycar which would speed things up heaps)
4)Flat head screw driver
5)sand paper
6)Old blanket or even bath mat (Seriously invaluable to save your knees)
What you will need to buy(all can be bought from jaycar):
6)10 metres of 15amp rated wire
7)pack of red bullet female and a pack of male wire connectors*
8)4 fuse taps that will fit mini-fuse outlets
9)4 20A fuses (could also grab a couple extra to be safe)
* You can chose to soldier the wires to together and use heat shrink to seal it. I'm pretty useless at soldering so that's why I chose to do it this way.
Step 1.
With the battery disconnected, begin removing the drivers seat with the ratchet. The plastic covers at the rear bolts with a flat head screw driver levering them off. You dont have to be particularly gentle as these covers with not be able to fit on the leather seats (the bolts will be exposed if you dont have the plastic covers from the previous interior so be aware of this).

Here is a useful clip giving on how to take the front seats out
Step 2.
Once you have removed the drivers seat you will see two wiring harness' sticking out. The yellow one is the Srs system and will be kept plugged right into the new seat.
Also, now is a great time to give this area a vacumm as you not be able to reach some of these areas again.

The other wiring harness with the blue and black wire will be cut and pulled out. The remaining wires will be connected to the blue and black (colours matching) on the new wiring harness using female and male wire connectors.
Hint: the faster you can strip wires and connect them then crimp them the fast the whole process will be as you will spend most of your time doing this.
Step 3.
Measure out enough 15amp cabling to go from the fuse box with enough give to hide it effectively (located on the right hand side kick panel) through to under the drivers seat. Cut two lengths. Connect one end of this wire to the white and blue and other to the white and red cables (these will power the electric motors in the seat). Run the cabling into the hole and under the carpet to the plastic door sill. Just lightly pull up the door sill and it will progressively snap up. Run the two wires along the length of the door sill till you get to the fuse box.

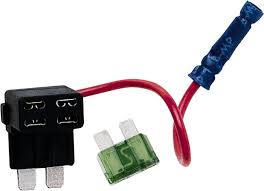
Step 4.
Strip the end of the wire to go to the fuse box and connect these wires to the fuse taps. Pull out the fuse corresponding to fuse 13 and fuse 16 (inside the fuse cover will have a guide on where these points are). Put the fuses you pulled out into the top of the fuse taps along with adding another two you bought. Both fuse taps should have two fuses in the top. Connect the two wires you ran under the door sill to the fuse taps. Go ahead and plug the fuse taps into spot 13 and 16.

Remember that this is not the tidiest way to do it as at the end of this process you will have four fuse taps stuck into your fuse box. You will still be able to close the cover but not fully.
Step 5.
We need to earth all the black wires (I'm one of them is for the heated seat function but I wasn't sure which one it was so I chose to ground them all. On the drivers side there will be three to ground in total. Get the sand paper and sand away the paint at the right back screw point to secure the seat. Connect and extend the three loose black cables from the new seats wiring harness with enough cable to reach the area you just sanded. Go ahead and push the cabling under the carpet to this point. Strip away the ends to have some bare wire exposed ready to screw under the securing point.

Step 6.
Give the seat a good clean and prepare to put it in. Although I did everything on my own. I would recommended getting someone to assist you as the seat is awkward to carry and you could hurt your back or worse, scratch something in the interior.
Step 7.
With the seat in connect the existing yellow wiring harness with that under the seat and also the other wiring harness with that under the seat. Now go to the right back securing point and make sure the earth wires are snug in contact with the bare metal where you sanded the paint. Go ahead and screw that corner in nice and tight.
Step 8.
Now we can test. Go and reconnect the battery. Try the electric function and it should be working now (you do not need to turn the ignition to work it).
Congratulations, you have successfully installed one seat.
The process is essentially the same for the passenger seat except it has one more wiring harness in addition to the yellow and harness you came across on the drivers. seat The good news is that you keep you can snap that one right into the new seat.
Also, the power wires on the passenger side are white with black strip and white with green strip as opposed to on the drivers side which was white + red and white + blue. The passenger is also slightly more difficult and time consuming as you will need to run two wires from the fuse box under the dash and around to the passenger side door sill and through to under the seat which was a pain.
In terms of which fuse to tap power from, as the fuse taps are shaped awkwardly, I needed to space them apart, so I plugged the two additional fuse taps to fuse 28 (sunroof) and fuse 8 (central locking) they are all rated at 20A power so it should be fine.
It is also slight more difficult to ground the all the black wires (there ill be four to ground) as there is a bit more carpet to try and run them through to the left back securing point. I actually had to cut the carpet a bit to give me a bit more room to work with.
All in all, good luck
Here are some before and afters for inspiration 

Again, I'm sure this isn't best way to do it so feel free add any advice or better methods
Tags for this Thread
 Posting Permissions
- You may not post new threads
- You may not post replies
- You may not post attachments
- You may not edit your posts
-
Forum Rules
|


Bookmarks