Page 2 of 3 FirstFirst 123 LastLast
Results 13 to 24 of 33

Thread: eat's AT Civic

  1. #13
    Seems pretty mint overall, nice.

  2. #14
    Member Array
    Join Date
    Sep 2006
    Location
    Out in Nature
    Car:
    91 eg5 b16a
    Chopped springs = Nasty.

    We love pics,so keep em coming!

  3. #15
    Member Array
    Join Date
    Mar 2015
    Location
    Perth
    Car:
    E-AT Civic
    Thanks to a local Perth CRX member I found a replacement JDM intake tube... turns out I couldn't have used an Aussie Integra one as the ZC has the larger diameter twin throttle body.

    The original was held together with some sticky black silicone which looked ok from the top, but underneath was completely cracked apart. Hopefully the engine has not been ingesting unfiltered air for too long!


    In other news I tackled the sloppy shifter. Upon inspection, there was slight play in nearly every possible joint in the system, but the major source of slop was the actual shifter shaft coming out of the transaxle. The roll pin although still tight in the transaxle shaft had badly worn at either end allowing the shifter rod to move about which wore the transaxle shaft down so that there was no longer a neat fit between the two.
    It's hard to tell, but you can sort of make out the wear mark in this pic:


    I ended up cutting off the standard universal joint off the shifter rod and welded in a standard steering column universal joint to replace it. As the splined end of the joint is split and has a bolt & nut, it can be clamped onto the worn-down transaxle shaft to make for a tight fit in addition to the roll pin locating it side-to-side & fore and aft. This also removed any play in the uni-joint too. After a bit of trial and error I got the gear stick in a good position and the shifter is 200% more precise.


    Before you couldn’t tell if the car was in gear or not as there was as much side-to-side play whether in gear or not! This sorta shows the process I went through:


    Also finally got around to cutting another half coil off the rear springs. That's two coils off in total now and I'm happy with how it sits at the moment.
    Last edited by e-at; 25-04-2017 at 09:26 AM.

  4. #16
    Member Array
    Join Date
    Mar 2015
    Location
    Perth
    Car:
    E-AT Civic

    Fog lights on their way!

    First did a quick mock-up to decide where the're going to sit. Don't mind the pot plants - no plants were harmed in the making of this project! Decided on about half-way between edge of number plate and outside edges of the lower air intake opening of bumper. I hope they don't block too much airflow to the radiator cooling all those ZC horse powaz!


    Pulled the bumper off to work out some way of mounting them. Cut a piece of box section, which attaches to three bolts joining the plastic bumper to the pressed steel bumper supports. This box section is hidden from the outside. Two brackets attach to the box section which drop down and provide a mount for the fog lights to hang off. A bit of trimming to the bumper plastic here and there aaaaand...


    ...from the front! The LHS bracket can be seen through the opening (there's no plastic between the louvres on that side) whilst the RHS cannot.


    Painted the mounts black so it's well hidden once all reassembled:


    Aaaaaand finished product:


  5. #17
    Member Array
    Join Date
    Mar 2015
    Location
    Perth
    Car:
    E-AT Civic
    Plus bought this fog light switch off ebay (which I think may be an EF number) but it's close to standard & fits in ok!


    Pity it didn't work but. Only made intermittent connection when pushed in. So pulled it apart, cleaned the contacts and it worked much better. But once back together the button wouldn't stay depressed! So after pulling apart, fiddling with the internals and reassembling a few times it is now working! Let's hope it stays that way! Yay for buying a 30 year old switch for too many $$$ that didn't work!


    Made up a simple head-rest camera mount from a piece of box section and a pair of u bolts...


    Last edited by e-at; 25-04-2017 at 09:27 AM.

  6. #18
    Member Array
    Join Date
    Mar 2015
    Location
    Perth
    Car:
    E-AT Civic
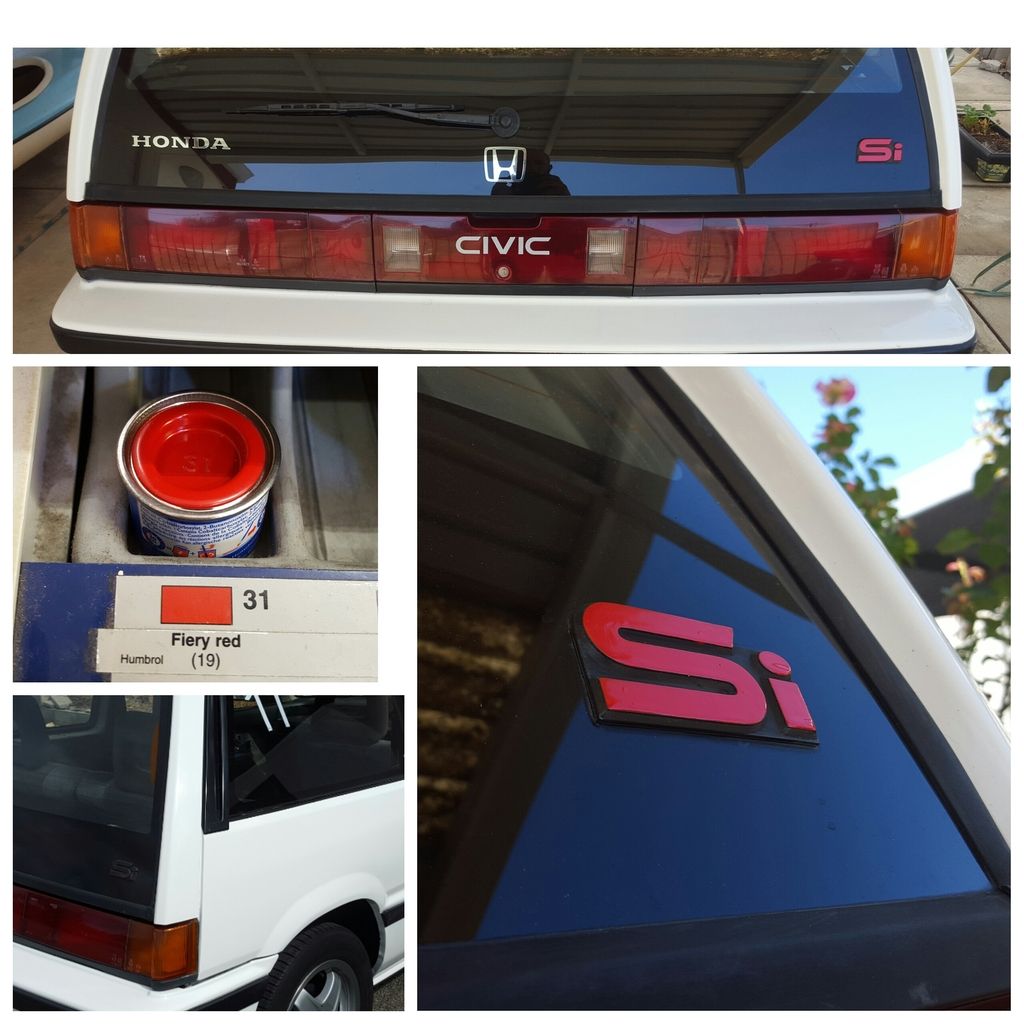
    Often I'm too lazy to do anything mechanics wise on the car so why not dress it up a bit...


    More coming... and soon will be up to date
    Last edited by e-at; 24-04-2017 at 11:59 PM.

  7. #19
    Member Array
    Join Date
    Sep 2006
    Location
    Out in Nature
    Car:
    91 eg5 b16a
    Yeah man,your pretty handy! Well done.

    Fog lights = WIN.

  8. #20
    Member Array
    Join Date
    Mar 2015
    Location
    Perth
    Car:
    E-AT Civic
    Cheers, I love the foggies, even if I never really use 'em! purely for posing

    Suspension-wise there’s not a lot of cheap options for the old torsion bar cars. So far I’ve done all the cheap tricks I can. Pulled the torsion bars out and here’s how they compare to an Integra’s:

    Teg: 21mm dia; 651mm long
    Civic: 20.2mm dia; 612mm long

    Not much difference diameter-wise. At least the length doesn't have as big an effect as the increase in diameter. So, I put them in along with the longer torsion tubes for now. With the rear torsion tube caps now sitting 40mm further back I screwed them down with some self-tapping screws.

    I removed the keyway from the Integra torsion tubes & indexed the Integra bars one notch lower. This lowered the front around 20mm which has levelled it up nicely (2 coils removed from the rear in total now).

    I removed front brake line brackets & notched the damper bodies up higher to drop them down the knuckles regaining some bump travel.

    A handy mod for these civics is fitting front lower control arms from an Integra which are slightly longer – giving a smidge more negative camber. Was nice to find that at some stage in its life the civic had received a pair. (Although it meant I wouldn’t be getting that easy camber gain I was hanging out for ☹)

    Rear sway bar mk1 consisted of a 14mm EG? Civic rear bar clamped to the rear axle with muffler clamps lol. Made up some nut plates that slid into the chassis rails to which the mounting brackets for the drop links bolted onto. Used a pair of random sway bar links found in the shed. This was more of a proof of concept than a real solution as it was all sorts of dodgy. The clamps weren’t strong enough and the EG bar ends were designed for bushes sandwiched by a fork, not a single pin mount. End links were too long… quite embarrassing really!


    Last edited by e-at; 25-04-2017 at 10:29 AM.

  9. #21
    Member Array
    Join Date
    Mar 2015
    Location
    Perth
    Car:
    E-AT Civic
    Rear sway bar mk2 was slightly improved… The chassis rail mounts were the only part of the original setup to remain. I picked up a 22mm Whiteline adjustable sway bar (heavy bugger), a pair of adjustable length end links. The muffler clamps were not going to cut it, so I welded two bosses straight to the axle beam to which the sway bar bush clamps will bolt to. Much betterer!


    Shortened the end links a bit after this, but you get the idea!

  10. #22
    Member Array
    Join Date
    Mar 2015
    Location
    Perth
    Car:
    E-AT Civic
    Got a set of alloys off a mate and started cleaning them up ready for some semi-slicks

    This is one mounted on my super expensive custom wheel lathe (Worksafe need not apply):


    And progress! Background is before; foreground is after sanding through to 2000 grit:


    Don't mind the toes haha. Next will be back on the "lathe" and onto polishing with some compound. Then who knows? Maybe the centres will get some love with a bit of colour...

    Aaaaand the finished product – after a few hours of applying polish, very sore fingers and a fresh coat of gunmetal grey on the centres:


    But... semislicks fell through unfortunately. But found some RE001s and Advan AD07s which will hopefully provide some semblance of grip at least as good or better than my old tyres!

  11. #23
    Member Array
    Join Date
    Mar 2015
    Location
    Perth
    Car:
    E-AT Civic
    After doing a few autokhanas with a local car club I stared looking for ways to decrease times with my limited budget. I began thinking of ways to increase acceleration and thought of reducing the rolling diameter of my wheels i.e. going to a lower profile tyre or even going to 13 inch wheels. The other option was to change the final drive ratio.
    After confirming the civic’s FD ratio was 3.866:1, I pulled the gearbox off a spare DA1 engine I had stored in the shed ready to clean up and count ratios before swapping in. Turns out the Integra box had a final drive of 4.066:1. Enough of a difference to bother with? Maybe. So out with the box ready for the Integra one to go in


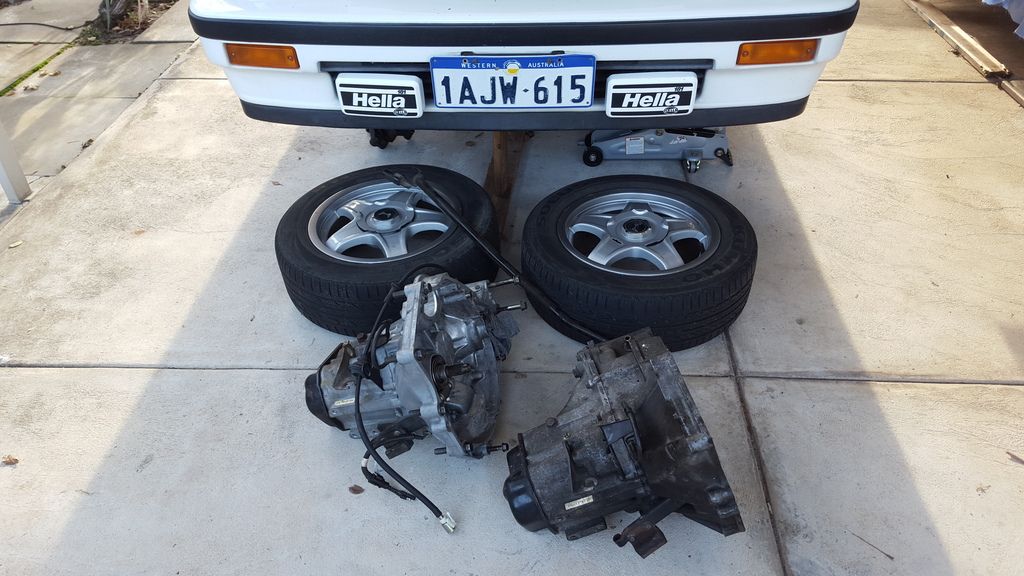
    Dirty box out, clean one ready to go in!

    So once everything was back together and after topping up the gearbox fluid I gave the old bread van a wash and a test drive which has proved to show a nice improvement in gear ratios even from a quick zip around at town speeds.

  12. #24
    Member Array
    Join Date
    Mar 2015
    Location
    Perth
    Car:
    E-AT Civic

    Exhausting work

    New exhaust system… "what size exhaust piping should I use? posts on the interwebz" a topic fraught with extremes of opinion ranging from deep scientifically backed up and measured data, to "my mate said 5 inch piping equals 500hp easy" which doesn't really help the average guy who wants to balance power output, noise, cost and not to mention the evil foe (or is it best-friend?) back pressure! I decided upon 2.5 inch in the end which still fits easily, doesn't cost much more that 2 or 2.25 inch, looks tough, hopefully still muffles some dB and sure won’t restrict the power output.


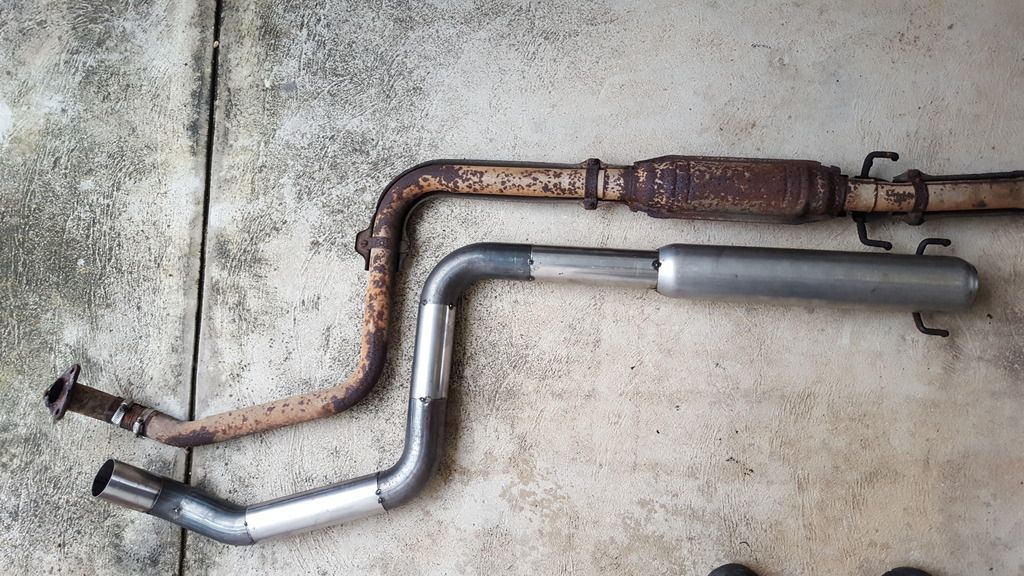
    Have gone with an 18" hotdog as shown along with a straight through 16" rear muffler. Going to be loud, but earplugs are cheap right?!


    2.5” Redback megaflow offset/centre straight-through muffler 8x4x16". Probably should have gone with a baffled or chambered one (not actually sure of the difference between those two) but will give it a go.
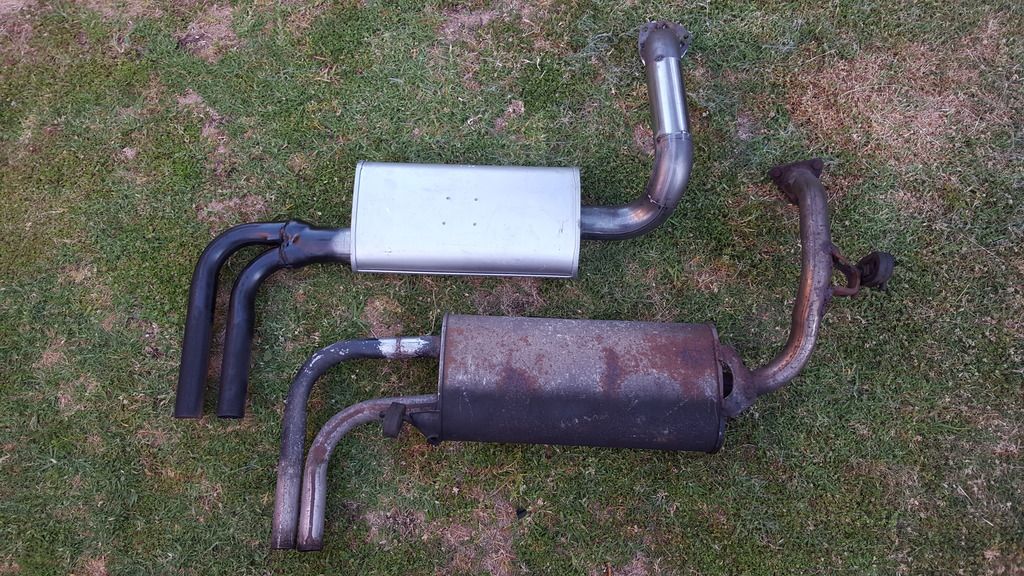
    Ended up going with twin tips (1.75 inch up from 1.5 inch). Keeps the whole thing very standard-looking. Even found some chrome tips to add too! This is the new axle-back next to the original.


    I know that the benefits of mandrel bends are probably offset by the number of joins, each with potential weld penetrations inside the piping, not to mention cheap mandrel bends not maintaining perfect cross section throughout their entire length. But I really wanted to have a go myself. I must say it's not as easy as I thought it would be! The amount of issues you have to keep in mind is huge. Cutting bends at the right angle, getting lengths correct and rotations of various bends right at each join is tricky. As well as making sure that you clear everything on the underside of the car, including moving suspension parts! But hopefully the finished product is satisfactory! I now know why good fabricators charge an arm and a leg... and they have my respect!

    The money shot, sorta… bit wonky:


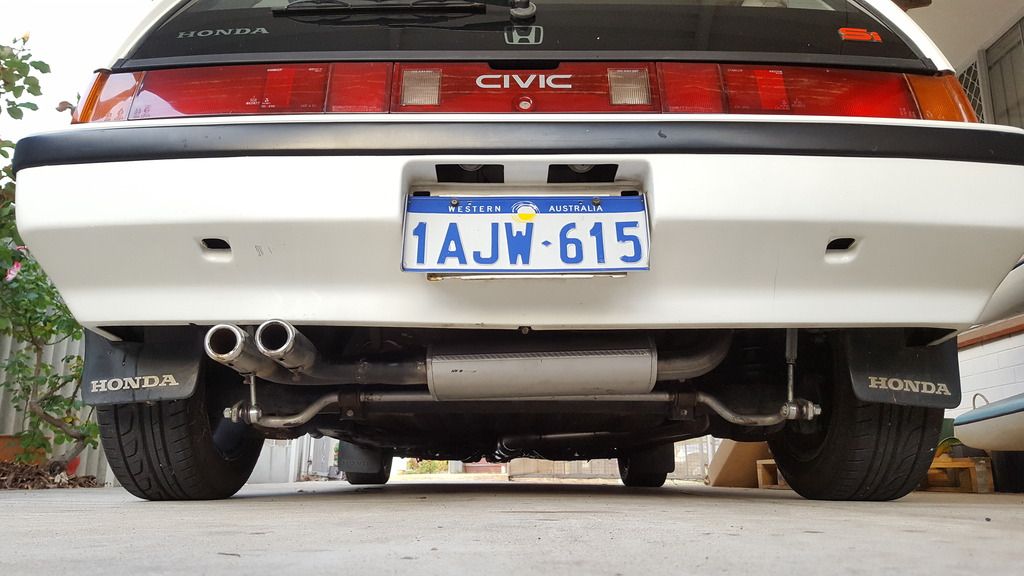
    Ended up going sans-cat for now. Has a nice note to it. Semi-loud outside, surprisingly quiet and not droney (is that a word?) inside. Wishing there was a bit of crackle on the overrun, but I guess the hot dog removes that... so much quieter than I was expecting which makes me happy.

    Twin tips need shortening and tweaking a bit and need a shorter rubber hanger for one end of the rear muffler as it sits a bit crooked, so will tackle soon. Was chuffed that I found a pair of chrome tips a little larger but similar to the originals which finish it off nicely.

Posting Permissions

  • You may not post new threads
  • You may not post replies
  • You may not post attachments
  • You may not edit your posts
  •  
Powered by vBadvanced CMPS v4.1.3


Terms and Conditions
Ozhonda.com is in no way affiliated with the Honda motor company or Honda Australia in anyway whatsoever.