|
-
 DIY: Spring/Shock combo into 1998 - 2002 CG/CK series Honda Accord DIY: Spring/Shock combo into 1998 - 2002 CG/CK series Honda Accord
Disclaimer: The following is provided as a GUIDE ONLY, and neither myself nor Ozhonda take any responsibility for the outcomes of someone else doing the following. You follow these steps at your own risk!
Aim: Install Spring/Shock combo into 1998 - 2002 CG/CK series Honda Accord
Time Required: 4-6 hours (usually) but expect more if first time
SAFETY FIRST!
1. Required:
1.1. H&R Sport lowering springs
1.2. Koni Sports
1.3. Personal protection
1.4. Sockets
1.5. Coil Spring compressor ~ $40 Autobarn
1.6.Torque wrench ~ $40 - $250 Super Cheap Auto, Repco, Autobarn...
1.7. Jack stands ~ $40 pair, supports
1.8. Helper mate ~ Free dinner and case of beer
1.9. Other various tools ~ ask Dad
1.10. Hip hop CD
__________
2. Steps:
2.1. Jackpoints
2.1.1. Front - in between splashguards

2.1.2. Rear - tow hook

__________________________
2.2. Front suspension Install
2.2.1. Jack up the front of the car safely using jackpoint + stands + tyre wedge

2.2.2. Loosen strut tower nuts. Leave one or two loosely attached so the unit won't drop once everything is loose.

2.2.3. Take wheel off then...take out Pinch bolt and Connecting bolt (you may need to displace the LCA with a jack to free up the pressure) - once free, the damper fork should be loose and free to move up and down. You may need to mallet/hammer the connecting bolt out as it's a stubborn focker.


2.2.4. Stock suspension setup OUT

2.2.5. Firstly compress spring

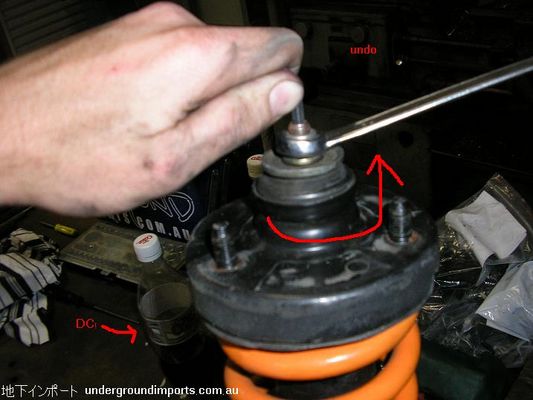
2.2.6. Using a 'stationary' Allen Key and 'rotating' spanner, undo top mount. Keep the order of components as found on stock strut housing top mount as we will use that order for the new set. (Full credit to egSi for this picture)
2.2.7. Install everything back, tightening the nuts using the torque wrench and numbers below. You may need to jack up/down the LCA to make everything fit.

2.2.8. Front Torque settings:
Connecting Bolt = 47 ft lbs
Pinch Bolt = 32 ft lbs
Top mount bolts = 37 ft lbs
Strut bracket bolts = 12 ft lbs
Koni strut top nut = 22 ft lbs
_______________________
2.3. Rear Suspension Install
DO NOT jack up car yet, as you will be working inside the car.
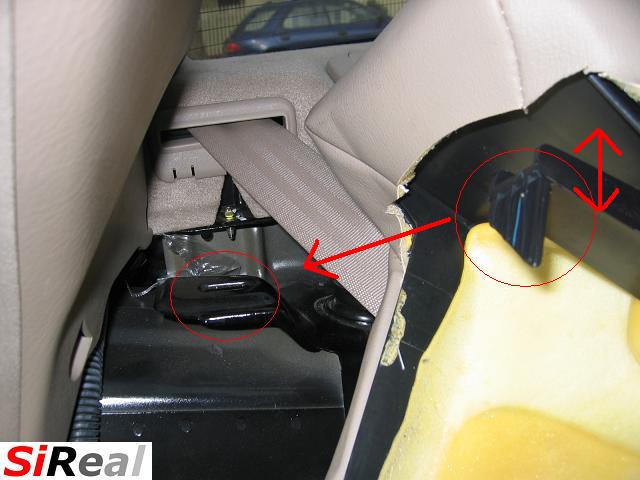
2.3.1. Firstly, we have to gain access to the rear strut top nuts. Start by pulling up the rear seat. There are two clicky things as circled

2.3.2. Once you have the side of the seat lifted, you will see the bolt which holds the bolster cushion down. Undo that and push bolster cushion up. It will be hooked down as shown in pics.

2.3.3. You will need to remove the plastic panel as seen. There are four clips total. Grunt and groan a bit for this.

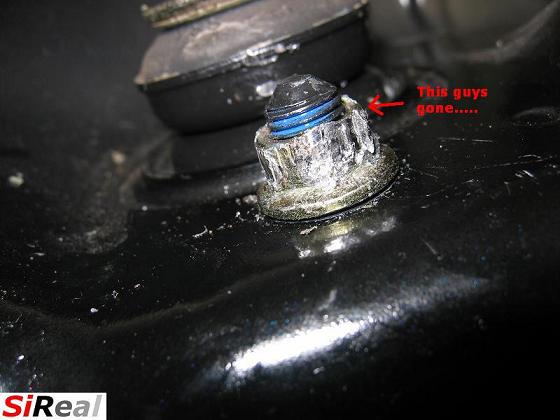
2.3.4. Once exposed, loosen the two nuts. Keep one loosely done as we don't want to drop the stock assembly when it becomes loose.

2.3.5. One of these fockers were so tight, I started grinding it down, so I took it down to Bob Jane T-marts Box Hill who undid it for me and left me a bruised and battered rounded nut. I ended up using the stock strut top nut instead of this in the end. Yippee!
2.3.6. Jack up the rear of the car safely using jackpoint + stands + tyre wedge
2.3.7. Take the wheel off then...take out the Lower mounting bolt and swaybar endlink nut. These fockers mean business and you need to grunt, groan, curse and belch just to get the bastards out. You will need to jack up the knuckle a good 1.5" to get the swaybar endlink bolt on an angle (perpendicular) where you can take the bolt out completely.


2.3.8. Once these are out, you need to mallet, push, pull and beat the focker stock rear setup loose enough for it to fall down (after you undo strut top nut). You need to step down on the wheel hub so that it frees up the unit and gives enough space for the setup to come out. Larry Emder: "Step on DOWN!"

2.3.9. Same process as per front setup. Transfer some stock parts over and re-assemble. Re-install in the reverse order. Grunt, groan and curse again. Torque them nuts and bolts back in properly. See below. Its in y0!

2.3.10. Rear Torque settings:
Lower mounting bolt = 43 ft lbs
Swaybar endlink nut = 29 ft lbs
Top mount bolts = 37 ft lbs
Koni strut top nut = 22 ft lbs
_______
2.4. Complete for ALL sides. Put wheels back on and tighten nuts.
_______
2.5. Headlight re-alignment
2.5.1. Because the car is now lower, the light beam path will have changed also. You will need to adjust this as well. Turn clockwise to raise beam for both High and Low beams. I turned it a full 360 degrees and found out it was too high. Now it’s sitting on 180 degrees clockwise from stock.

3. Other comments:
First and foremost, safety was the number one priority. So please, and I cannot highly stress this enough, play safe.
Secondly, I would like to thank in no particular order:
- my dear friend Bobby for helping me from start to finish and listening to me mega whinge after stupid nuts and tight fitments
- egSi for his continued support and for sourcing the Konis - Go TRAVDM
- Ozhonda.com members for their advice (you know who you are
 ) ) - various mates for their equipment
- v6performace.net members for their help via PM
_________
And what we've been waiting for all along...
TADA!
3.1. Before and After
3.1.1. Before - Parent Spec

3.1.2. After - "I can car cruise with OH proudly" spec

The car was lowered approximately total 2.2” F and 1.9” R
3.2. Get a wheel alignment after.
Thanks for reading.
Please feel free to comment. Apologies if I have left something out - just let me know.
Jeff aka SiReal
Last edited by SiReal; 06-01-2007 at 05:13 PM.
-
Green block gangster
Array
very thorough
love the before and after pic. looks so much nicer slammed.
awome DIY dude . thumbs up to yal 
-
Just another thing, i measured the height from ground to lowest point on car and it is legal.
I also started getting a clunking noise from the rear going over speed humps, potholes, only at slow speeds. turns out the swaybar endlink nut was not tight enough, so make sure you tighten those b1atches!
-
If you stand for nothing, you will fall for anything.
-
soooooooooo GLAD to see youve finally done the impossible, VERY good work jeff, nice write up, REP POINTS well deserved.... cant wait 2 cruise with you so0n....
by tha way.... we shuld do a photo shoot sumtime 
-
thanks for your comments guys! photo shoot can be arranged sometime But i'll be there for the KK cruise so we can snap up some shots then.
-
-
holy crap, now that's a good DIY
-
-
is cool.....good diy, is hard to me to diy, no skill
-
Nice write up! What is the current gap you have front and rear?
Looks to be a good 2 fingers?
You may not know but how far off the ground is the lowest structural point?
Cheers
Raz
-
hey dude, i got 1 finger gap all round! hoho. getting the car raised soon back up to 2 finger gaps. I have too many problems. alot of sounds from the rear (apparently things are hitting themselves)
I measured it out. its around 12-13cm lower structural point.
the front sits lower than the rear because I got different height springs (H&R SPort), not the standard 1.5" all round. wanted that 'even' look.
 Posting Permissions
- You may not post new threads
- You may not post replies
- You may not post attachments
- You may not edit your posts
-
Forum Rules
|


 Reply With Quote
Bookmarks