

Disclaimer: The following is provided as a GUIDE ONLY, and neither myself nor Ozhonda take any responsibility for the outcomes of someone doing the following. You follow these steps at your own risk!
Aim:
How to install stereo wiring, speakers and amplifier(s) into an EG (4 door) civic. Assuming a head unit is already installed with RCA pre-outs.
Required:
- Power cable Leads + clamp
- RCA Leads x2 (front/rear), amplifier enable signal cable.
- Screws (for mounting amp/speakers)
- Fuses (x1 Power cable fuse, x1 amplifier remote signal fuse)
Steps:
1. Mount amplifier / speakers
To install the front speakers you will have to remove the door trim.
A. Front speakers/splits
Firstly remove the 3 screws which hold the door panel in.
[PIC]
The trickiest part is removing the handle on the inside of the door. After you have taken the door handle screw out, slide the handle forwards (in the direction of the door hinge) and then it should pop loose. However to remove it completely you need to unclip the handle from the metal rod that connects to the door release. Use a flat head screwdriver to do this and be carefull not to snap the plastic!
Clip behind the door handle:
Once the door handle is off, the panel is only held in by clips so wedge your fingers (or use a screw driver) to pop the clips off working your way slowly around the door.
Once the panel is off, unclip the connectors to the power window controls and then you can take out the door trim completely. To get the connectors off there are smal inserts that you have to press to unclip it.
[PIC]
Mount the speakers using a speaker spacer if required. To mount my 6" (or were the 6.5" I forget) speakers I had to make up a custom wooden spacer. I won't go into too muh detail on how to mount the speakers here. Once the front speakers are mounted guide the wires through the grommit that is used to carry the power window cables. This part is a bit tricky and small hands are required! Since it is hard to work with the small speaker wire, I used a slightly stiff metal rod that I passed through the grommit (from the outside) then once that came through to the inside of the cabin I attached the speaker wire to it and pulled the metal rod back out!
For the tweeters, I simply drilled a hole using a hole saw and mountd the tweeters on the door panel at the closest point to the air vents. Ideally I would have liked the tweeters a bit higher, but this position was the most practical.
[PIC]
B. Rear Speakers
The rears are pretty easy to instal provided you get the correct sized speaker. The stock Civic speaker is xxxx inches.
Firstly we need to remove the dust cover/plastic protector. This is held down by 4 nuts that are accessible from under the parcel shelf (IE climb into the boot). Once those nuts are off just take out the dust cover from inside the cabin. The speaker is then held by 3-4 screws. Undo them and install your new speakers, then replace the dust cover.
2. Install wiring - Power, RCA cables, amplifier enable wire
Make sure you run the Power cable down one side and the signal (RCA) cables down the other side in order to minimise interference!.
The Power fuse should be located as CLOSE TO THE +ve terminal of the battery as possible. Usually around 10cm or so away from the terminal.
I ran the+ve power lead and the Amplifier trigger cable down the right hand side (driver) of the cabin and the RCA cables/speaker cables down the left hand side (passenger).
Guide the +.ve cable from the batery along the top of the firewall and through the grommit near the brake fluid reservoir.
Cable taken from inside of firewall
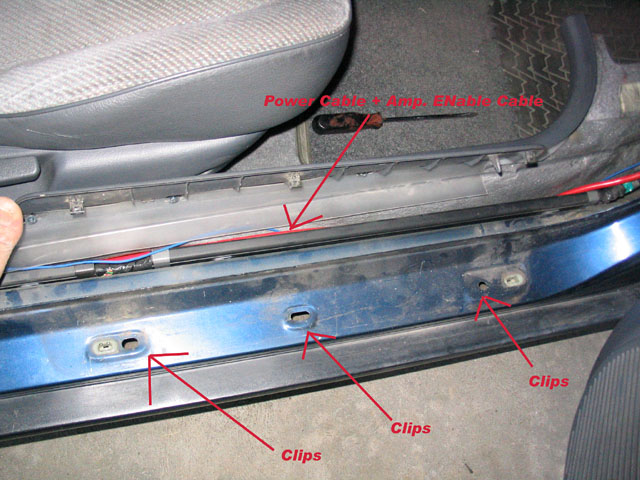
Take the cable from the inside of the car (firewall) and guide it along the side of the car (under the sidestep trim by removing the plastic trim as seen in the pictures below. First remove the plastic moulding that covers the middle pillar between the front/rear doors. This is not bolted on in anyway, but rather just clips on snugly around the pillar. I started at the bottom and pried it with my fingers.
[PIC]
Once this is off, take off the plastic side steps under the front and back doors. They are held in by clips (see pic) and to get them off, wedge a small flat head screw driver between the plastic and the body of the car. Take your time and put even upward pressure or else you WILL snap the clips! Locations of the clips can be seen in the pics. Once the plastic side step is off, guide the cables under them/under the carpet.
Then take the cable under the back seat (pic below) and keep it ready to plug into the amplifier by bringing the cable up under the cloth behind the back seat.
Follow the same process for the signal (RCA) cables on the other side).
Negative/Ground
The best place to connect the negative cable is at the seat belt anchor bolt. Make sure you peel back/scrape off some of the paint and use a good cable clamp in order for the cable to contact properly with the chasis. Once done do up the seat belt anchor bolt nice and tight!
3. Mount Amplifier (back seat)
Position the amplifier(s) where you want them on the back seat and then drill holes using the amplifier mounting holes as a guide. I used a nut and bolt combination where I had to put one hand UNDER the metal seat backing (to hold the nut) while I tightened the bolt with my other hand. There is very little room to fit your hand under the seat backing so i DO NOT suggest you do this! (I know I won't again!). Instead I suggest you get some self tightening bolts from Bunnings ETC such that you can tighten the bolt simply by turning the bolt head (like a rivert where you only need access to one side of the surface). Make sure the amp. is nice an secure.......you don't want it falling off when you hit a bump
Removing the cloth from the rear seat backing:
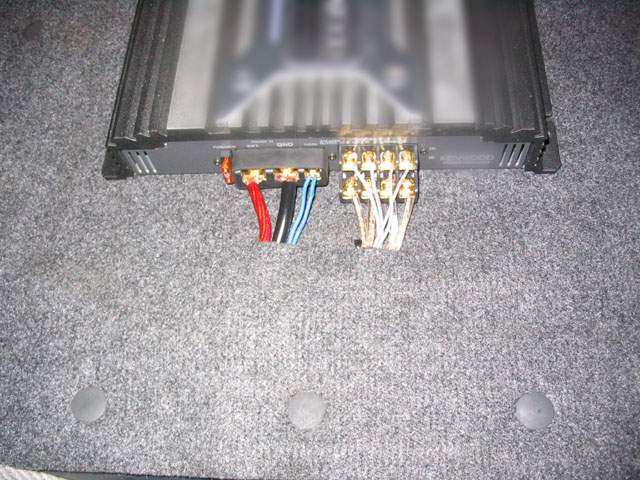
Well those are the basics. Once that is done, it is simply a matter of connecting up the relative wires and cleaning up whatever mess you have made.
Here is a small pic of the wires connected up to my amp.
Goodluck and most importantly..........TAKE YOUR TIME and don't rush things.


 Reply With Quote


Bookmarks