|
-
DIY DA9/6 Locustom Shark II S2k Replica Antenna Install
Heres my first DIY, the installation of a Locustom Shark II antenna, on a DA Integra, I tried to make it as detailed as possible, without making it look to complex. Dont be daunted by the amount of writing. This took longer to write than it did to perform. The installation took me 45 minutes including all of the photos, testing etc. And that was without using instructions. I hope you find it useful, and if you have any extra tips/info/pics, send them along to me and Ill try to improve the article.
Disclaimer: The following is provided as a GUIDE ONLY, and neither myself nor Ozhonda take any responsibility for the outcomes of someone else doing the following. You follow these steps at your own risk!
Aim: To Install the Locustom Shark II antenna on a DA9/6 Integra
Required: The full antenna. This includes the rubber mast as well as the base + wiring.
Towel/Drop-sheet. To prevent any scratches to your paint, if youre clumsy
Philips Head + Flat Head screwdrivers. For panel + external antenna removal
10mm socket / Pliers. For internal antenna removal. Pliers are also good to get
an extra tight mounting of the new antenna.
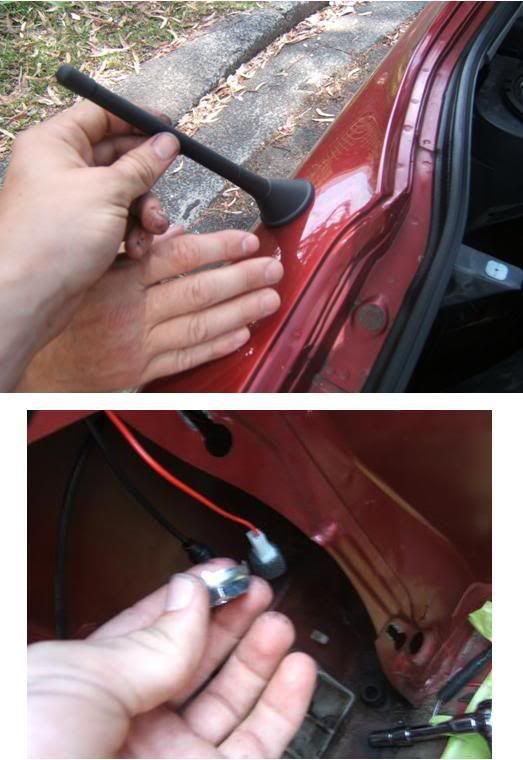
1. External Removal
a) Go to the outside of the car, and cover the area surrounding the antenna using a towel etc. (This is to prevent any chance of damaging your paintwork if you slip)
b) Make sure the antenna mast is fully retracted. If it isnt, just push it back in by hand
or break it in half and say good riddance.
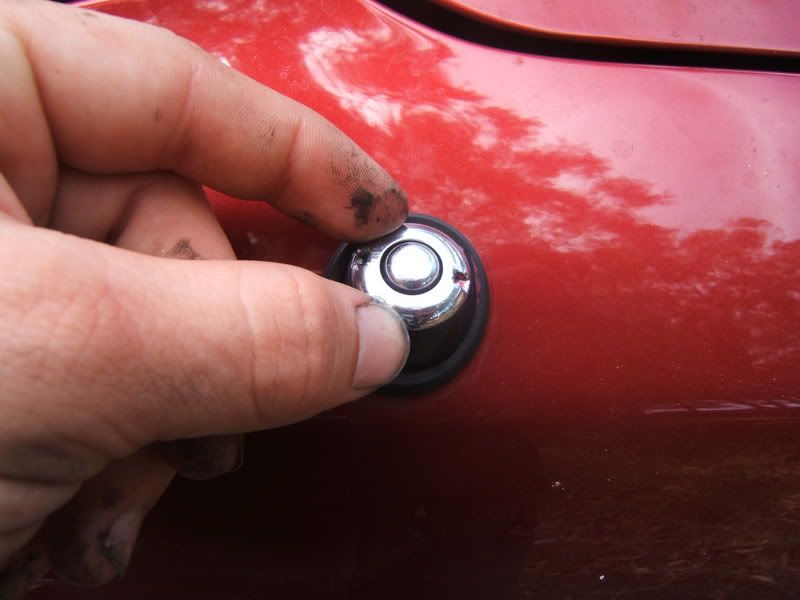
c) Take a flathead screwdriver, and use it to turn the silver ring anti-clockwise. You should only need to use the screwdriver to start it off. Do the rest by hand.
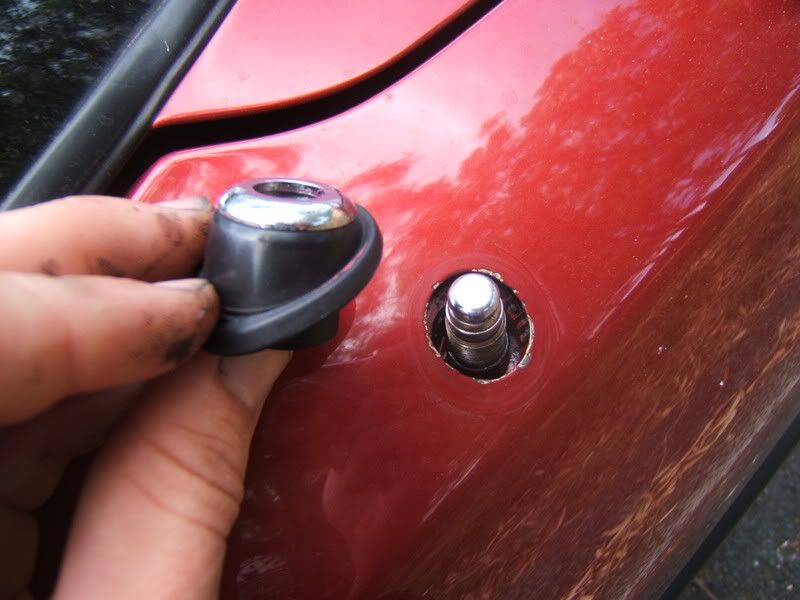
d) Once the ring is off, also lift off the black rubber pieces. These should come right off.
The external removal is now complete.
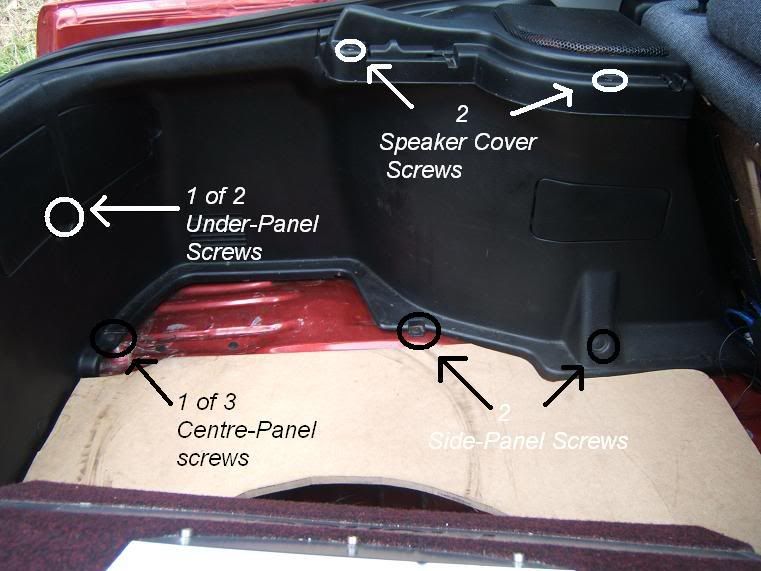
2. Internal Panel Removal
a) Remove the parcel shelf, and the wood floor panel, if it gets in your way.
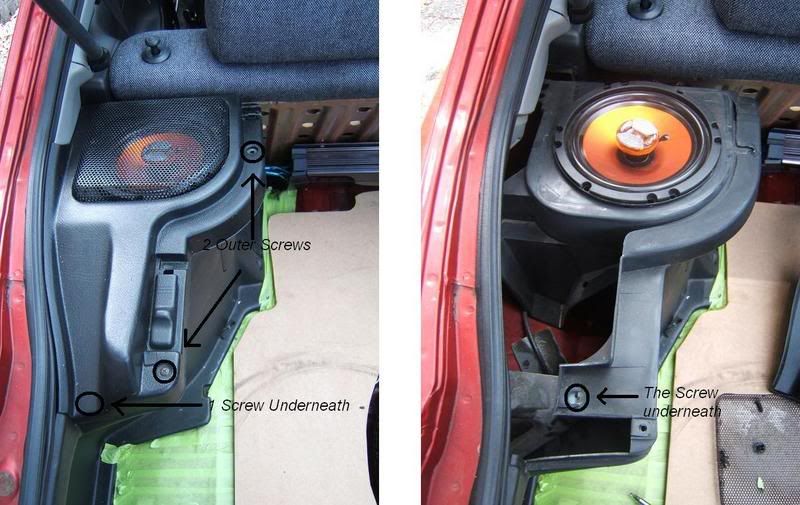
b) The speaker cover/holder. (On the antenna side, obviously)
Pull the grille out, and then tackle the screws. Once the outer cover is off, theres one more underneath.
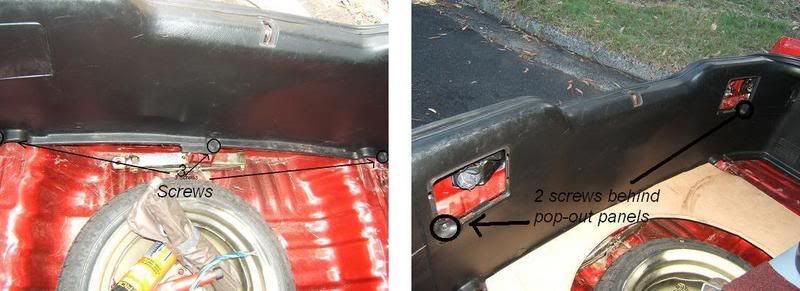
c) The back centre panel. As this panel sits on top of the one we need out of the way for our install, we need to get it out first.
There are three of those weird plastic screws in your way on the bottom. Using a screwdriver, and holding the outer ring of these plastic screws, turn anti-clockwise until theres enough of the centre part out that you can pull the rest out by hand.
Theres also another two behind the square pop-out panels. Pull out the plastic pieces and take out these two as well.
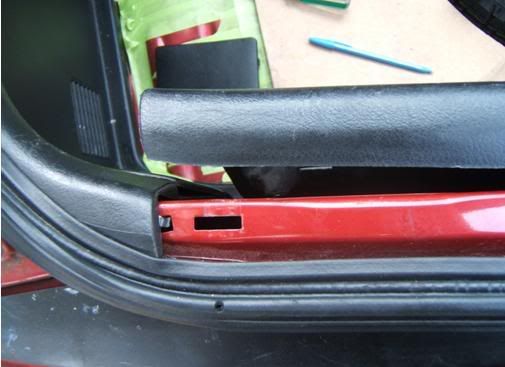
Now that the screws are removed, you need to either pull the panel out one side at a time, or push up from the bottom. The top is currently grabbing onto the metal of the hatch, and like the door panels, must be pushed up (sometimes forcefully) to get it free. Its meant to do this.
d) The side panel. (On the antenna side, obviously)
We dont need to fully remove this panel, just getting the rear half loose will give us more than enough room to get in there and do our thing.
Remove more plastic screws, and unhook the panel from the metal, in much the same way as the centre panel, but to the side a little.
You can see the catch that requires you to move it to the side to free it, so no worries there. Just dont try to rip that part straight out. Once its free the panel should be free enough to pull it out of your way, and show you the internal parts of the antenna.
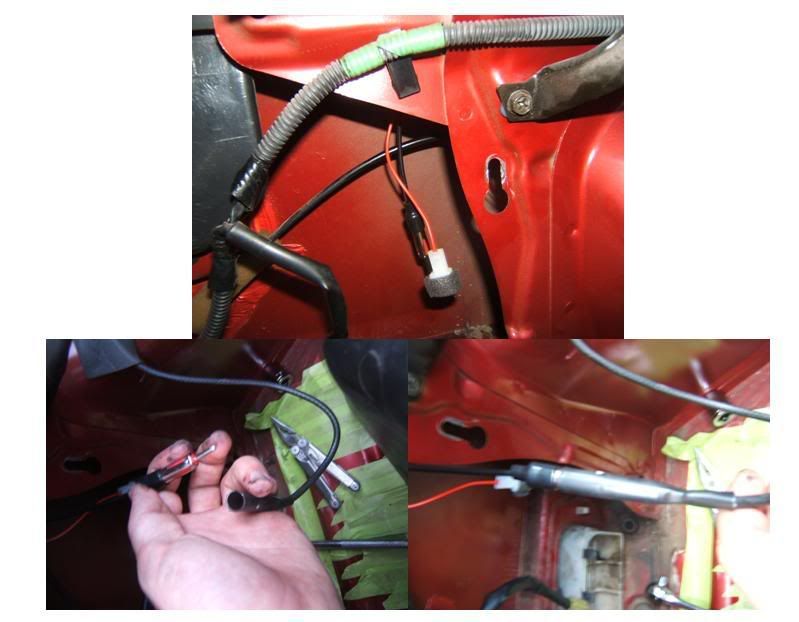
3. Internal Antenna Removal
a) Undo the two 10mm bolts holding the antenna to the chassis
b) Pull the antenna down and out
c) Unplug the Antenna cable (big black one like in the back of your
Head Unit)
d) Unplug the 3-pin power connector
e) Disconnect the drain hose (tubing) from the car. Just tug on it.
Your old antenna is now removed. Thank God, say goodbye to bad/no reception, a stuck antenna, and/or crazy, embarrassing grinding noises.
Now we get to start on installing the new one. Yay!
1. Prepping for installation
a) Take a look at the unit. Youll see a nut that screws and unscrews, as well as a wire for power, and the antenna plug receiver.
b) Looking at the nut on the unit, it has a piece cut out so that it fits perfectly over the aforementioned wires. This is important because youll have to remember to have this facing the right way when you go to do the nut back up.
c) Remove the nut, and drop the antenna in. Cables First. It should be installed so that the antenna angles back. But yknow, if you want to be different, be different. At this point It wouldnt do any harm to run a ring of waterproofing silicon around the antenna hole on the car, to create a better seal and prevent any water leaks in heavy rain.
d) You may also notice that the antenna appears to angle out as well as back. This is normal because of the curvature of the fender, but if you want to make some kind of mount to get it perfectly straight, thats fine. Just take a look and see if you mind or not.
Personally, I left it how it was. Its only a slight thing, and you can only notice it from one angle. Compared to my stock one which didnt work AND looked dodgy from all angles :thumbsdown:
2. Mounting the Unit
a) Take the nut, and remembering to have the cutout facing the right way, reach up and push it on as far as possible, then start to tighten it. If it seems to lock up while the antenna is nowhere near secured, just back off and try again, youve just tried to screw it on at an angle accidentally.
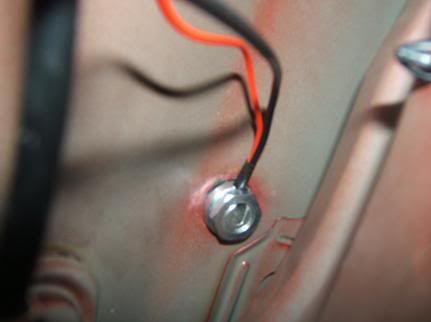
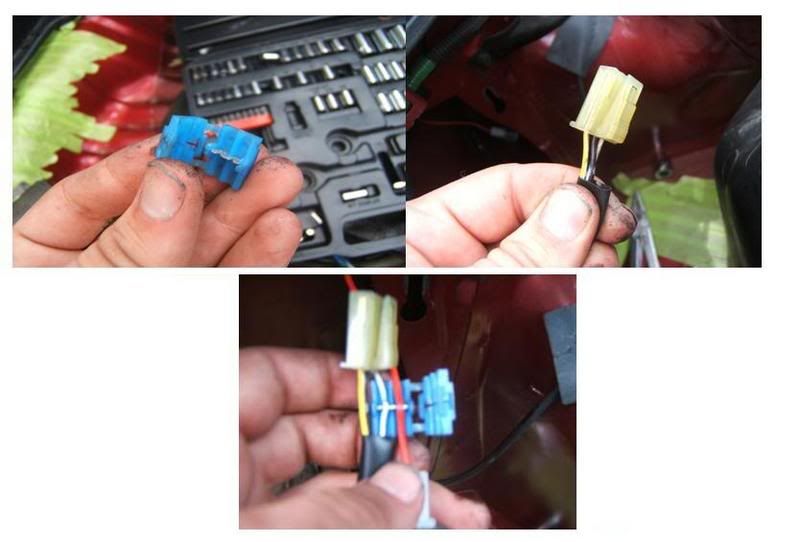
3. Wiring the Unit
a) Once the nut is tight and the antenna is secured, start the wiring by plugging in the antenna. Too easy.
b) Then connect the power wire (for the signal booster built into this nifty little antenna) to either of the side wires on the 3-pin power connector we removed from the old antenna. Dont connect it to the black one, as this is ground. Useless for our purpose.
You can either strip the wires back or solder them together, crimp, whatever. Or you can use a clip like I did that just bites into both wires and makes the connection without any fuss. This may not provide ideal signal transfer, however, if you dont ensure that a solid connection is made.
c) Whatever you choose, make sure that its a secure fit, and tape/heat-shrink up the connection, and make sure that its not going to come loose or get damaged in any way and force you to redo it.
4. Testing
Power up, make sure that everything is nice and tight, fitted how you like it, and that the reception is good. If not double check your wiring and that the black antenna plug is in properly.
5. Panel Reinstallation
After checking your handiwork, and grooving to some tunes, whatever, go through Step 2 a)-d) from the removal section, but in reverse, and get your panels back in place.
Congratulations, youre done, now decide if you want beer, food, to stand staring at the car, or just fiddling with the radio and hearing nothing but clear reception and silence where there used to be the horrifying sound of a dying OEM antenna.
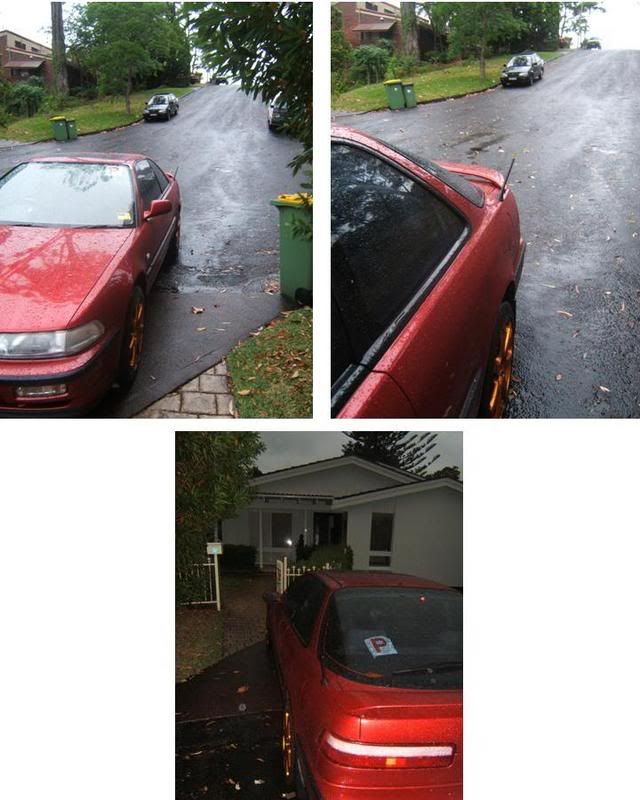
Before:
After:
Note: This mod will not change your rims and make them crazy colours, or turn your hands greasy and black, like mine. Or make it look suspiciously like your boot is being prepped for a custom sub box installation.
 Originally Posted by mugeneration
Well I always thought to PLEASURE your girl was anything sexual.
To PLEASE your girl is anything that costs money.
-
i dont like it.. it sticks out to the left of the car.. dosent follow the body lines...
sorry jus got a panel beaters eye.. :P
good work but nice write up
-
You make a good point, but as I say in there, you can always modify it to make it sit flat. Personally I was happy like that. If anyone does modify it, let me know and we can add that in here.
Thanks for the comment
Originally Posted by mugeneration
Well I always thought to PLEASURE your girl was anything sexual.
To PLEASE your girl is anything that costs money.
-
-
You do not need to modify the antenna to make it sit straight, it can be clocked or rotated to line up vertically, look at this.... http://www.locustom.com/fender_install.htm
-
-
Originally Posted by locustom

That's a good point, I tried that as well but I found that the base hung out a little, which I didn't like. Thinking about it now though, that's a lot less obvious than the antenna sticking out.
Though, I just went back and gave the angled method another go, and found that by wiggling it and tightening it down a little more I could eliminate the overhang. So thanks for convincing me to give it another go 
I'll edit in that info, if you don't mind.
Originally Posted by mugeneration
Well I always thought to PLEASURE your girl was anything sexual.
To PLEASE your girl is anything that costs money.
-
spiffy
-
-
Nicely done. Mind if I add this option into the original DIY? Or are you writing your own? Thanks for the input. And to everyone else for their feedback.
Also, you're right, it can't hurt to double-check the wiring yourself. But I found that I didn't need a multimeter, I could just test the connection with both wires, and you could hear the obvious difference.
So it's red+white on the DC, and white+blue on the DA.
I'll also add in the comments on 'clocking' of the antenna, i.e. the ability to twist the base to prevent the antenna sticking out the side, and I'll update my pictures to reflect this.
(Of course, not tonight. Tonight I'm celebrating my court case. With a case. Thankyou Industrial Relations Commission! The system works.)
Last edited by Rasputin; 16-12-2006 at 01:02 PM.
Reason: Added more comment, plus some OT stuff :P
Originally Posted by mugeneration
Well I always thought to PLEASURE your girl was anything sexual.
To PLEASE your girl is anything that costs money.
-
-
exactly wat u had done rasputin... good write up and ahh the days i remember or the antenna noise i had as i pulled up to a busy parking lot and looks i got
 Posting Permissions
- You may not post new threads
- You may not post replies
- You may not post attachments
- You may not edit your posts
-
Forum Rules
|


 Reply With Quote


Bookmarks