Disclaimer: The following are provided as a GUIDE ONLY, and neither myself. nor the original writer, nor Ozhonda
take any responsibility for the outcomes of someone else doing the following. You follow these steps at your own risk!
DIY Strut Brace Covers OEM Style for 94-01 DC Honda Integra OEM Type R Rear Strut Brace
By specialst
DC Integra OEM Rear Strut Brace Cut Out.pdf
http://www.megaupload.com/?d=LJV47TSK
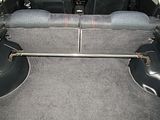
Firstly. this guide is written specifically for the DC2/4 Honda Integra in conjunction with OEM DC2 Integra Type R Rear Strut brace. This concept can be applied to other aftermarket bars provided you have the mojo to do it.
This guide will purely focus on how to fabricate the covers.
This is a straight forward thing to do if you have initiative, some common sense and the tools. If you do not feel comfortable with any step – don't be idiotic and attempt this.
What You Will Need:
DC2 OEM Rear Strut Brace
The brace covers in your boot
0.5-1mm Rubber edging (optional)
Permanent marker
Drill with bits
Jigsaw
Sanding block or Stanley knife
Scissors
Probably other stuff I have missed
Fabricating the Covers:
1. Print off this and the stencils found in the PDF below.
DC Integra OEM Rear Strut Brace Cut Out.pdf
http://www.megaupload.com/?d=LJV47TSK
2. Carefully remove your strut brace covers from your boot (trunk as the Americans like to call it). Careful not to damage or break the side tabs or metal fasteners.
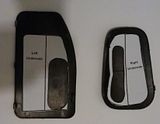
3. Using scissors cut around the outside line of the stencil. These cut-outs are the inner section of the covers looking at them from the underneath. You’ll see it, it’s not hard.
4. Again using scissors and some Year 1 cutting skills – cut out the grey shaded area of the stencil. You now have a workable stencil.
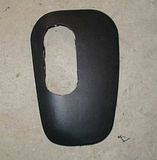
5. Overlay each stencil onto the covers and use a permanent marker draw the shape of the hole. This is where the strut brace bar will be inserted.
6. Drill a hole in the centre then continue the job with a jigsaw. I do not recommend using a Stanley (utility) knife since its pretty tough plastic especially at the curves.
7. Tidy up the edges with whatever pleases you – sanding block, knife, picking it off with your finger nails.
8. Dismantle your OEM rear strut brace and insert your covers. Think ahead here and bear in mind the cover orientation for it to go back into place.
9. Do a test fit. Adjust as needed. You may need to trim your cut holes a bit to clear the bar.
10. Install the rear strut brace. Not covered here.
11. Place the covers back into their spots.
12. Optional - For that neat OEM look - use some black rubber edging. Push it in nice and tight. Cut it very straight to length with about 3-5mm extra for a snug fit. A tiny dab of super glue on the edge will keep in in place forever.
Congratulations. Your OEM strut brace now has OEM style covers to go with it.
Observe and admire your work.
The End.
All feedback is welcome and appeciated.


 Reply With Quote

Bookmarks